
| Movement Pattern: Gait | Target: Quadriceps | Synergist(s): Gastrocnemius, Hamstrings | |
| Exercise | 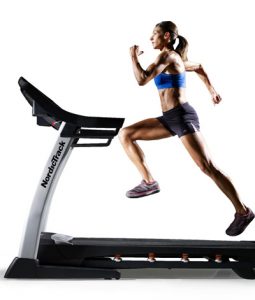 |
||
| Regressions: | Progressions: | ||
| Movement Pattern: Squat | Target: Quadriceps | Synergist(s): Gluteals, Hamstrings, Hip Adductors, Soleus | |
| Exercise | 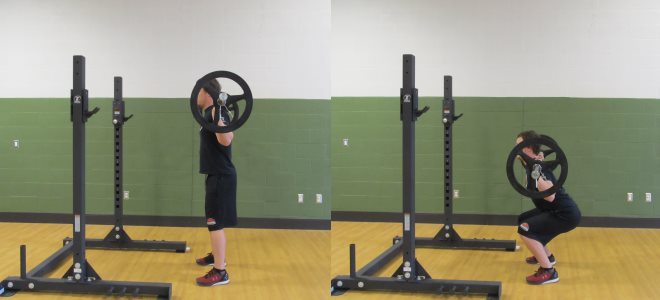 |
||
| Regressions: | Goblet Squat | Walking Lunge | Progressions: | |
| Key Teaching Points | |||
|---|---|---|---|
|
|||
| Common Error(s): | Valgus knees | Torso collapses forward | ||
| Spotting: | Spotting Squats | ||
| Movement Pattern: Press | horizontal | Target: Pec Major | Synergist(s): Deltoids (Anterior), Triceps | |
| Exercise | 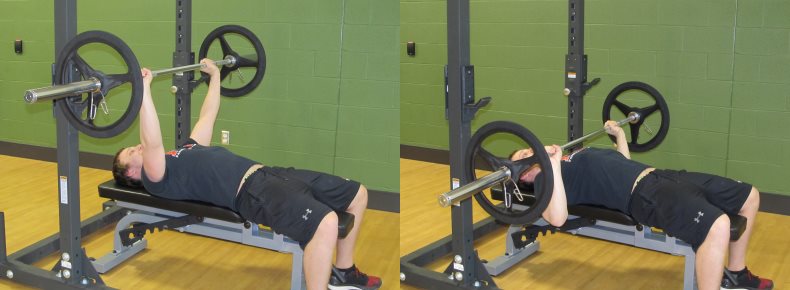 |
||
| Regressions: | Chest Press | Push Up | Progressions: | |
| Key Teaching Points | |||
|---|---|---|---|
N.B. Avoid bouncing the weight off your chest. Also, use a spotter whenever using heavier weights or planning on lifting to muscular fatigue. |
|||
| Common Error(s): | Inappropriate momentum | Bouncing Weights | ||
| Spotting: | Barbell Bench Press | ||
| Movement Pattern: Press | horizontal | Target: Pec Major | Synergist(s): Deltoids (Anterior), Triceps | |
| Exercise | 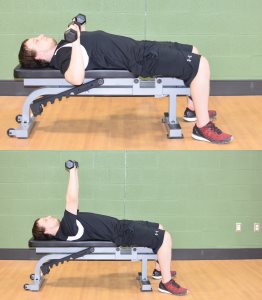 |
||
| Regressions: | Progressions: | Bench Press | |
| Key Teaching Points | |||
|---|---|---|---|
|
Initiation Have client sit at the end of the bench, with the dumbbells resting on their thighs. Instruct client to rock backwards into a lying position, while simultaneously bringing the dumbbells up in front of the chest (arms should be fully extended). Client’s feet should be flat on the floor and client should maintain curvature in the low back. Spotting The trainer (standing behind the bench near the client’s head) should assist the client to get the weights into position. All spotting assistance should be provided by grabbing client’s wrist/forearm (and not spotting at the elbow). Movement Instruct client to take a prontated grip (palms facing away from face) and by bending the arm at the elbow, move the dumbbells from in front of their chest to a point where their arm is bent at slightly more than a 90° angle (generally elbow will be 1-2″ inches below parallel with the chest at this point.) At bottom of the movement, client should pause, then return weights back to starting position. |
|||
| Common Error(s): | Bouncing Weights | Not engaging core | ||
| Spotting: | Dumbbell Chest Press | ||
| Movement Pattern: Press | vertical | Target: Deltoids (Anterior) | Synergist(s): Deltoid (Medial), Trapezius, Triceps | |
| Exercise | 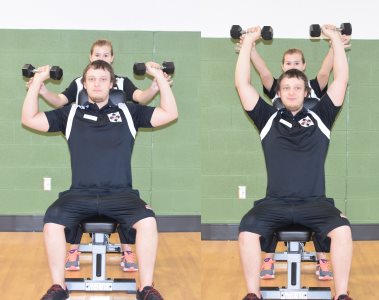 |
||
| Regressions: | Assisted Shoulder Press | Progressions: | Standing Shoulder Press | Push Press |
| Key Teaching Points | |||
|---|---|---|---|
|
|||
| Common Error(s): | Bouncing Weights | Using Excessive Momentum | ||
| Spotting: | Dumbbell Shoulder Press | ||
| Movement Pattern: Hinge | Target: Gluteals | Synergist(s): Hamstrings, Spinal Erectors | |
| Exercise | 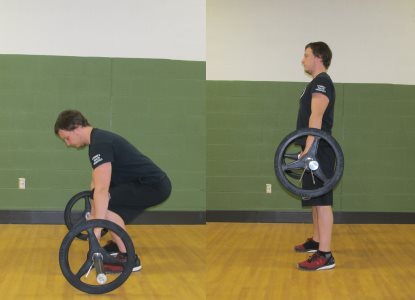 |
||
| Regressions: | Pull Through | Trap Bar Deadlift | Progressions: | Swing |
| Key Teaching Points | |||
|---|---|---|---|
|
Conventional Deadlift
Variations
|
|||
| Common Error(s): | Arching the upper back | Rounded shoulders | ||
| Spotting: | |||
| Movement Pattern: Lunge | Target: Quadriceps | Synergist(s): Gluteals, Hamstrings | |
| Exercise | 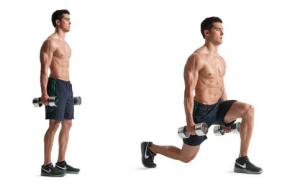 |
||
| Regressions: | Goblet Squat | Split Squat | Progressions: | Bulgarian Split Squat |
| Key Teaching Points | |||
|---|---|---|---|
|
Preparation
Execution
|
|||
| Common Error(s): | Torso collapses forward | ||
| Spotting: | Travel alongside client | ||
| Movement Pattern: Single-joint | isolation | Target: Deltoid (Medial) | Synergist(s): | |
| Exercise | 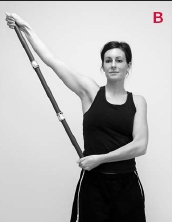 |
||
| Regressions: | Progressions: | ||
| Key Teaching Points | |||
|---|---|---|---|
|
Upright standing neutral posture with shoulders and head back and aligned. End of dowel within palm of active hand/arm and griped at the other end by assisting hand/arm. Arms straight. |
|||
| Common Error(s): | Inappropriate momentum | ||
| Spotting: | |||
| Movement Pattern: Press | horizontal | Target: Pec Major | Synergist(s): Deltoids (Anterior), Triceps | |
| Exercise | 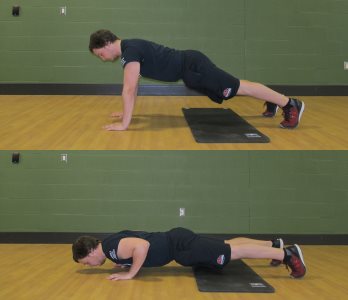 |
||
| Regressions: | Incline Push Up | Progressions: | Bench Press |
| Key Teaching Points | |||
|---|---|---|---|
|
|||
| Common Error(s): | Not engaging core | Forward Head Posture | Sagging lower back | ||
| Spotting: | |||
| Movement Pattern: Press | horizontal | Target: Pec Major | Synergist(s): Deltoids (Anterior), Triceps | |
| Exercise | 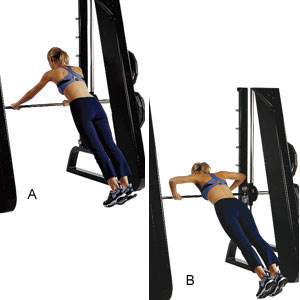 |
||
| Regressions: | Progressions: | Push Up | |
| Key Teaching Points | |||
|---|---|---|---|
|
|||
| Common Error(s): | Not engaging core | Rounded lower back | Rounded shoulders | ||
| Spotting: | |||
| Movement Pattern: Single-joint | isolation | Target: Deltoids (Anterior) | Synergist(s): Deltoid (Medial), Triceps | |
| Exercise |  |
||
| Regressions: | Progressions: | Seated Shoulder Press | |
| Key Teaching Points | |||
|---|---|---|---|
|
Seated on secure chair or bench with upright posture. Shoulder and head back and aligned. Neutral grip on pulley with both hands. Elbow at 90deg. Use as much force as able with the weak side to raise the arm overhead. Assisting only after attempting to engage the weak side, pull down with the opposite strong side to allow further ROM from the weak side. You should feel a light stretch. This should be performed pain free. |
|||
| Common Error(s): | Inappropriate momentum | ||
| Spotting: | |||
| Movement Pattern: Pull | horizontal | Target: Latissimus Dorsi | Synergist(s): Deltoid (Posterior), Rhomboids, Trapezius | |
| Exercise | 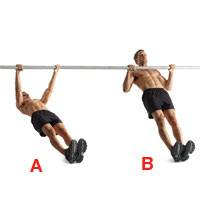 |
||
| Regressions: | 1-Arm Row | Progressions: | Bent-Over Row |
| Key Teaching Points | |||
|---|---|---|---|
Regression: If client is unable to maintain core stability or unable to pull their chest until it almost touches the bar, you can have client bend their knees to 90° and keep their feet flat while performing the motion. |
|||
| Common Error(s): | Forward Head Posture | Not engaging core | ||
| Spotting: | Mirror Client Level | ||
| Movement Pattern: Squat | Target: Quadriceps | Synergist(s): Gluteals, Hip Adductors | |
| Exercise | 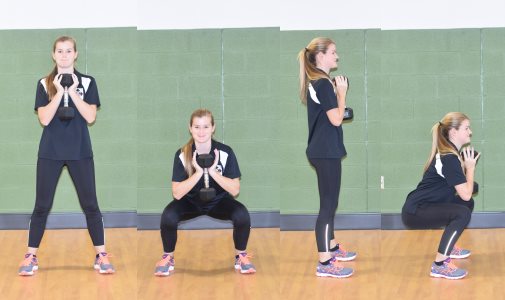 |
||
| Regressions: | TRX Assisted Squat | Box Squat | Progressions: | Back Squat | Front Squat |
| Key Teaching Points | |||
|---|---|---|---|
|
Standing with feet approximately shoulder width, toes pointed slightly out, grasp a dumbbell with both hands in front of chest. While keeping:
Sit backwards until your hips break parallel and your knees are bent below 90 degrees. Pause at the bottom of the squat then pushing off your heels, return back to the starting position. |
|||
| Common Error(s): | Valgus knees | ||
| Spotting: | |||
| Movement Pattern: Single-joint | isolation | Target: Tibialis Anterior | Synergist(s): | |
| Exercise | 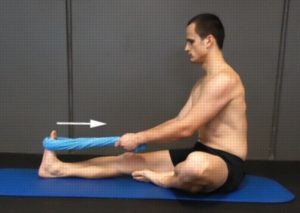 |
||
| Regressions: | Progressions: | ||
| Movement Pattern: Squat | Target: Quadriceps | Synergist(s): Gluteals, Transverse Abdominus | |
| Exercise | 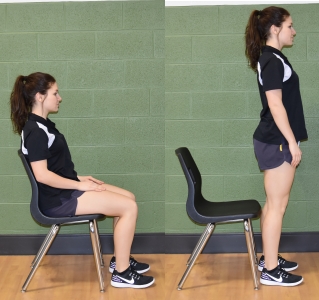 |
||
| Regressions: | Progressions: | Goblet Squat | Goblet Squat | |
| Key Teaching Points | |||
|---|---|---|---|
|
Place chair against the wall so it is secure. Sit upright with feet shoulder width apart, back under your knees, and flat on floor. Arms crossed in front. Lean forward so weight is over ball of the foot. Engage core, gluts and quadriceps. Lift upwards until spine and hips are fully erect. Breath. Re-engage core, gluts and quadriceps. Slowly lower under control. Regress – arms in front or arm rest aid or higher chair. Progress – arms crossed, lower chair. |
|||
| Common Error(s): | |||
| Spotting: | Consider self-spotting option | ||
| Movement Pattern: Whole Body | Target: Quadriceps | Synergist(s): Hamstrings, Spinal Erectors, Trapezius | |
| Exercise | 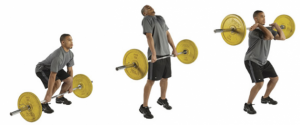 |
||
| Regressions: | 1-Arm Clean and Press | Deadlift | Progressions: | |
| Key Teaching Points | |||
|---|---|---|---|
|
Preparation
Execution
Return
|
|||
| Common Error(s): | Not engaging core | ||
| Spotting: | |||
| Movement Pattern: Lower Body | Target: Quadriceps | Synergist(s): Gluteals, Hamstrings | |
| Exercise | 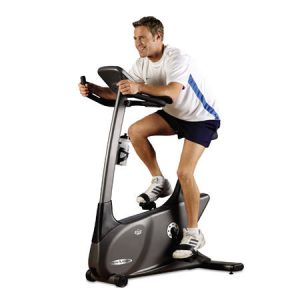 |
||
| Regressions: | Progressions: | ||
| Movement Pattern: Lower Body | Target: Gluteals | Synergist(s): | |
| Exercise |  |
||
| Regressions: | Progressions: | ||
| Movement Pattern: Lower Body | Target: Soleus | Synergist(s): | |
| Exercise | 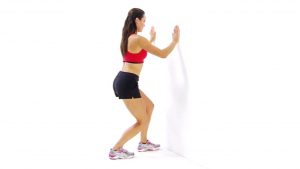 |
||
| Regressions: | Progressions: | ||
| Movement Pattern: Pull | horizontal | Target: Latissimus Dorsi | Synergist(s): Biceps, Rhomboids, Trapezius | |
| Exercise | 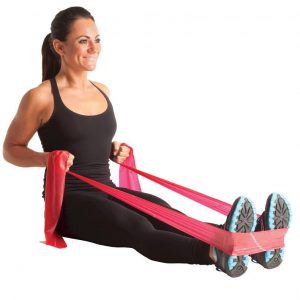 |
||
| Regressions: | Progressions: | Inverted Row | Bent-Over Row | |
| Key Teaching Points | |||
|---|---|---|---|
|
Secure band at mid-foot while keeping feet slightly plantar flexed and at hand by wrapping once around hand and re-gripping. Variation |
|||
| Common Error(s): | Rounded shoulders | Rounded lower back | Forward Head Posture | ||
| Spotting: | Band/Tubing Anchoring | ||
| Movement Pattern: Press | horizontal | Target: Pec Major | Synergist(s): Triceps | |
| Exercise | 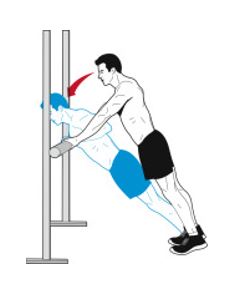 |
||
| Regressions: | Progressions: | Push Up | Bench Press | |
| Key Teaching Points | |||
|---|---|---|---|
|
Hands under shoulders width and placed firmly on wall. Body posture is aligned (head, shoulders, spine). Feet are shoulder width apart and firmly planted. Lead with chest (not chin). Allow for some scapular retraction at the bottom phase. Engage chest, triceps and core. Use either the Wall, BB Rack (various heights) or Bench to adjust the intensity of the push-up without having the client on the floor. |
|||
| Common Error(s): | Sagging lower back | Not engaging core | ||
| Spotting: | |||
| Movement Pattern: Pull | horizontal | Target: Latissimus Dorsi | Synergist(s): Biceps, Rhomboids, Trapezius | |
| Exercise | 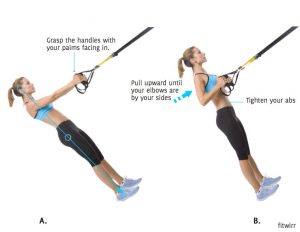 |
||
| Regressions: | Progressions: | TRX Row Single Arm | |
| Key Teaching Points | |||
|---|---|---|---|
|
|||
| Common Error(s): | Not engaging core | ||
| Spotting: | |||
| Movement Pattern: Squat | Target: Quadriceps | Synergist(s): Gluteals | |
| Exercise | 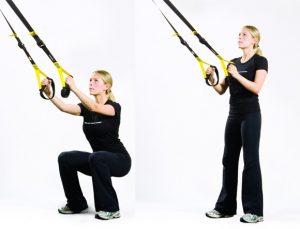 |
||
| Regressions: | Progressions: | Goblet Squat | Walking Lunge | |
| Key Teaching Points | |||
|---|---|---|---|
|
|||
| Common Error(s): | Inappropriate momentum | ||
| Spotting: | |||
| Movement Pattern: Press | horizontal | Target: Pec Major | Synergist(s): Deltoids (Anterior), Triceps | |
| Exercise | 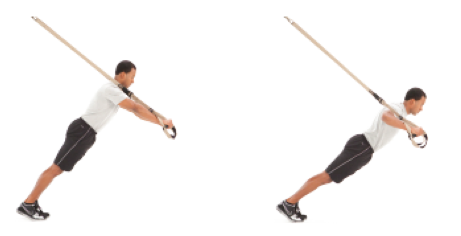 |
||
| Regressions: | Progressions: | ||
| Key Teaching Points | |||
|---|---|---|---|
|
|||
| Common Error(s): | Not engaging core | ||
| Spotting: | |||
| Movement Pattern: Core | stabilization | Target: Transverse Abdominus | Synergist(s): Pelvic Floor, Rectus Abdominus | |
| Exercise | 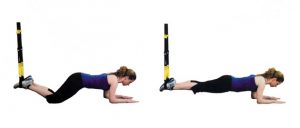 |
||
| Regressions: | Plank | Progressions: | |
| Key Teaching Points | |||
|---|---|---|---|
|
|||
| Common Error(s): | Not engaging core | ||
| Spotting: | |||
| Movement Pattern: Hinge | Target: Hamstrings | Synergist(s): Gluteals | |
| Exercise | 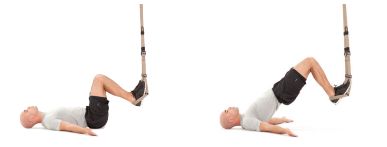 |
||
| Regressions: | Hip Bridge | BOSU Hip Bridge | Progressions: | TRX Hamstring Curl to Hip Press (Bridge) |
| Key Teaching Points | |||
|---|---|---|---|
|
|||
| Common Error(s): | Arching the upper back | ||
| Spotting: | |||
| Movement Pattern: Lower Body | Target: Quadriceps | Synergist(s): | |
| Exercise | 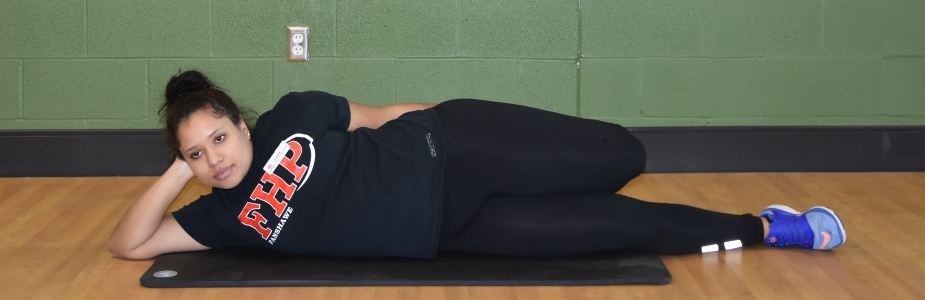 |
||
| Regressions: | Progressions: | Standing Quadriceps Stretch | |
| Movement Pattern: Lower Body | Target: Hamstrings | Synergist(s): | |
| Exercise | 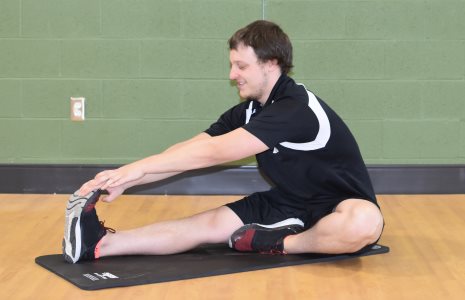 |
||
| Regressions: | Progressions: | ||
| Key Teaching Points | |||
|---|---|---|---|
|
While sitting on the ground, bend one leg towards groin while extending the other leg. |
|||
| Common Error(s): | |||
| Spotting: | |||
| Movement Pattern: Lower Body | Target: Gluteals | Synergist(s): | |
| Exercise |  |
||
| Regressions: | Progressions: | ||
| Key Teaching Points | |||
|---|---|---|---|
|
With client sitting on ground, extend one leg and cross the other over (with bent knee). With hand, gently pull knee towards chest and hold 20-30s. |
|||
| Common Error(s): | |||
| Spotting: | |||
| Movement Pattern: Hinge | Target: Gluteals | Synergist(s): Hamstrings | |
| Exercise | 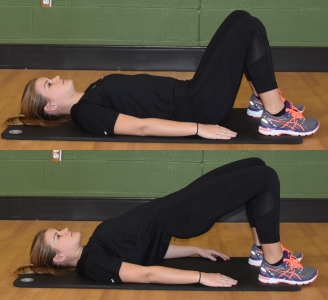 |
||
| Regressions: | Progressions: | Deadlift | Leg Curl | |
| Key Teaching Points | |||
|---|---|---|---|
|
|||
| Common Error(s): | Not engaging core | ||
| Spotting: | |||
| Movement Pattern: Hinge | Target: Gluteals | Synergist(s): Hamstrings, Spinal Erectors | |
| Exercise | 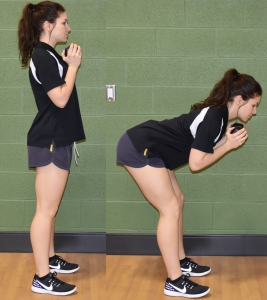 |
||
| Regressions: | Progressions: | Deadlift | |
| Key Teaching Points | |||
|---|---|---|---|
|
Stand and grab two dumbbells with your knees slightly bent and your feet hip-width apart. Hold the weights at shoulder level with your palms facing toward you. Without changing the bend in your knees, hinge at your hips and lower your torso until it’s almost parallel to the floor. Pause, and return to the starting position. That’s one repetition. Don’t allow your lower back to round as you perform the exercise. |
|||
| Common Error(s): | Rounded shoulders | Sagging lower back | Not engaging core | ||
| Spotting: | |||
| Movement Pattern: Hinge, Lower Body | Target: Gluteals | Synergist(s): Hamstrings, Spinal Erectors | |
| Exercise | 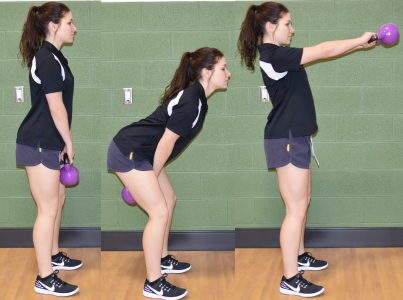 |
||
| Regressions: | Good Morning | Back Extension | Progressions: | Deadlift | Snatch |
| Key Teaching Points | |||
|---|---|---|---|
|
1. Get set: Stand with feet shoulder-width apart, toes pointed out, and knees slightly bent; look straight ahead. Hold the kettlebell between your legs using a two-handed, overhand grip. 2. Swing it: Keeping the arch in your lower back, bend your hips back until the kettlebell is between and behind your legs; then forcefully squeeze your glutes to extend your hips (imaging you are going to jump forward) and propel the weight up to chest height. You should not feel as though you are lifting the weight up with your shoulders, rather your hips/hamstrings should be doing all the work. 3. Bring it down: Once the bell has reached chest height, let the weight fall (i.e. swing back) between your legs as you bend your hips and slightly bend your knees. Aim to maintain a tight core throughout. Avoid dropping into a squat on the descent. Aim to maintain just a slight bend in the knee and use the hips and hamstrings to decelerate the kettlebell, not your quadriceps. Once the kettlebell passes back beneath your hips, extend your hips and knees to reverse the momentum as you immediately begin the next rep. Variations
|
|||
| Common Error(s): | Not engaging core | Rounded lower back | ||
| Spotting: | |||
| Movement Pattern: Lunge | Target: Quadriceps | Synergist(s): Gluteals, Hamstrings | |
| Exercise | 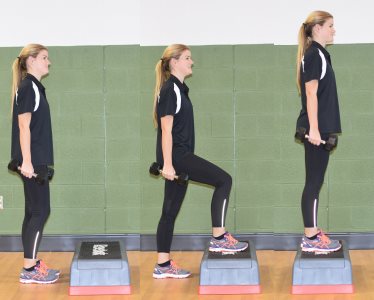 |
||
| Regressions: | Goblet Squat | Progressions: | Walking Lunge |
| Key Teaching Points | |||
|---|---|---|---|
|
Place left foot on bench or box (knee should be bent at ~90 degrees). Pushing through the heel, drive body up bring both feet on top of bench. Step down leading with the right foot. Ensure both legs *lead* the same number of times. |
|||
| Common Error(s): | Torso collapses forward | ||
| Spotting: | |||
| Movement Pattern: Whole Body | Target: Latissimus Dorsi | Synergist(s): Quadriceps, Rhomboids | |
| Exercise | 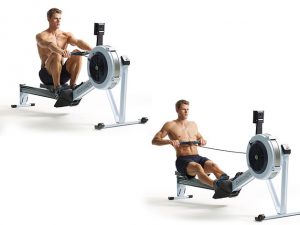 |
||
| Regressions: | Progressions: | ||
| Movement Pattern: Lower Body | Target: Quadriceps | Synergist(s): Gastrocnemius, Hamstrings | |
| Exercise | 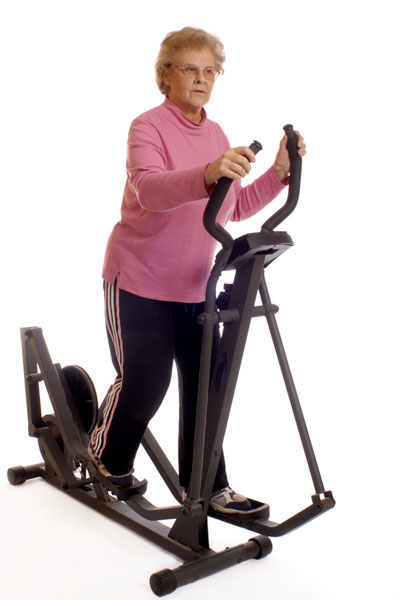 |
||
| Regressions: | Progressions: | ||
| Key Teaching Points | |||
|---|---|---|---|
| Common Error(s): | |||
| Spotting: | |||
| Movement Pattern: Lunge | Target: Quadriceps | Synergist(s): Gluteals, Hamstrings | |
| Exercise | 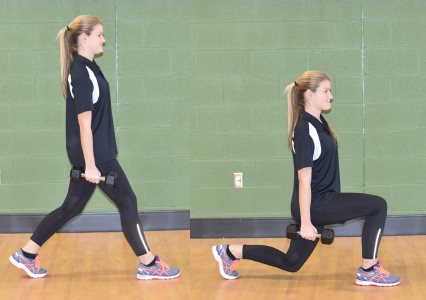 |
||
| Regressions: | Goblet Squat | Progressions: | Walking Lunge | Step Up |
| Key Teaching Points | |||
|---|---|---|---|
|
Start by standing with torso erect (shoulders retracted), hands on hips or at sides for balance, one foot in front of the other. Lower body by flexing knee and hip of front leg (weight should be focus on heel of lead foot) until knee of rear leg is almost in contact with floor. Pause and return to starting position, pushing off through the heel of the lead leg. |
|||
| Common Error(s): | Torso collapses forward | ||
| Spotting: | |||
| Movement Pattern: Pull | horizontal | Target: Latissimus Dorsi | Synergist(s): Biceps, Rhomboids | |
| Exercise | 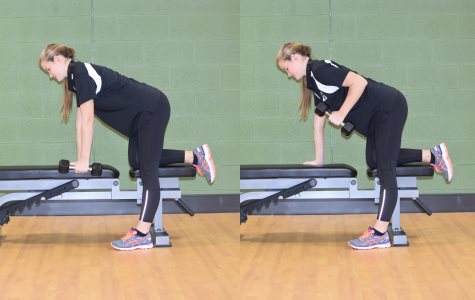 |
||
| Regressions: | Seated Row | Progressions: | Bent-Over Row | T-Bar Row |
| Key Teaching Points | |||
|---|---|---|---|
|
|||
| Common Error(s): | Inappropriate momentum | Rounded lower back | Not engaging core | ||
| Spotting: | |||
| Movement Pattern: Pull | horizontal | Target: Latissimus Dorsi | Synergist(s): Biceps, Deltoid (Posterior), Rhomboids | |
| Exercise | 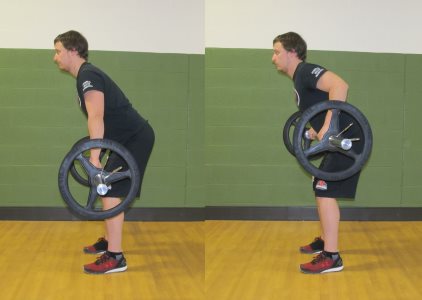 |
||
| Regressions: | Bent-Over Row | 1-Arm Row | Progressions: | |
| Key Teaching Points | |||
|---|---|---|---|
|
Stand with feet shoulder width apart & slight bend in the knee. Hinge forward at the hip, keep the spine neutral. With either a pronated or supinated grip, pull the bar up to the chest, then return to starting position. |
|||
| Common Error(s): | Rounded lower back | Rounded shoulders | ||
| Spotting: | |||
| Movement Pattern: Pull | horizontal | Target: Latissimus Dorsi | Synergist(s): Rhomboids | |
| Exercise |  |
||
| Regressions: | Row | Inverted Row | Progressions: | 1-Arm Row | Bent-Over Row |
| Key Teaching Points | |||
|---|---|---|---|
|
|||
| Common Error(s): | Using Excessive Momentum | Forward Head Posture | ||
| Spotting: | |||
| Movement Pattern: Pull | vertical | Target: Latissimus Dorsi | Synergist(s): Brachialis, Deltoid (Posterior), Rhomboids | |
| Exercise | 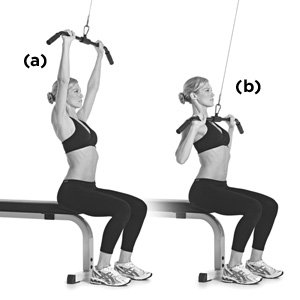 |
||
| Regressions: | Progressions: | Chin Ups | Pull Ups | |
| Key Teaching Points | |||
|---|---|---|---|
|
|||
| Common Error(s): | Using Excessive Momentum | Forward Head Posture | ||
| Spotting: | |||
| Movement Pattern: Single-joint | isolation | Target: Hamstrings | Synergist(s): Gastrocnemius | |
| Exercise | 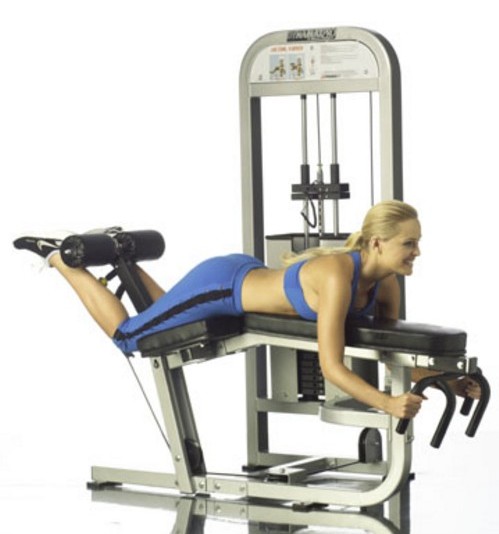 |
||
| Regressions: | Progressions: | Nordic Hamstrings Curl | TRX Hamstring Curl to Hip Press (Bridge) | |
| Movement Pattern: Single-joint | isolation | Target: Hamstrings | Synergist(s): Gastrocnemius | |
| Exercise |  |
||
| Regressions: | Progressions: | ||
| Movement Pattern: Pull | horizontal | Target: Latissimus Dorsi | Synergist(s): Biceps, Brachialis, Rhomboids | |
| Exercise | 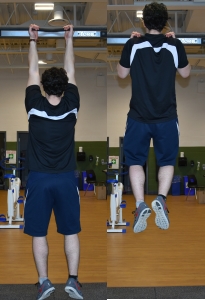 |
||
| Regressions: | Lat Pulldown | Assisted Chin Ups | Progressions: | |
| Key Teaching Points | |||
|---|---|---|---|
|
|||
| Common Error(s): | Inappropriate momentum | Not engaging core | ||
| Spotting: | |||
| Movement Pattern: Pull | vertical | Target: Latissimus Dorsi | Synergist(s): Brachialis, Deltoid (Posterior), Rhomboids | |
| Exercise |  |
||
| Regressions: | Lat Pulldown | Progressions: | |
| Key Teaching Points | |||
|---|---|---|---|
|
|||
| Common Error(s): | Forward Head Posture | Not engaging core | ||
| Spotting: | |||
| Movement Pattern: Pull | vertical | Target: Latissimus Dorsi | Synergist(s): Biceps, Brachialis, Rhomboids | |
| Exercise | 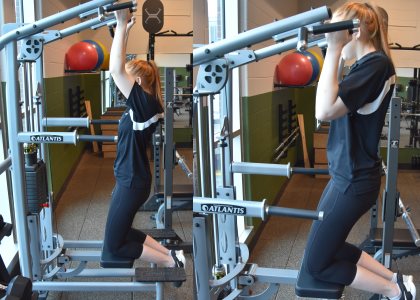 |
||
| Regressions: | Progressions: | Chin Ups | Pull Ups | |
| Key Teaching Points | |||
|---|---|---|---|
N.B. The weight selection plate will subtract that much weight from a client’s weight. Therefore a client with a bodyweight of 150 lbs, if they were to perform an assisted dip machine set at “50 lbs” would actually be lifting 100 lbs. |
|||
| Common Error(s): | Using Excessive Momentum | Not engaging core | ||
| Spotting: | |||
| Movement Pattern: Pull | vertical | Target: Latissimus Dorsi | Synergist(s): Biceps, Brachialis, Rhomboids | |
| Exercise | 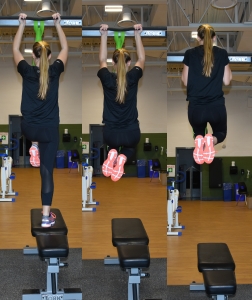 |
||
| Regressions: | Lat Pulldown | Assisted Chin Ups | Progressions: | Chin Ups | Pull Ups |
| Key Teaching Points | |||
|---|---|---|---|
|
|||
| Common Error(s): | Inappropriate momentum | Not engaging core | ||
| Spotting: | |||
| Movement Pattern: Press | vertical | Target: Triceps | Synergist(s): Deltoids (Anterior), Pec Major | |
| Exercise | 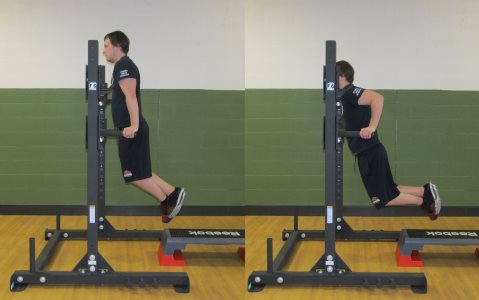 |
||
| Regressions: | Assisted Dips | Progressions: | |
| Key Teaching Points | |||
|---|---|---|---|
|
|||
| Common Error(s): | Not engaging core | Forward Head Posture | Using Excessive Momentum | ||
| Spotting: | |||
| Movement Pattern: Press | vertical | Target: Triceps | Synergist(s): Deltoids (Anterior), Pec Major | |
| Exercise | 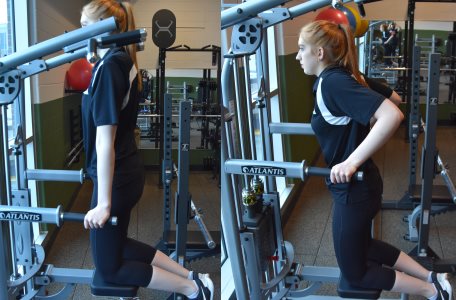 |
||
| Regressions: | Progressions: | Dips | |
| Key Teaching Points | |||
|---|---|---|---|
|
Preparation
Execution
N.B. The weight selection plate will subtract that much weight from a client’s weight. Therefore a client with a bodyweight of 150 lbs, if they were to perform an assisted dip machine set at “50 lbs” would actually be lifting 100 lbs. |
|||
| Common Error(s): | Forward Head Posture | Torso collapses forward | Not engaging core | ||
| Spotting: | |||
| Movement Pattern: Squat | Target: Quadriceps | Synergist(s): Gluteals, Hamstrings | |
| Exercise | 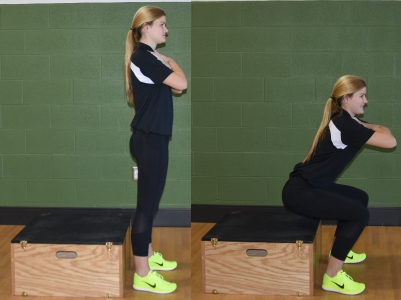 |
||
| Regressions: | Progressions: | ||
| Movement Pattern: Lower Body | Target: Quadriceps | Synergist(s): Gastrocnemius, Gluteals, Hamstrings | |
| Exercise | 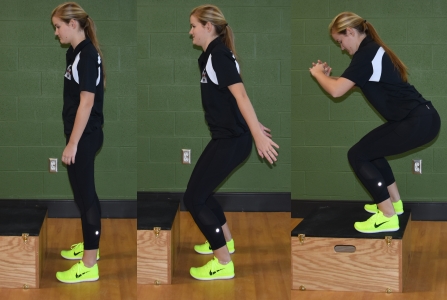 |
||
| Regressions: | Progressions: | Depth Jump | |
| Key Teaching Points | |||
|---|---|---|---|
|
Box jumps are a plyometric movement designed to improve explosive power, therefore when prescribed should be limited to sets of 6 reps or fewer, with each jump done explosively and with perfect technique.
Common Errors
|
|||
| Common Error(s): | Valgus knees | ||
| Spotting: | |||
| Movement Pattern: Lower Body | Target: Quadriceps | Synergist(s): Gastrocnemius, Gluteals, Hamstrings | |
| Exercise | 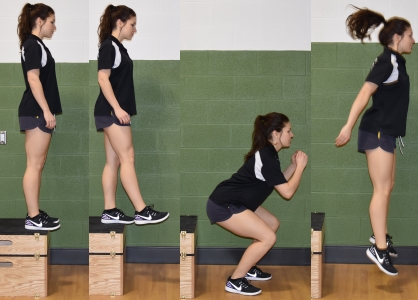 |
||
| Regressions: | Progressions: | ||
| Key Teaching Points | |||
|---|---|---|---|
|
The depth jump is a plyometric movement designed to improve explosive power, therefore reps should be limited to 6 or fewer. Start with a plyometric box between 12-42″ high. N.B. The higher the box, the greater the stress experienced.
Variation
|
|||
| Common Error(s): | Valgus knees | ||
| Spotting: | |||
| Movement Pattern: Lunge | Target: Quadriceps | Synergist(s): Gluteals, Hamstrings | |
| Exercise | 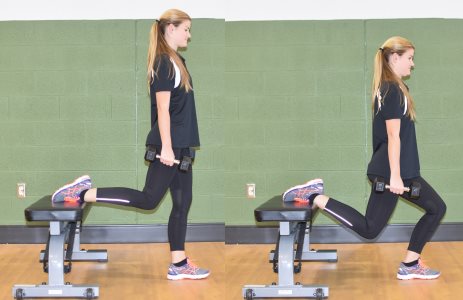 |
||
| Regressions: | Split Squat | Progressions: | Walking Lunge |
| Key Teaching Points | |||
|---|---|---|---|
|
Preparation
Execution
|
|||
| Common Error(s): | Not engaging core | Torso collapses forward | ||
| Spotting: | |||
| Movement Pattern: Single-joint | isolation | Target: Deltoid (Medial) | Synergist(s): Deltoids (Anterior), Trapezius | |
| Exercise | 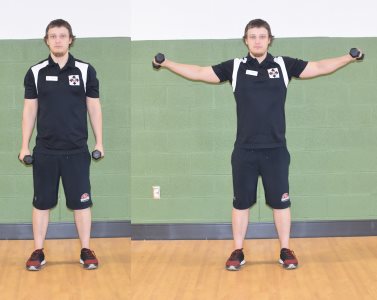 |
||
| Regressions: | Lateral Shoulder Raise | Progressions: | |
| Key Teaching Points | |||
|---|---|---|---|
Variations
|
|||
| Common Error(s): | Using Excessive Momentum | ||
| Spotting: | |||
| Movement Pattern: Single-joint | isolation | Target: Quadriceps | Synergist(s): | |
| Exercise | 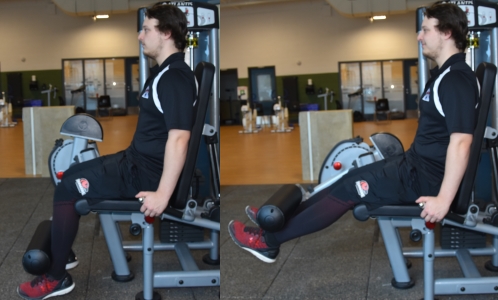 |
||
| Regressions: | Seated Leg Extension | Progressions: | Goblet Squat | Back Squat |
| Key Teaching Points | |||
|---|---|---|---|
|
|||
| Common Error(s): | Using Excessive Momentum | ||
| Spotting: | |||
| Movement Pattern: Squat | Target: Quadriceps | Synergist(s): Gluteals, Hamstrings | |
| Exercise |  |
||
| Regressions: | Goblet Squat | Box Squat | Progressions: | |
| Key Teaching Points | |||
|---|---|---|---|
|
|||
| Common Error(s): | Torso collapses forward | Valgus knees | Foot/ankle collapse | ||
| Spotting: | 2 person spotting | ||
| Movement Pattern: Squat | Target: Quadriceps | Synergist(s): Gluteals, Hamstrings | |
| Exercise | 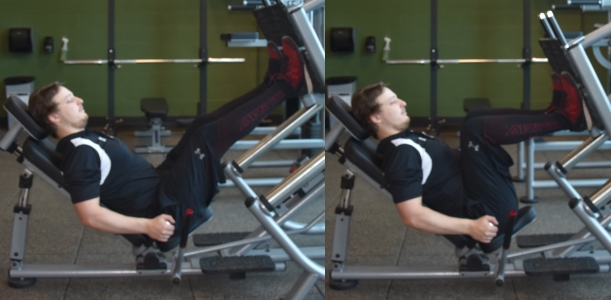 |
||
| Regressions: | Leg Extension | Box Squat | Progressions: | Back Squat | Front Squat |
| Key Teaching Points | |||
|---|---|---|---|
|
|||
| Common Error(s): | Valgus knees | Not engaging core | Using Excessive Momentum | ||
| Spotting: | |||
| Movement Pattern: Press | vertical | Target: Deltoids (Anterior) | Synergist(s): Deltoid (Medial), Pec Major, Triceps | |
| Exercise | 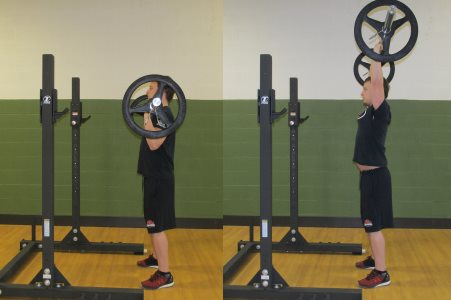 |
||
| Regressions: | Seated Shoulder Press | Progressions: | |
| Key Teaching Points | |||
|---|---|---|---|
|
|||
| Common Error(s): | Bouncing Weights | Not engaging core | ||
| Spotting: | |||
| Movement Pattern: Press | vertical | Target: Deltoids (Anterior) | Synergist(s): Deltoid (Medial), Pec Major, Triceps | |
| Exercise | 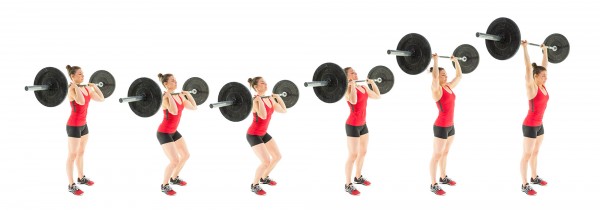 |
||
| Regressions: | Seated Shoulder Press | Progressions: | Power Snatch |
| Movement Pattern: Whole Body | Target: Quadriceps | Synergist(s): Deltoids (Anterior), Gastrocnemius, Pec Major, Transverse Abdominus | |
| Exercise | 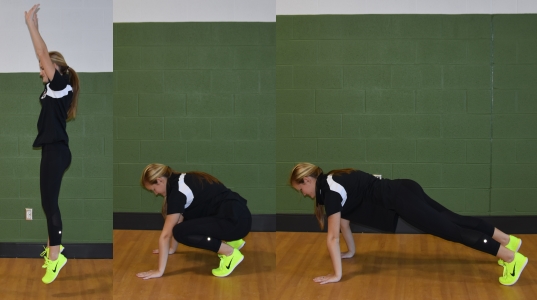 |
||
| Regressions: | Progressions: | ||
| Key Teaching Points | |||
|---|---|---|---|
|
|||
| Common Error(s): | Sagging lower back | Not engaging core | Inappropriate momentum | ||
| Spotting: | Mirror Client Level | ||
| Movement Pattern: Single-joint | isolation | Target: Biceps | Synergist(s): Brachialis, Brachioradialis | |
| Exercise | 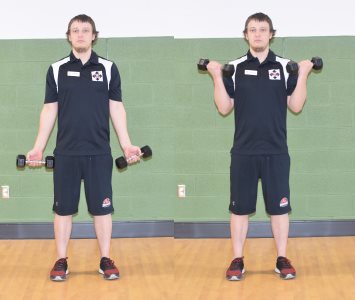 |
||
| Regressions: | Progressions: | ||
| Movement Pattern: Single-joint | isolation | Target: Biceps | Synergist(s): Brachialis, Brachioradialis | |
| Exercise | 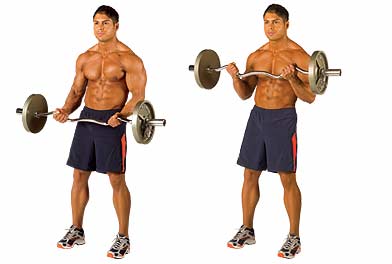 |
||
| Regressions: | Progressions: | ||
| Key Teaching Points | |||
|---|---|---|---|
|
|||
| Common Error(s): | Using Excessive Momentum | ||
| Spotting: | |||
| Movement Pattern: Single-joint | isolation | Target: Biceps | Synergist(s): Brachialis, Brachioradialis | |
| Exercise | 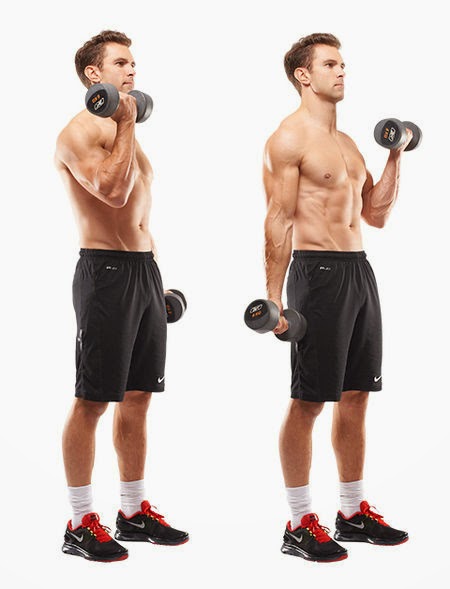 |
||
| Regressions: | Progressions: | ||
| Movement Pattern: Single-joint | isolation | Target: Biceps | Synergist(s): Brachialis, Brachioradialis | |
| Exercise | 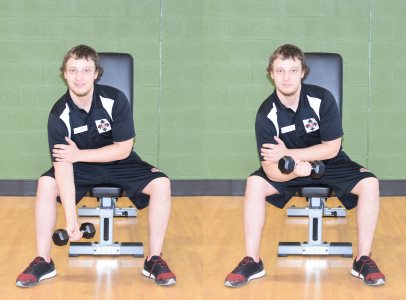 |
||
| Regressions: | Progressions: | ||
| Movement Pattern: Single-joint | isolation | Target: Triceps | Synergist(s): | |
| Exercise | 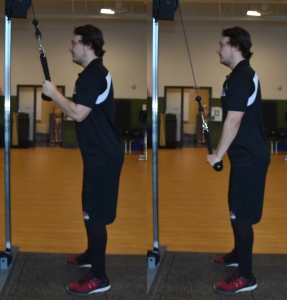 |
||
| Regressions: | Progressions: | ||
| Movement Pattern: Single-joint | isolation | Target: Brachialis | Synergist(s): Biceps, Brachioradialis | |
| Exercise | 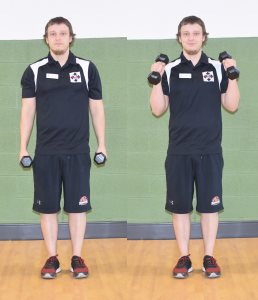 |
||
| Regressions: | Progressions: | ||
| Key Teaching Points | |||
|---|---|---|---|
|
|||
| Common Error(s): | Inappropriate momentum | ||
| Spotting: | |||
| Movement Pattern: Single-joint | isolation | Target: Deltoids (Anterior) | Synergist(s): | |
| Exercise | 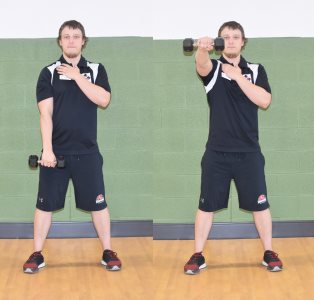 |
||
| Regressions: | Progressions: | ||
| Key Teaching Points | |||
|---|---|---|---|
|
|||
| Common Error(s): | Inappropriate momentum | Torso collapses forward | ||
| Spotting: | |||
| Movement Pattern: Single-joint | isolation | Target: Triceps | Synergist(s): | |
| Exercise | 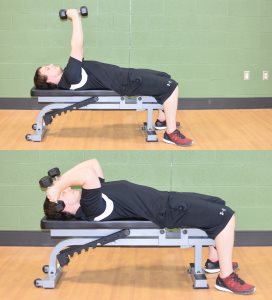 |
||
| Regressions: | Triceps Extension | Pushdown | Progressions: | |
| Movement Pattern: Pull | horizontal | Target: Rhomboids | Synergist(s): Biceps, Brachialis, Deltoid (Posterior), Rotator Cuff | |
| Exercise | 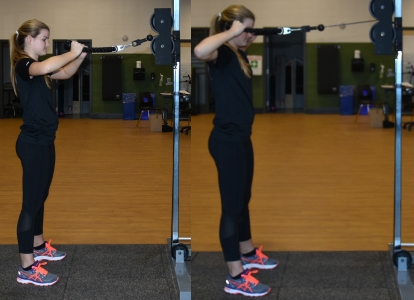 |
||
| Regressions: | Pull Apart | Progressions: | |
| Key Teaching Points | |||
|---|---|---|---|
Notes
|
|||
| Common Error(s): | Using Excessive Momentum | Forward Head Posture | ||
| Spotting: | |||
| Movement Pattern: Hinge | Target: Gluteals | Synergist(s): Hamstrings, Spinal Erectors | |
| Exercise | 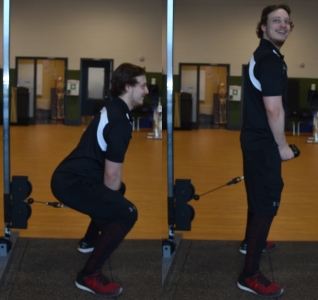 |
||
| Regressions: | Good Morning | Progressions: | Deadlift | Swing |
| Key Teaching Points | |||
|---|---|---|---|
|
Stand with feet shoulder width apart, a slight bend in the knees. Keeping spine neutral, hinge (pivot) at the hips so torso is bent forward and allow arms to hang down between legs. With arms extended, grasp the rope attachment on the cables. Keeping the arms extended, stand straight up attention, pulling the rope forward so that it rests slightly in front of your body. Return back to starting position, ensuring you maintain neutral spine throughout the motion. |
|||
| Common Error(s): | Rounded lower back | Not engaging core | ||
| Spotting: | |||
| Movement Pattern: Single-joint | isolation | Target: Deltoid (Posterior) | Synergist(s): Rhomboids | |
| Exercise | 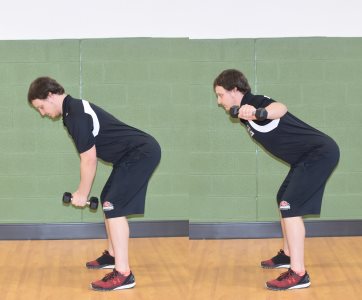 |
||
| Regressions: | Progressions: | ||
| Key Teaching Points | |||
|---|---|---|---|
|
|||
| Common Error(s): | Rounded lower back | Rounded shoulders | Not engaging core | ||
| Spotting: | |||
| Movement Pattern: Single-joint | isolation | Target: Pec Major | Synergist(s): Deltoids (Anterior) | |
| Exercise | 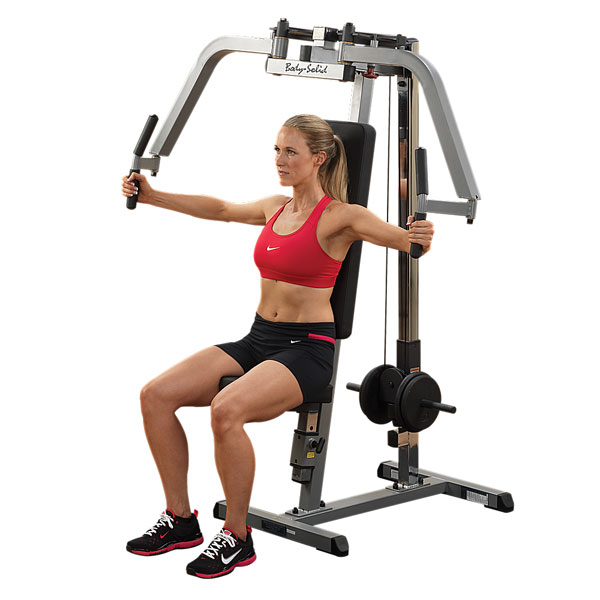 |
||
| Regressions: | Progressions: | ||
| Movement Pattern: Single-joint | isolation | Target: Triceps | Synergist(s): | |
| Exercise | 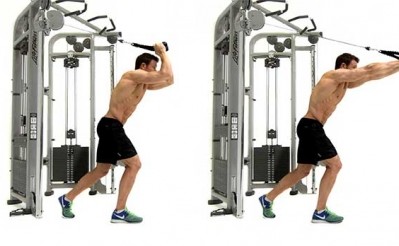 |
||
| Regressions: | Triceps Extension | Pushdown | Progressions: | |
| Key Teaching Points | |||
|---|---|---|---|
|
Preparation
Execution
|
|||
| Common Error(s): | Inappropriate momentum | Forward Head Posture | Using Excessive Momentum | ||
| Spotting: | |||
| Movement Pattern: Single-joint | isolation | Target: Triceps | Synergist(s): | |
| Exercise | 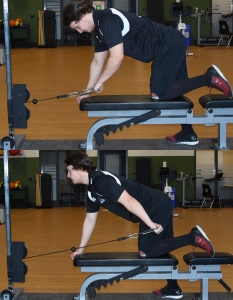 |
||
| Regressions: | Progressions: | Triceps Extension | Pushdown | |
| Movement Pattern: Whole Body | Target: Quadriceps | Synergist(s): Gluteals, Spinal Erectors, Trapezius | |
| Exercise | 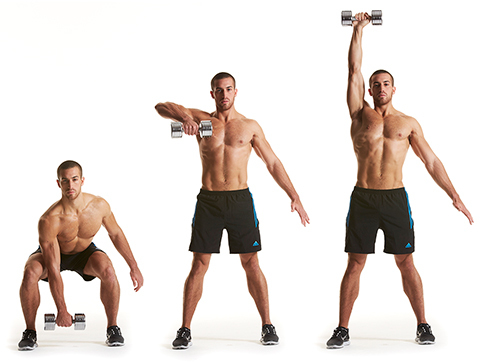 |
||
| Regressions: | Progressions: | Snatch | |
| Key Teaching Points | |||
|---|---|---|---|
|
Preparation
Execution
Return
|
|||
| Common Error(s): | Not engaging core | Rounded lower back | ||
| Spotting: | |||
| Movement Pattern: Whole Body | Target: Quadriceps | Synergist(s): Gluteals, Hamstrings, Spinal Erectors, Trapezius | |
| Exercise |  |
||
| Regressions: | Power Snatch | Snatch | Progressions: | |
| Key Teaching Points | |||
|---|---|---|---|
|
Preparation
Execution
Return
|
|||
| Common Error(s): | Bouncing Weights | Rounded lower back | ||
| Spotting: | |||
| Movement Pattern: Single-joint | isolation | Target: Deltoid (Posterior) | Synergist(s): Rhomboids | |
| Exercise |  |
||
| Regressions: | Progressions: | ||
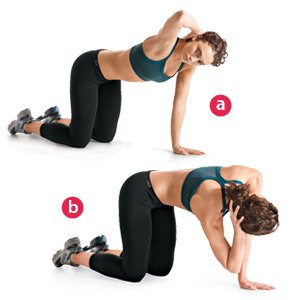
| Movement Pattern: Core | stabilization | Target: Transverse Abdominus | Synergist(s): Obliques, Rectus Abdominus, Spinal Erectors | |
| Exercise | 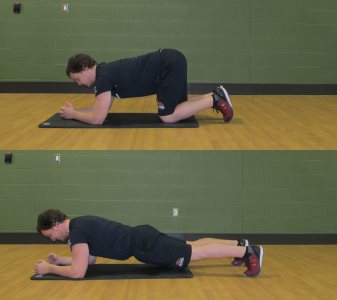 |
||
| Regressions: | Progressions: | Plank Push Up | Plank with Leg Raise | |
| Key Teaching Points | |||
|---|---|---|---|
|
Set Up Lie prone (face down) on mat. Place forearms on mat, elbows under shoulders. Place legs together with toes on floor. Execution Raise body upward by straightening body in straight line. Hold position, making sure bum is not higher than shoulders, not allowing midsection to sag or drop. Aim to hold for 30-60 seconds. |
|||
| Common Error(s): | Not engaging core | Trendelenburg Hip Drop | ||
| Spotting: | Mirror Client Level | ||
| Movement Pattern: Core | stabilization | Target: Transverse Abdominus | Synergist(s): Obliques, Rectus Abdominus | |
| Exercise | 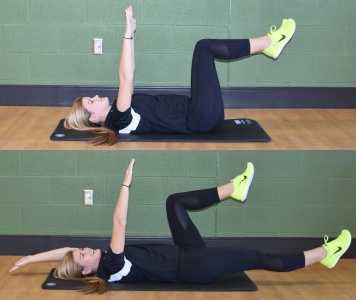 |
||
| Regressions: | Progressions: | ||
| Movement Pattern: Core | rotation | Target: Obliques | Synergist(s): Rectus Abdominus, Transverse Abdominus | |
| Exercise | 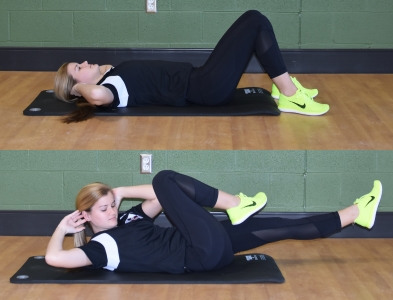 |
||
| Regressions: | Progressions: | ||
| Movement Pattern: Core | stabilization | Target: Rectus Abdominus | Synergist(s): Obliques, Transverse Abdominus | |
| Exercise |  |
||
| Regressions: | Progressions: | ||
| Movement Pattern: Core | flexion | Target: Rectus Abdominus | Synergist(s): Obliques, Transverse Abdominus | |
| Exercise | 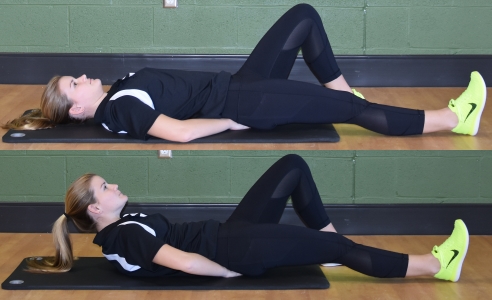 |
||
| Regressions: | Crunch | Progressions: | Stability Ball Pike | TRX Pike |
| Key Teaching Points | |||
|---|---|---|---|
|
Set-up Have client lie on their back on the floor with one leg extended straight and flat on the floor. The knee of the opposite leg should be bent and the foot flat. Have client place their hands hands palms down on the floor underneath the natural arch in their lower back. (Make sure client does not flatten their backs.) Execution Have client slowly raise their head and shoulders off the floor without bending the lower back or spine, and hold this position for 7 to 10 seconds, breathing deeply the entire time. That’s one repetition. Do all repetitions. In subsequent sets, switch legs that are extended. |
|||
| Common Error(s): | Inappropriate momentum | ||
| Spotting: | |||
| Movement Pattern: Core | flexion | Target: Hip Flexors | Synergist(s): Rectus Abdominus, Transverse Abdominus | |
| Exercise |  |
||
| Regressions: | Progressions: | ||
| Movement Pattern: Core | stabilization | Target: Obliques | Synergist(s): Rectus Abdominus, Transverse Abdominus | |
| Exercise | 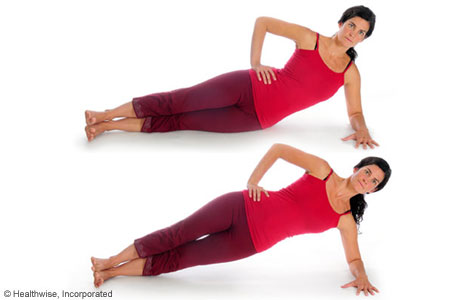 |
||
| Regressions: | Progressions: | ||
| Key Teaching Points | |||
|---|---|---|---|
|
Set Up Lie on side on mat. Place forearm on mat under shoulder, so forearm forms a 90 degree angle perpendicular to body. Place upper leg directly on top of lower leg and straighten knees and hips. Execution Raise hips off mat by straightening waist so body is ridged. Hold position, ensuring torso remains in line with legs. Don’t allow hips to drop back. Hold 20-40 seconds, then repeat with opposite side. |
|||
| Common Error(s): | Not engaging core | ||
| Spotting: | Mirror Client Level | ||
| Movement Pattern: Core | flexion | Target: Hip Flexors | Synergist(s): Rectus Abdominus, Transverse Abdominus | |
| Exercise | 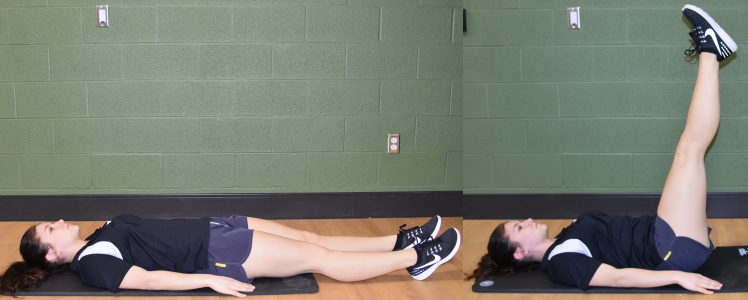 |
||
| Regressions: | Progressions: | Hanging Leg Raise | |
| Key Teaching Points | |||
|---|---|---|---|
|
|||
| Common Error(s): | Rounded lower back | Using Excessive Momentum | ||
| Spotting: | |||
| Movement Pattern: Core | stabilization | Target: Transverse Abdominus | Synergist(s): Obliques, Rectus Abdominus | |
| Exercise | 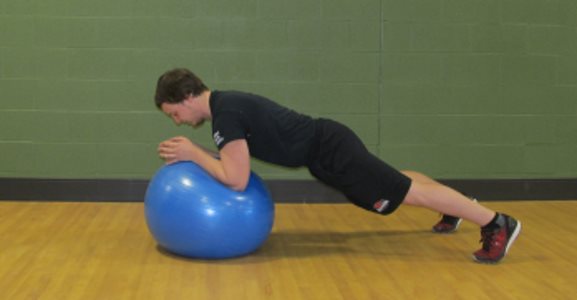 |
||
| Regressions: | BOSU Plank | Plank | Progressions: | Stability Ball ‘Stir the Pot’ | Rollout |
| Key Teaching Points | |||
|---|---|---|---|
|
Same position and set up as a typical plank. Special care when getting in and out of position as the stability ball is unstable. To increase intensity roll elbows away from body. |
|||
| Common Error(s): | Not engaging core | ||
| Spotting: | |||
| Movement Pattern: Core | stabilization | Target: Rectus Abdominus | Synergist(s): Latissimus Dorsi, Transverse Abdominus | |
| Exercise | 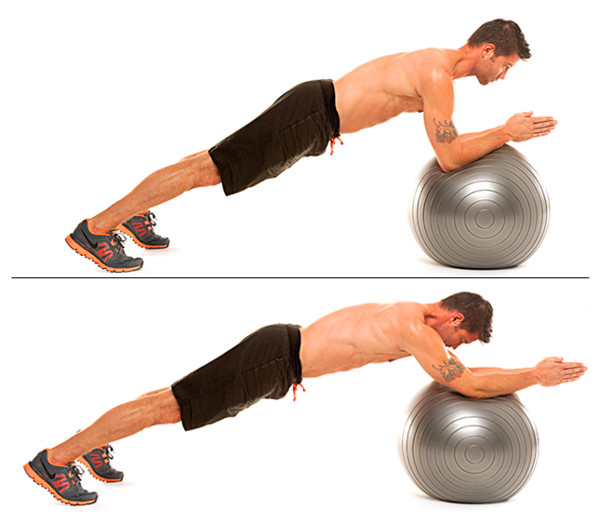 |
||
| Regressions: | Plank | Progressions: | |
| Key Teaching Points | |||
|---|---|---|---|
Variation To make this exercise more challenging, perform from a full plank position. |
|||
| Common Error(s): | Not engaging core | Sagging lower back | ||
| Spotting: | |||
| Movement Pattern: Core | flexion, Core | stabilization | Target: Rectus Abdominus | Synergist(s): Hip Flexors, Transverse Abdominus, Trapezius | |
| Exercise |  |
||
| Regressions: | Progressions: | ||
| Key Teaching Points | |||
|---|---|---|---|
|
|||
| Common Error(s): | Not engaging core | Sagging lower back | ||
| Spotting: | |||
| Movement Pattern: Core | stabilization | Target: Transverse Abdominus | Synergist(s): Hip Flexors | |
| Exercise | 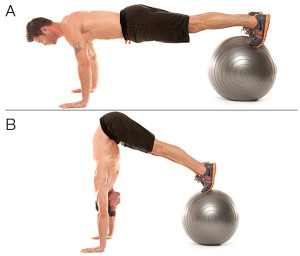 |
||
| Regressions: | Plank | TRX Hinge | Progressions: | |
| Key Teaching Points | |||
|---|---|---|---|
|
Assume a standard push up position with proper hand position under the shoulders and neutral spine with the core engaged. Carefully place one foot at a time on top of the stability ball while maintaining proper alignment. Pivot at toes with neutral ankle position. Consider the help of a friend or spotter or place ball near wall so that it doesn’t move away from you during initiation and exit from the starting position. Initiate movement by engaging core as you drive your pelvis towards the ceiling allowing your feet to roll forward on the ball. Slowly lower back down without sagging the lower back and repeat. Note this is a very challenging exercise and should be completed pain free. |
|||
| Common Error(s): | Sagging lower back | Not engaging core | ||
| Spotting: | Instability training | ||
| Movement Pattern: Core | stabilization | Target: Transverse Abdominus | Synergist(s): Gluteals, Spinal Erectors | |
| Exercise |  |
||
| Regressions: | Progressions: | ||
| Key Teaching Points | |||
|---|---|---|---|
|
Starting Position Starting on all fours (hands and knees on an exercise mat) positioning your knees underneath your hips and your hands directly underneath your shoulders with fingers pointing forward. Engage your core and abdominal muscles and focus on keeping a neutral spine throughout, avoiding any excessive sagging or arching. Movement The goal of this movement is to move the opposite arm and leg simultaneously. Begin by slowly extending the left leg until it is full extended (near parallel to the floor), ensuring you do not rotate at the hip. Simultaenously, the right arm should raise and straighten until it is near parallel to the floor. Once again, try to avoid allowing the shoulder or torso to rotate. The head should remain in line with the spine throughout the movement (only raise the arm and leg to a height that allow you to maintain the shoulders and pelvis in parallel to one another, the core engaged and the spine in neutral position). Slowly lower arm and leg back to starting kneeling position, then repeat on other side of the body. |
|||
| Common Error(s): | Not engaging core | ||
| Spotting: | |||
| Movement Pattern: Core | flexion | Target: Rectus Abdominus | Synergist(s): Obliques, Transverse Abdominus | |
| Exercise | 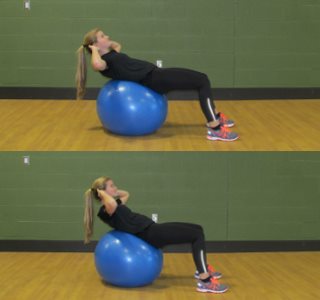 |
||
| Regressions: | Crunch | Progressions: | Stability Ball Plank |
| Key Teaching Points | |||
|---|---|---|---|
|
While seated on stability ball, carefully roll forward so that the stability ball sits at about the lumbar region of your back. Place your hands behind your head and relax your head. Do not initiate movement via the chin/head first, but rather keep spinal in neutral posture and initiate a controlled movement by engaging the abdomen as you sit upwards. Do not over curl your thoracic spine, rather imagine your chest rising towards the ceiling as you crunch up with abdominal engagement. |
|||
| Common Error(s): | Forward Head Posture | Rounded lower back | ||
| Spotting: | Mirror Client Level | ||
| Movement Pattern: Squat | Target: Quadriceps | Synergist(s): Gluteals, Hamstrings | |
| Exercise | 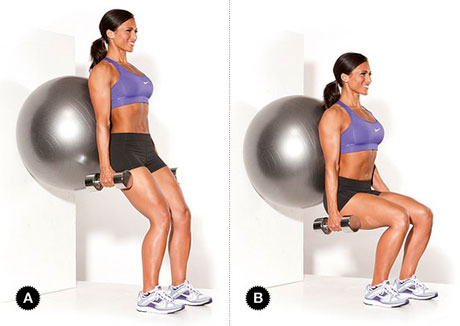 |
||
| Regressions: | Box Squat | TRX Assisted Squat | Progressions: | Back Squat | Goblet Squat |
| Key Teaching Points | |||
|---|---|---|---|
|
Either place a ball in the small of your lower back (or have a partner do it for you), then step into position. Standing with feet approximately shoulder width apart, feet far enough forward so that when you are at the bottom of the squat, knees aren’t dramatically past the toes. Holding a dumbbell in both hands, sit backwards into a squat until your hips break parallel and your knees are bent below 90 degrees. Ensure that you keep: 1) your torso erect and 2) your weight on the heels of your feet. Pause at the bottom of the squat then pushing off your heels, return back to the starting position. Try to avoid having client lean backwards into the ball too aggressively. The ball is to provide a small amount of assistance in helping the client keep their torso erect. |
|||
| Common Error(s): | Torso collapses forward | Not engaging core | ||
| Spotting: | |||
| Movement Pattern: Whole Body | Target: Transverse Abdominus | Synergist(s): Deltoids (Anterior), Latissimus Dorsi, Pec Major | |
| Exercise | 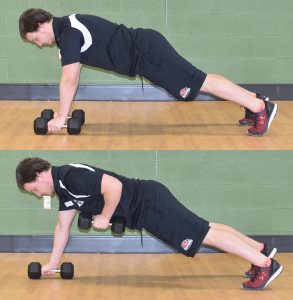 |
||
| Regressions: | Progressions: | ||
| Key Teaching Points | |||
|---|---|---|---|
| Common Error(s): | |||
| Spotting: | |||
| Movement Pattern: Core | stabilization | Target: Transverse Abdominus | Synergist(s): Deltoid (Posterior), Obliques | |
| Exercise | 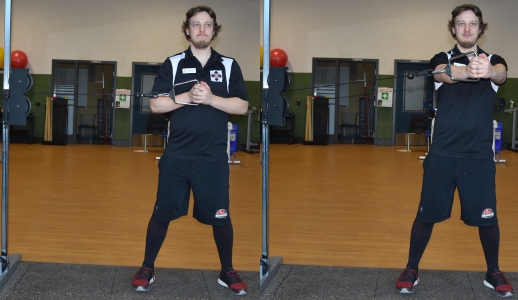 |
||
| Regressions: | Progressions: | ||
| Key Teaching Points | |||
|---|---|---|---|
Technique points Ensure client does not starting leaning away from the cable stack (thereby using their body weight to resist the load, as opposed to maintaining a neutral posture and forcing the core to remain engaged). A wider base of support makes this exercise easier and vice versa. |
|||
| Common Error(s): | Not engaging core | ||
| Spotting: | |||
| Movement Pattern: Hinge | Target: Gluteals | Synergist(s): Hamstrings, Spinal Erectors | |
| Exercise | 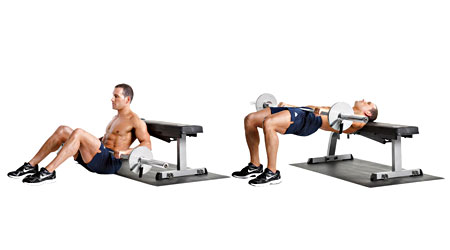 |
||
| Regressions: | Hip Bridge | Single Leg Bridge | Progressions: | |
| Key Teaching Points | |||
|---|---|---|---|
Variations:
|
|||
| Common Error(s): | Not engaging core | Inappropriate momentum | ||
| Spotting: | |||
| Movement Pattern: Single-joint | isolation | Target: Pec Major | Synergist(s): Deltoids (Anterior) | |
| Exercise | 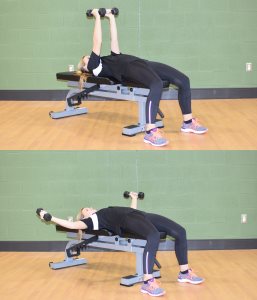 |
||
| Regressions: | Progressions: | ||
| Key Teaching Points | |||
|---|---|---|---|
|
|||
| Common Error(s): | Bouncing Weights | Inappropriate momentum | ||
| Spotting: | |||
| Movement Pattern: Press | horizontal | Target: Pec Major | Synergist(s): Deltoids (Anterior), Triceps | |
| Exercise | 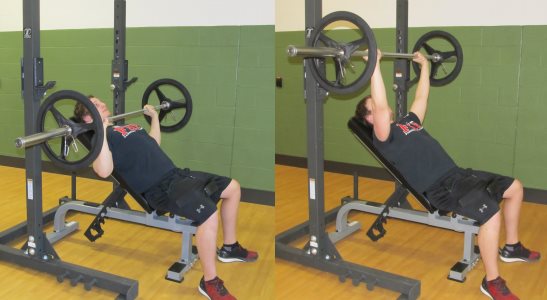 |
||
| Regressions: | Incline Push Up | Progressions: | |
| Key Teaching Points | |||
|---|---|---|---|
|
|||
| Common Error(s): | Inappropriate momentum | ||
| Spotting: | Barbell Bench Press | ||
| Movement Pattern: Press | horizontal | Target: Pec Major | Synergist(s): Deltoids (Anterior), Triceps | |
| Exercise | 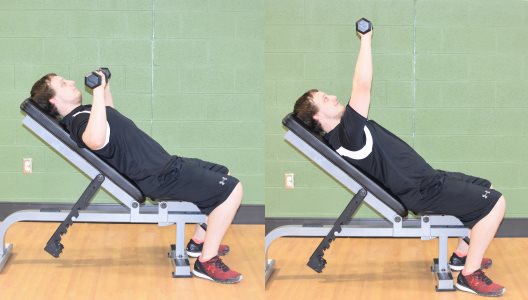 |
||
| Regressions: | Incline Push Up | Progressions: | |
| Key Teaching Points | |||
|---|---|---|---|
|
|||
| Common Error(s): | Bouncing Weights | ||
| Spotting: | Dumbbell Chest Press | ||
| Movement Pattern: Pull | horizontal | Target: Latissimus Dorsi | Synergist(s): Brachialis, Deltoid (Posterior), Rhomboids | |
| Exercise | 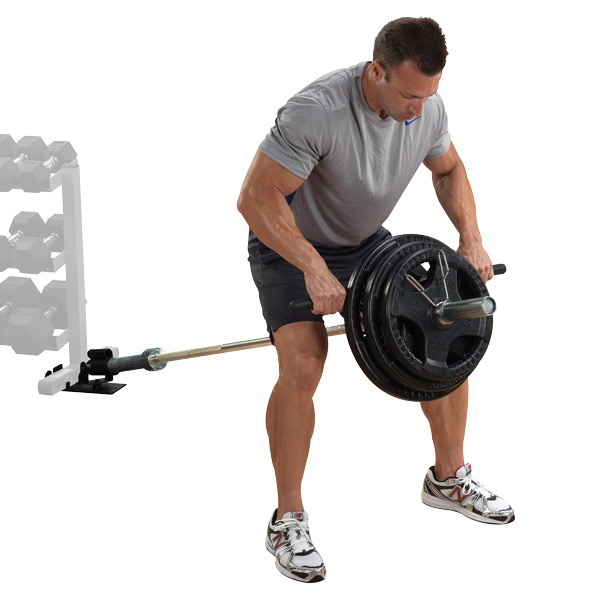 |
||
| Regressions: | Seated Row | Progressions: | Bent-Over Row |
| Key Teaching Points | |||
|---|---|---|---|
|
|||
| Common Error(s): | Arching the upper back | Not engaging core | Inappropriate momentum | ||
| Spotting: | |||
| Movement Pattern: Press | vertical | Target: Deltoids (Anterior) | Synergist(s): Obliques, Quadriceps, Triceps | |
| Exercise | 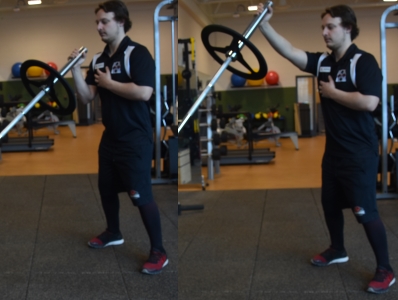 |
||
| Regressions: | Progressions: | ||
| Key Teaching Points | |||
|---|---|---|---|
|
Also known as the Grappler press.
In increase the focus on the upper body and core, start your athlete in a half-kneeling position.
To make this movement more applied to sport, you can:
|
|||
| Common Error(s): | Not engaging core | ||
| Spotting: | |||
| Movement Pattern: Core | rotation | Target: Obliques | Synergist(s): Deltoids (Anterior), Transverse Abdominus | |
| Exercise | 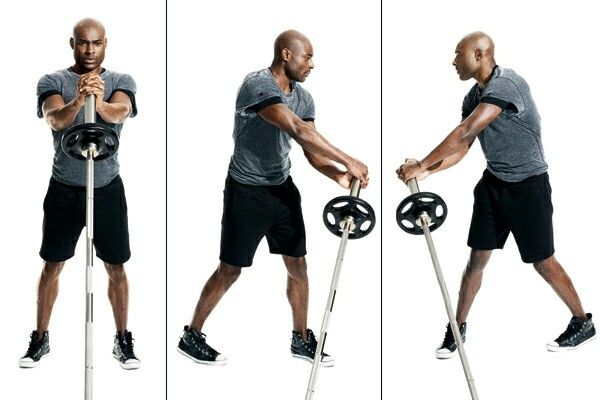 |
||
| Regressions: | Progressions: | ||
| Key Teaching Points | |||
|---|---|---|---|
|
|||
| Common Error(s): | Not engaging core | ||
| Spotting: | |||
| Movement Pattern: Single-joint | isolation | Target: Pec Major | Synergist(s): Deltoids (Anterior) | |
| Exercise | 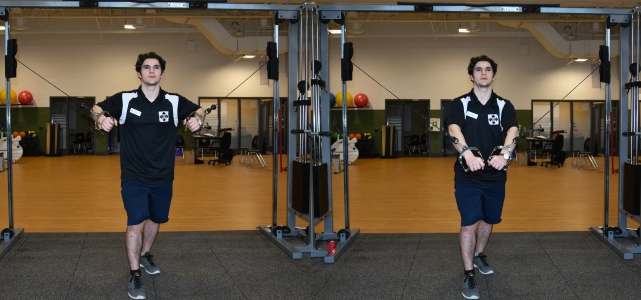 |
||
| Regressions: | Progressions: | ||
| Key Teaching Points | |||
|---|---|---|---|
|
|||
| Common Error(s): | Inappropriate momentum | Not engaging core | ||
| Spotting: | |||
| Movement Pattern: Core | stabilization | Target: Transverse Abdominus | Synergist(s): Rectus Abdominus, Spinal Erectors | |
| Exercise | 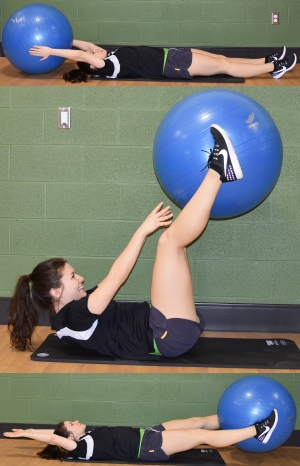 |
||
| Regressions: | Plank | Crunch | Progressions: | |
| Key Teaching Points | |||
|---|---|---|---|
|
1.) Start off by laying on your back with your arms and feet extended out with an exercise held in between your feet. 2.) Once in position slowly bring your upper and lower body together at the same time, squeezing with your core, and once reaching the top of the movement transfer the ball from your feet to your hands. 3.) After the transfer slowly move back to the original starting position with the ball still kept in your hands extended out and your legs kept straight out. 4.) Repeat for as many reps and sets as desired. |
|||
| Common Error(s): | Not engaging core | ||
| Spotting: | |||
| Movement Pattern: Core | extension | Target: Spinal Erectors | Synergist(s): Gluteals, Hamstrings | |
| Exercise | 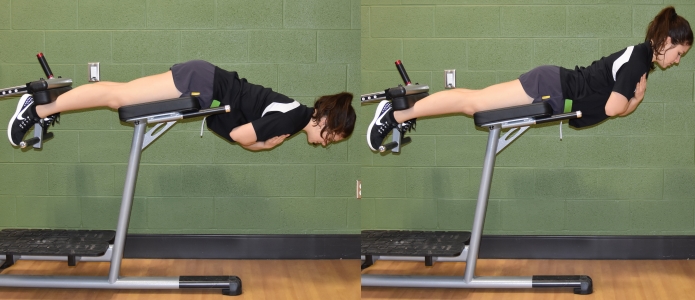 |
||
| Regressions: | Progressions: | Deadlift | |
| Key Teaching Points | |||
|---|---|---|---|
|
|||
| Common Error(s): | Not engaging core | Using Excessive Momentum | ||
| Spotting: | |||
| Movement Pattern: Core | flexion | Target: Rectus Abdominus | Synergist(s): Hip Flexors, Latissimus Dorsi, Transverse Abdominus | |
| Exercise | 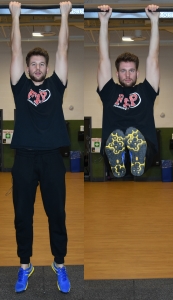 |
||
| Regressions: | Progressions: | ||
| Key Teaching Points | |||
|---|---|---|---|
Regression (Knee/Hip Raise on Parallel Bars)
|
|||
| Common Error(s): | Inappropriate momentum | Not engaging core | ||
| Spotting: | |||
| Movement Pattern: Core | extension | Target: Spinal Erectors | Synergist(s): Gluteals | |
| Exercise | 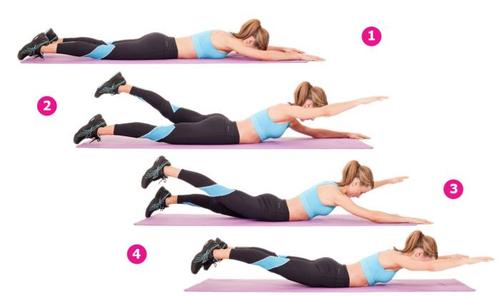 |
||
| Regressions: | Progressions: | ||
| Movement Pattern: Single-joint | isolation | Target: Hip Abductors | Synergist(s): | |
| Exercise | 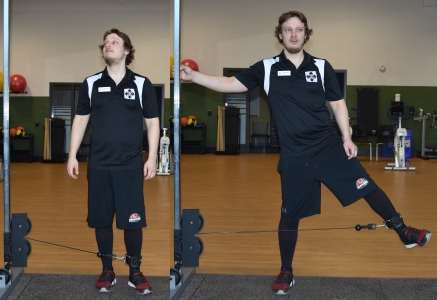 |
||
| Regressions: | Progressions: | ||
| Movement Pattern: Single-joint | isolation | Target: Hip Adductors | Synergist(s): | |
| Exercise | 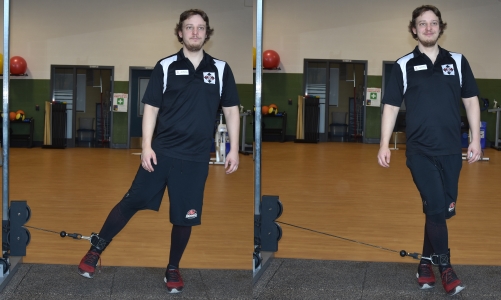 |
||
| Regressions: | Progressions: | ||
| Movement Pattern: Hinge | Target: Gluteals | Synergist(s): Spinal Erectors | |
| Exercise | 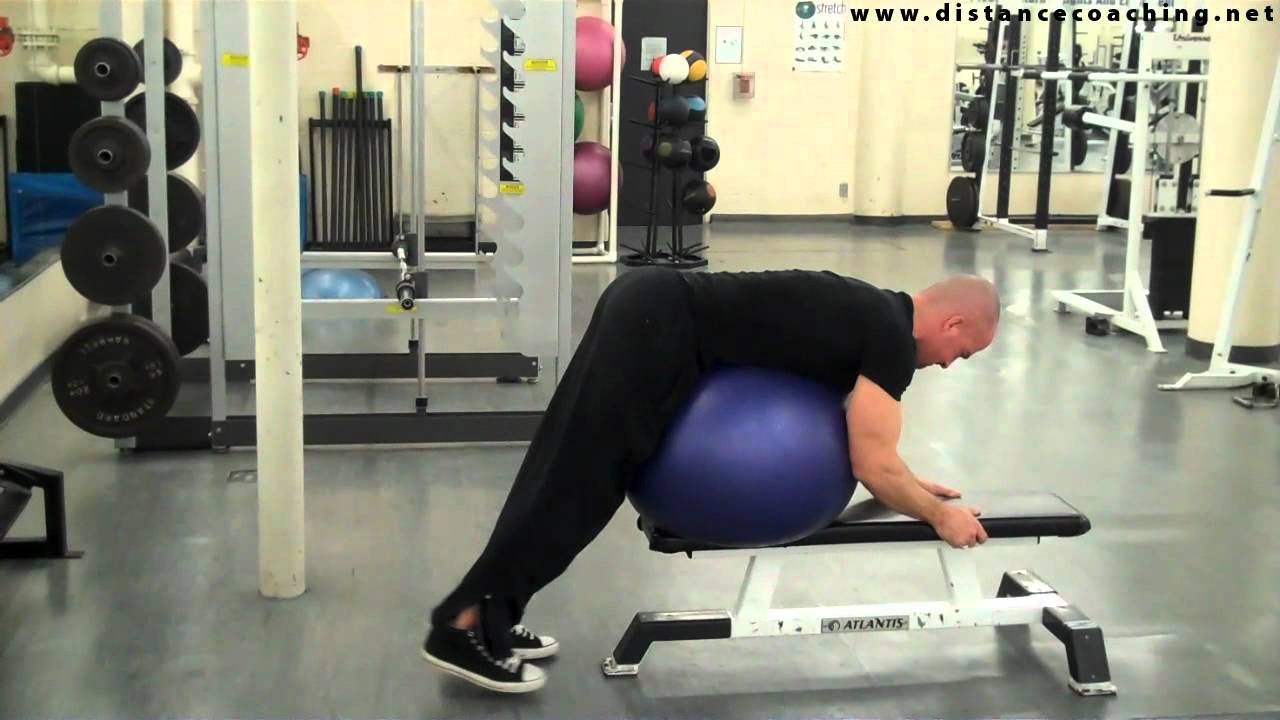 |
||
| Regressions: | Progressions: | ||
| Key Teaching Points | |||
|---|---|---|---|
|
|||
| Common Error(s): | Inappropriate momentum | ||
| Spotting: | |||
| Movement Pattern: Hinge | Target: Gluteals | Synergist(s): Hip Adductors, Spinal Erectors | |
| Exercise | 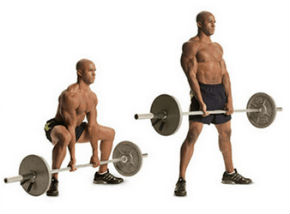 |
||
| Regressions: | Progressions: | ||
| Movement Pattern: Whole Body | Target: Quadriceps | Synergist(s): Deltoids (Anterior), Gluteals | |
| Exercise | 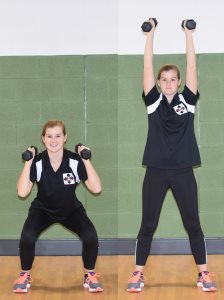 |
||
| Regressions: | Progressions: | ||
| Movement Pattern: Pull | vertical | Target: Deltoid (Medial) | Synergist(s): Trapezius | |
| Exercise | 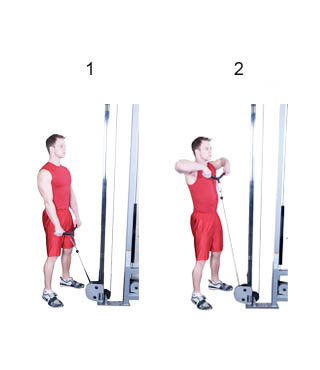 |
||
| Regressions: | Progressions: | ||
| Key Teaching Points | |||
|---|---|---|---|
|
The conventional, narrow-grip barbell upright row tends to be quite stressful on many client’s shoulders. A much better alternative is to use a cable, elastic or dumbbell which allows the wrists to adjust to a client’s body shape, as well as limiting how high you bring the weight.
Caution: Don’t be too quick to increase to heavy loading with this exercise (as it is more stressful on the shoulders). |
|||
| Common Error(s): | Using Excessive Momentum | Forward Head Posture | ||
| Spotting: | |||
| Movement Pattern: Core | rotation | Target: Obliques | Synergist(s): Deltoid (Posterior), Transverse Abdominus | |
| Exercise | 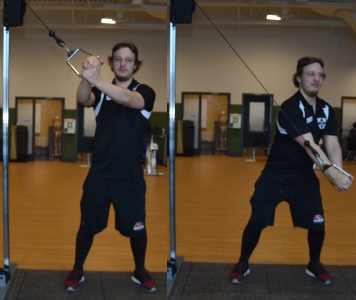 |
||
| Regressions: | Progressions: | ||
| Key Teaching Points | |||
|---|---|---|---|
|
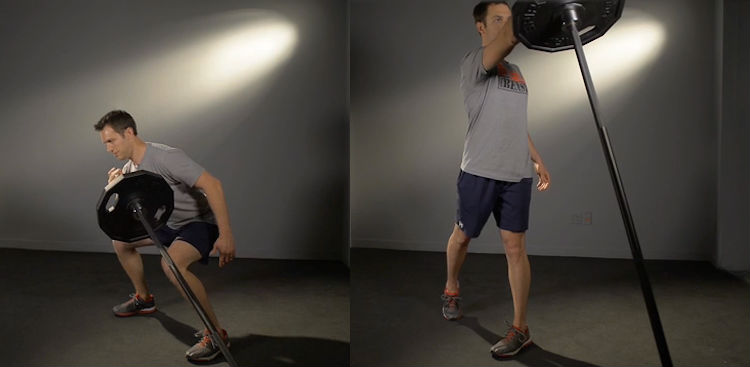
This exercise can be done half kneeling, tall kneeling, or standing (split or straight stance). High-to Low Set up Grasp handle or rope from shoulder height cable pulley (or slightly higher). Feet should be positioned slightly wider than shoulder width, with a slight bend in the knees. Turn towards cable stack until outside arm is nearly extended straight. Execution Keeping outside arm straight and core engaged, pull handle/rope diagonally downward around shoulders by rotating torso and gradually lowering arms downward. In order to allow rotation to happen, pivot on your back foot (foot closest to cable stack), allowing hips to turn. Bring the handle down towards hip height, which should require a slight bend of the knees. Slowly return the handle/rope to original position and repeat for desired number of repetitions. Continue with opposite side. Low-to-High Set the cable stack to a low position near the bottom of the stack. Starting with feet a little wider than shoulder width and knees slightly bent, grasp handle and extend your outside arm. Execution Keeping outside arm straight and core engaged, pull handle/rope diagonally upwards around your body by rotating torso, ensuring you are actively involving the muscles of the legs and hips. In order to allow rotation to happen, pivot on your back foot (foot closest to cable stack), allowing hips to turn. Keep your arms extended throughout the motion (particularly the outside arm), bring the handle up to shoulder-height. Slowly return the handle/rope to original position (by maintaining a wide arc) and repeat for desired number of repetitions. Continue with opposite side |
|||
| Common Error(s): | Not engaging core | ||
| Spotting: | |||
| Movement Pattern: Lunge | Target: Quadriceps | Synergist(s): Gluteals, Hip Abductors | |
| Exercise | 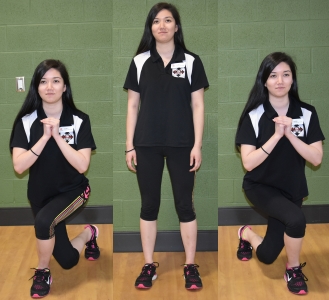 |
||
| Regressions: | Progressions: | ||
| Key Teaching Points | |||
|---|---|---|---|
| Common Error(s): | |||
| Spotting: | |||
| Movement Pattern: Lunge | Target: Quadriceps | Synergist(s): Gluteals, Hip Adductors | |
| Exercise | 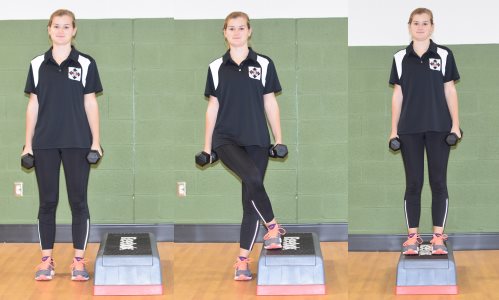 |
||
| Regressions: | Progressions: | ||
| Key Teaching Points | |||
|---|---|---|---|
| Common Error(s): | |||
| Spotting: | |||
| Movement Pattern: Lunge | Target: Hip Abductors | Synergist(s): Gluteals, Quadriceps | |
| Exercise | 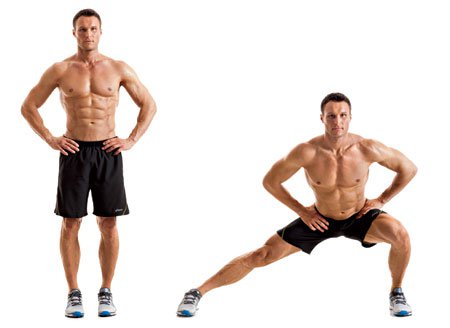 |
||
| Regressions: | TRX Lateral Lunge | Progressions: | |
| Movement Pattern: Single-joint | isolation | Target: Trapezius | Synergist(s): | |
| Exercise | 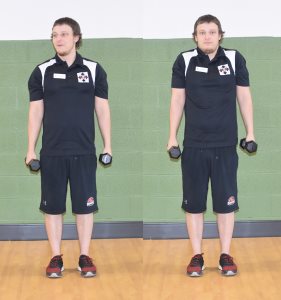 |
||
| Regressions: | Progressions: | ||
| Movement Pattern: Single-joint | isolation | Target: Gastrocnemius | Synergist(s): Soleus | |
| Exercise |  |
||
| Regressions: | Progressions: | ||
| Movement Pattern: Single-joint | isolation | Target: Soleus | Synergist(s): | |
| Exercise | 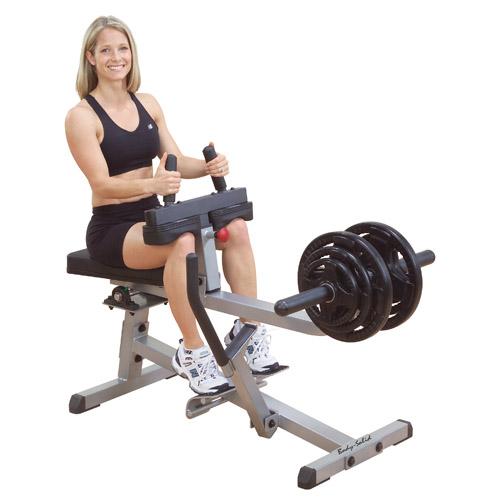 |
||
| Regressions: | Progressions: | Standing Calf Raise | |
| Movement Pattern: Single-joint | isolation | Target: Gastrocnemius | Synergist(s): Soleus | |
| Exercise | 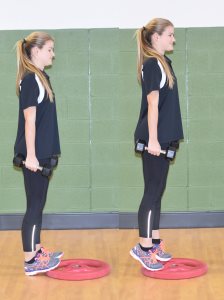 |
||
| Regressions: | Progressions: | ||
| Movement Pattern: Hinge | Target: Hamstrings | Synergist(s): Gastrocnemius, Hip Abductors | |
| Exercise | 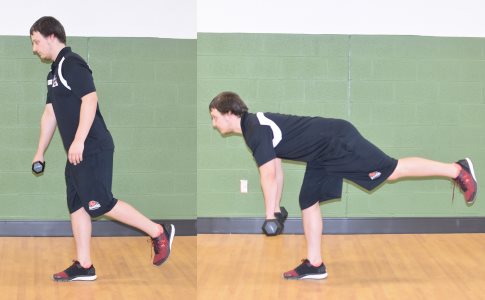 |
||
| Regressions: | Single Leg Bridge | Progressions: | Trap Bar Deadlift |
| Key Teaching Points | |||
|---|---|---|---|
|
Consider a self spotting option by placing dowel (wall, chair) in hand opposite to leg on the ground. Maintain an upright and neutral spine and head. Lower like a ‘bobbing bird’ keeping the back leg, spine and head in a straight line. Lower until you feel tension in the posterior structures of the leg. Slowly come back up by engaging the gluts and hamstrings and continuing to maintain a straight line as described above. |
|||
| Common Error(s): | Torso collapses forward | Rounded lower back | Foot/ankle collapse | ||
| Spotting: | Instability training | ||
| Movement Pattern: Press | horizontal | Target: Pec Major | Synergist(s): Deltoids (Anterior), Triceps | |
| Exercise | 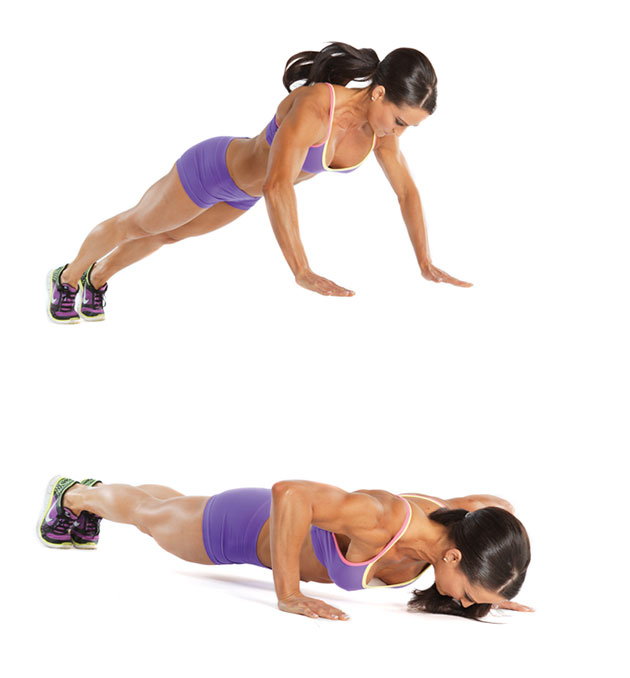 |
||
| Regressions: | Progressions: | ||
| Key Teaching Points | |||
|---|---|---|---|
|
Preparation
Execution
Advanced variations
|
|||
| Common Error(s): | Inappropriate momentum | Forward Head Posture | ||
| Spotting: | |||
| Movement Pattern: Lower Body | Target: Quadriceps | Synergist(s): Hamstrings, Hip Flexors | |
| Exercise | 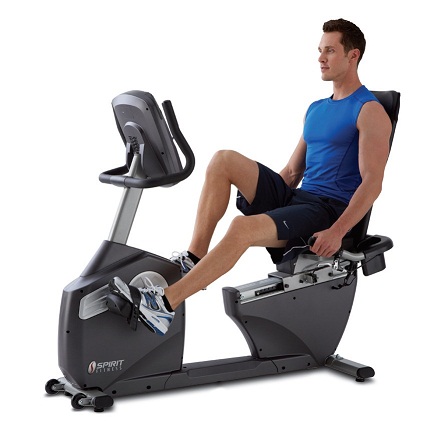 |
||
| Regressions: | Progressions: | ||
| Key Teaching Points | |||
|---|---|---|---|
| Common Error(s): | |||
| Spotting: | |||
| Movement Pattern: Lower Body | Target: Quadriceps | Synergist(s): Gluteals, Hamstrings | |
| Exercise | 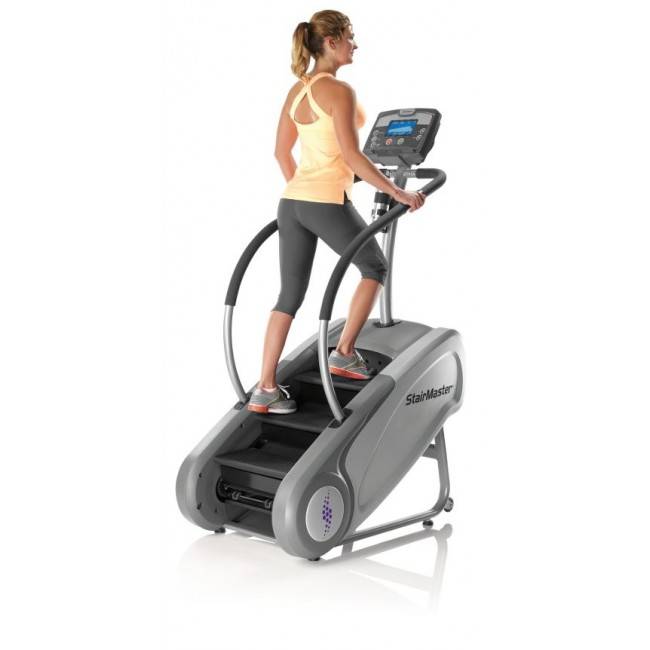 |
||
| Regressions: | Progressions: | ||
| Key Teaching Points | |||
|---|---|---|---|
|
same as treadmill but client has to climb stairs on different speeds. |
|||
| Common Error(s): | |||
| Spotting: | |||
| Movement Pattern: Press | horizontal | Target: Pec Major | Synergist(s): Deltoids (Anterior), Triceps | |
| Exercise | 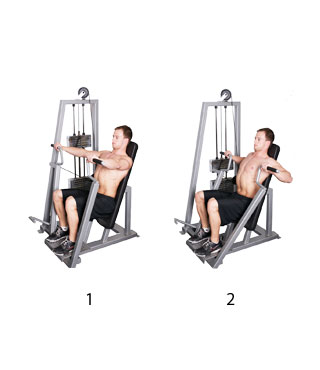 |
||
| Regressions: | Progressions: | ||
| Movement Pattern: Single-joint | isolation | Target: Hip Adductors | Synergist(s): | |
| Exercise | 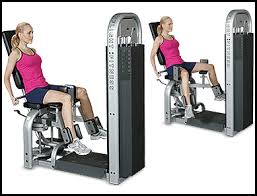 |
||
| Regressions: | Progressions: | ||
| Key Teaching Points | |||
|---|---|---|---|
| Common Error(s): | |||
| Spotting: | |||
| Movement Pattern: Squat | Target: Quadriceps | Synergist(s): Gluteals, Hamstrings | |
| Exercise |  |
||
| Regressions: | Goblet Squat | Progressions: | Back Squat |
| Key Teaching Points | |||
|---|---|---|---|
|
|||
| Common Error(s): | Not engaging core | ||
| Spotting: | |||
| Movement Pattern: Single-joint | isolation | Target: Biceps | Synergist(s): Brachialis, Brachioradialis | |
| Exercise | 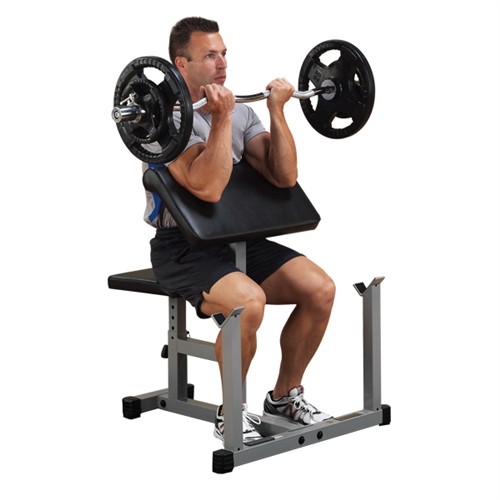 |
||
| Regressions: | Alternating Biceps Curls | Progressions: | |
| Key Teaching Points | |||
|---|---|---|---|
|
|||
| Common Error(s): | Inappropriate momentum | ||
| Spotting: | |||
| Movement Pattern: Whole Body | Target: Quadriceps | Synergist(s): Hamstrings, Transverse Abdominus, Trapezius | |
| Exercise | 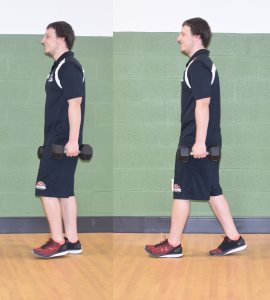 |
||
| Regressions: | Progressions: | Bottoms Up Carry | |
| Key Teaching Points | |||
|---|---|---|---|
Variations
|
|||
| Common Error(s): | Not engaging core | ||
| Spotting: | |||
| Movement Pattern: Hinge, Lower Body | Target: Hamstrings | Synergist(s): Gastrocnemius, Gluteals | |
| Exercise | 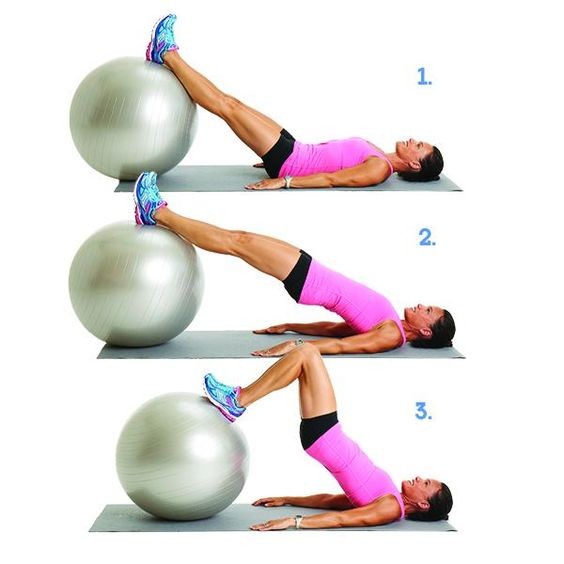 |
||
| Regressions: | Lying Leg Curl | Seated Leg Curl | Progressions: | |
| Key Teaching Points | |||
|---|---|---|---|
|
1. Lie supine on floor with lower legs on exercise ball, arms extended out to sides. |
|||
| Common Error(s): | Using Excessive Momentum | Not engaging core | ||
| Spotting: | |||
| Movement Pattern: Upper Body | Target: Deltoids (Anterior) | Synergist(s): Pec Major, Triceps | |
| Exercise |  |
||
| Regressions: | Push Up | Progressions: | Bench Press |
| Key Teaching Points | |||
|---|---|---|---|
|
|||
| Common Error(s): | Inappropriate momentum | ||
| Spotting: | |||
| Movement Pattern: Core | stabilization | Target: Transverse Abdominus | Synergist(s): Gluteals, Spinal Erectors | |
| Exercise |  |
||
| Regressions: | Plank | Progressions: | |
| Key Teaching Points | |||
|---|---|---|---|
|
|||
| Common Error(s): | Not engaging core | ||
| Spotting: | |||
| Movement Pattern: Core | stabilization | Target: Transverse Abdominus | Synergist(s): Deltoid (Posterior), Spinal Erectors | |
| Exercise | 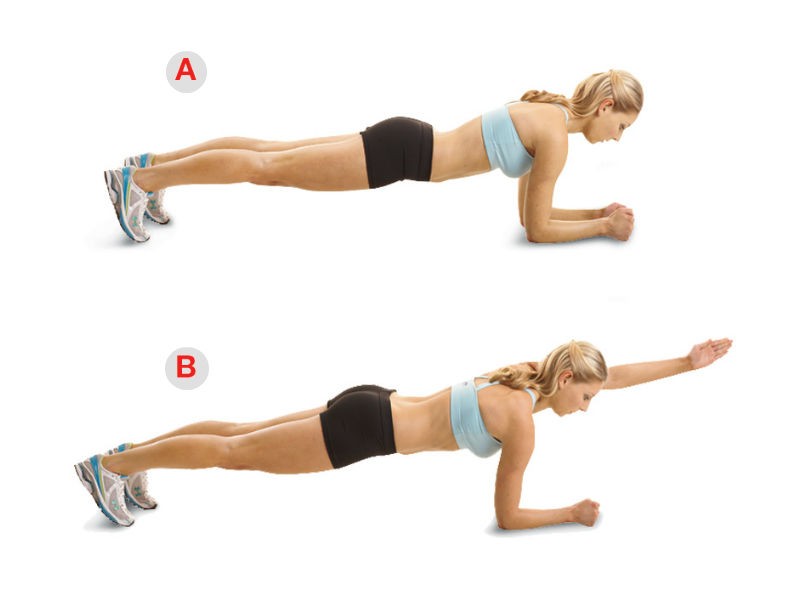 |
||
| Regressions: | Progressions: | ||
| Key Teaching Points | |||
|---|---|---|---|
|
|||
| Common Error(s): | Not engaging core | Arching the upper back | ||
| Spotting: | |||
| Movement Pattern: Squat | Target: Quadriceps | Synergist(s): Gluteals, Hamstrings | |
| Exercise | 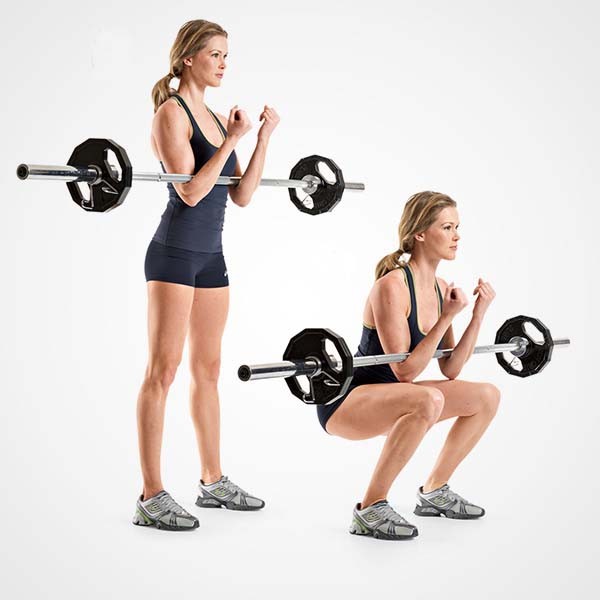 |
||
| Regressions: | Progressions: | ||
| Movement Pattern: Squat | Target: Quadriceps | Synergist(s): Gluteals, Hamstrings | |
| Exercise |  |
||
| Regressions: | Progressions: | ||
| Movement Pattern: Whole Body | Target: Deltoids (Anterior) | Synergist(s): Latissimus Dorsi, Rectus Abdominus, Spinal Erectors, Triceps | |
| Exercise |  |
||
| Regressions: | Progressions: | ||
| Movement Pattern: Lower Body | Target: Quadriceps | Synergist(s): Gastrocnemius, Soleus | |
| Exercise |  |
||
| Regressions: | Progressions: | ||
| Movement Pattern: Core | stabilization | Target: Transverse Abdominus | Synergist(s): Hip Flexors, Rectus Abdominus | |
| Exercise | 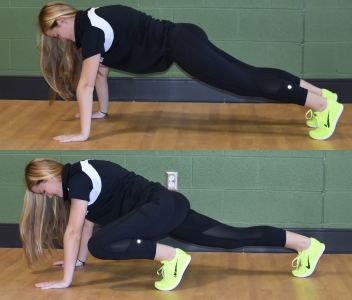 |
||
| Regressions: | Progressions: | BOSU Mountain Climber | |
| Key Teaching Points | |||
|---|---|---|---|
|
|||
| Common Error(s): | Not engaging core | ||
| Spotting: | |||
| Movement Pattern: Core | flexion | Target: Quadratus Lumborum | Synergist(s): Obliques, Transverse Abdominus | |
| Exercise |  |
||
| Regressions: | Progressions: | ||
| Key Teaching Points | |||
|---|---|---|---|
| Common Error(s): | |||
| Spotting: | |||
| Movement Pattern: Whole Body | Target: Quadriceps | Synergist(s): Gastrocnemius, Spinal Erectors, Trapezius | |
| Exercise | 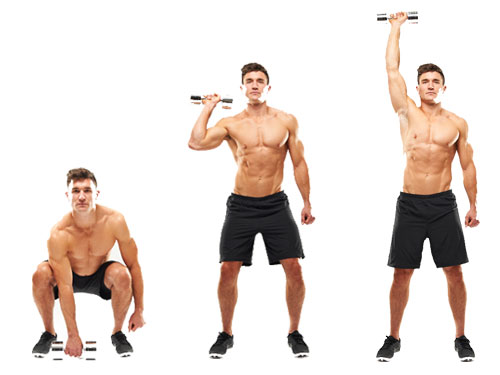 |
||
| Regressions: | Progressions: | Power Clean | |
| Key Teaching Points | |||
|---|---|---|---|
N.B. If you prefer to do all your reps with a single-arm, start with your non-dominant arm first. |
|||
| Common Error(s): | Not engaging core | ||
| Spotting: | |||
| Movement Pattern: Hinge | Target: Gluteals | Synergist(s): Deltoid (Posterior), Hamstrings, Spinal Erectors | |
| Exercise | 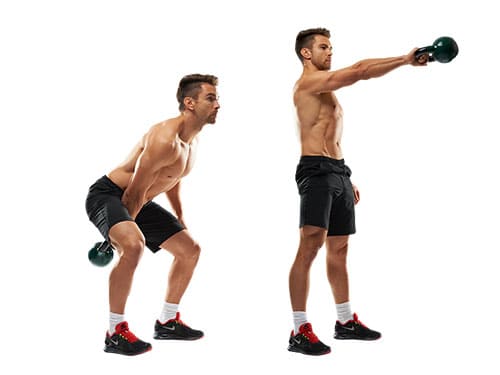 |
||
| Regressions: | Progressions: | ||
| Movement Pattern: Whole Body | Target: Transverse Abdominus | Synergist(s): Deltoids (Anterior), Quadriceps, Quadratus Lumborum | |
| Exercise | 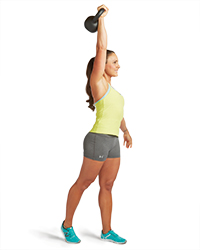 |
||
| Regressions: | Progressions: | ||
| Key Teaching Points | |||
|---|---|---|---|
|
|||
| Common Error(s): | Not engaging core | ||
| Spotting: | |||
| Movement Pattern: Core | rotation | Target: Obliques | Synergist(s): Deltoid (Posterior), Hip Flexors, Quadratus Lumborum, Transverse Abdominus | |
| Exercise |  |
||
| Regressions: | TRX Windmill | Progressions: | |
| Key Teaching Points | |||
|---|---|---|---|
|
|||
| Common Error(s): | Not engaging core | ||
| Spotting: | |||
| Movement Pattern: Hinge | Target: Spinal Erectors | Synergist(s): Gluteals, Latissimus Dorsi, Wrist Flexor, Wrist Extensor | |
| Exercise | 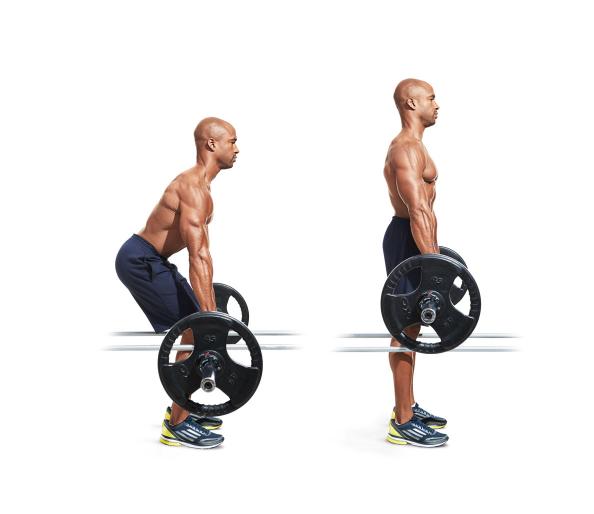 |
||
| Regressions: | Progressions: | ||
| Key Teaching Points | |||
|---|---|---|---|
| Common Error(s): | |||
| Spotting: | |||
| Movement Pattern: Hinge | Target: Spinal Erectors | Synergist(s): Gluteals, Quadriceps, Wrist Flexor, Wrist Extensor | |
| Exercise | 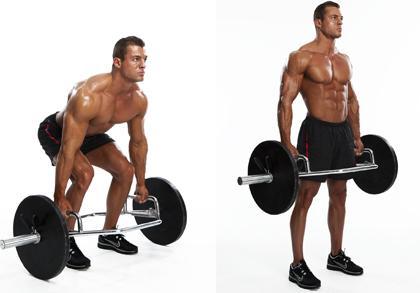 |
||
| Regressions: | Pull Through | Progressions: | Deadlift |
| Key Teaching Points | |||
|---|---|---|---|
|
|||
| Common Error(s): | Not engaging core | Rounded lower back | ||
| Spotting: | |||
| Movement Pattern: Lower Body | Target: Hip Abductors | Synergist(s): IT Band | |
| Exercise | 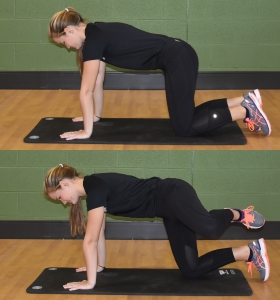 |
||
| Regressions: | Progressions: | ||
| Key Teaching Points | |||
|---|---|---|---|
Perform this slowly for a number of repetitions, and repeat on the other side. |
|||
| Common Error(s): | Not engaging core | ||
| Spotting: | |||
| Movement Pattern: Whole Body | Target: Hamstrings | Synergist(s): | |
| Exercise |  |
||
| Regressions: | Progressions: | ||
| Key Teaching Points | |||
|---|---|---|---|
|
|||
| Common Error(s): | Not engaging core | Sagging lower back | ||
| Spotting: | |||
| Movement Pattern: Whole Body | Target: Hip Adductors | Synergist(s): | |
| Exercise |  |
||
| Regressions: | Progressions: | ||
| Movement Pattern: Upper Body | Target: Deltoid (Posterior) | Synergist(s): Rhomboids, Rotator Cuff | |
| Exercise | 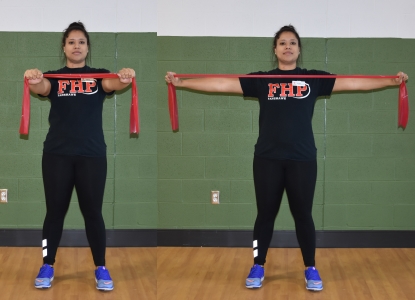 |
||
| Regressions: | Progressions: | Face Pull | |
| Key Teaching Points | |||
|---|---|---|---|
|
|||
| Common Error(s): | Forward Head Posture | Using Excessive Momentum | ||
| Spotting: | |||
| Movement Pattern: Pull | horizontal | Target: Rhomboids | Synergist(s): Deltoids (Anterior), Trapezius | |
| Exercise |  |
||
| Regressions: | Progressions: | ||
| Key Teaching Points | |||
|---|---|---|---|
|
|||
| Common Error(s): | Arching the upper back | ||
| Spotting: | |||
| Movement Pattern: Squat | Target: Quadriceps | Synergist(s): Gastrocnemius, Gluteals | |
| Exercise |  |
||
| Regressions: | Goblet Squat | Box Squat | Progressions: | Front Squat |
| Key Teaching Points | |||
|---|---|---|---|
This variation can be great for taller lifter, or novice lifters who are just learning proper squatting mechanics. |
|||
| Common Error(s): | Not engaging core | Arching the upper back | ||
| Spotting: | |||
| Movement Pattern: Press | vertical | Target: Deltoids (Anterior) | Synergist(s): Obliques, Transverse Abdominus, Triceps | |
| Exercise |  |
||
| Regressions: | Progressions: | ||
| Movement Pattern: Lower Body | Target: Quadriceps | Synergist(s): | |
| Exercise | 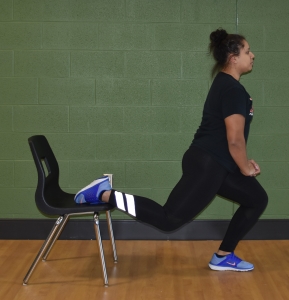 |
||
| Regressions: | Progressions: | ||
| Movement Pattern: Lower Body | Target: Quadriceps | Synergist(s): | |
| Exercise | 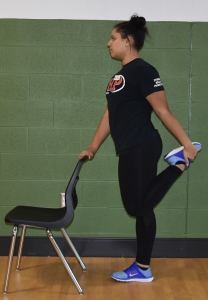 |
||
| Regressions: | Progressions: | ||
| Movement Pattern: Lower Body | Target: Gastrocnemius | Synergist(s): | |
| Exercise | 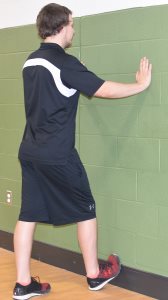 |
||
| Regressions: | Progressions: | ||
| Movement Pattern: Lower Body | Target: Hamstrings | Synergist(s): | |
| Exercise | 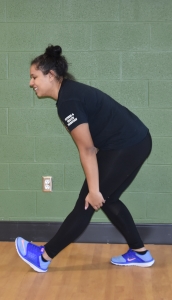 |
||
| Regressions: | Progressions: | ||
| Key Teaching Points | |||
|---|---|---|---|
|
|||
| Common Error(s): | |||
| Spotting: | |||
| Movement Pattern: Upper Body | Target: Latissimus Dorsi | Synergist(s): | |
| Exercise | 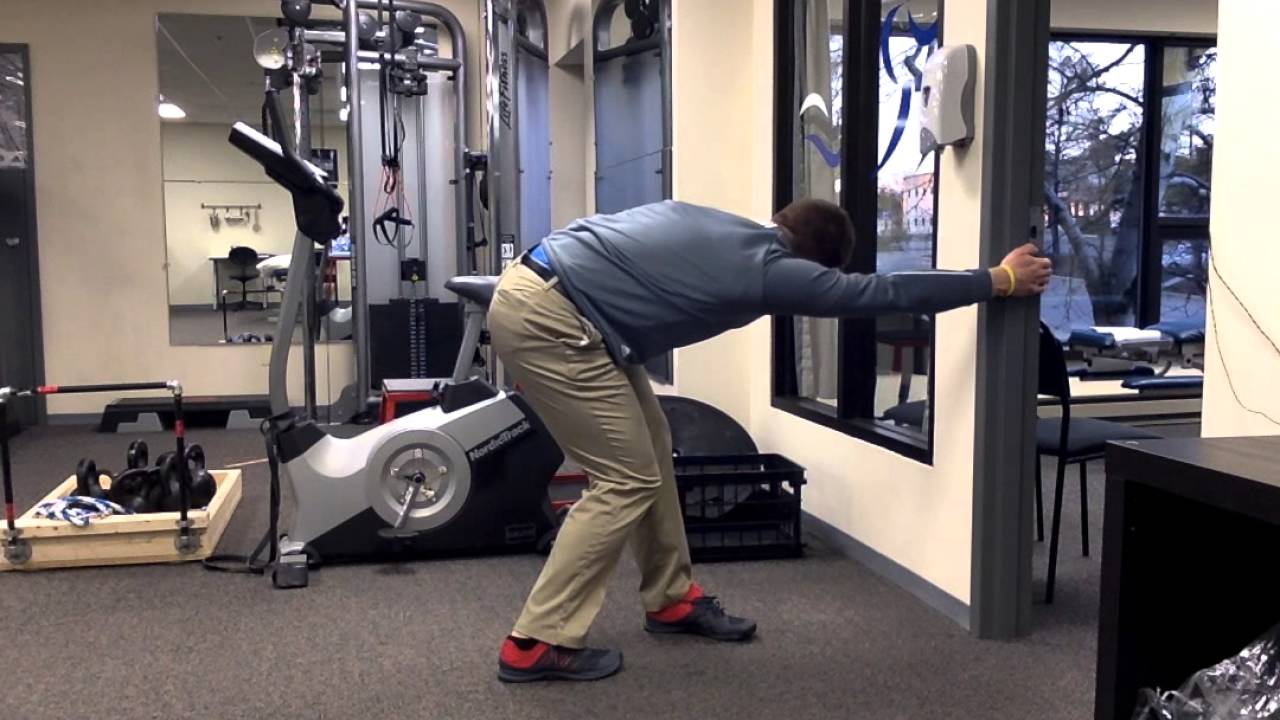 |
||
| Regressions: | Progressions: | ||
| Movement Pattern: Upper Body | Target: Pec Major | Synergist(s): | |
| Exercise |  |
||
| Regressions: | Progressions: | ||
| Movement Pattern: Core | stabilization | Target: Spinal Erectors | Synergist(s): | |
| Exercise | 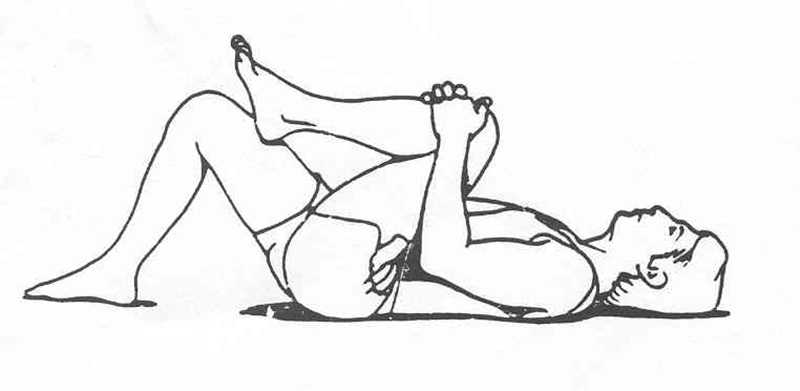 |
||
| Regressions: | Progressions: | ||
| Movement Pattern: Core | stabilization | Target: Rectus Abdominus | Synergist(s): | |
| Exercise |  |
||
| Regressions: | Progressions: | ||
| Movement Pattern: Lower Body | Target: Hip Flexors | Synergist(s): | |
| Exercise | 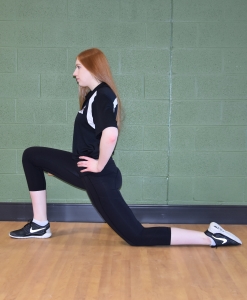 |
||
| Regressions: | Progressions: | ||
| Key Teaching Points | |||
|---|---|---|---|
| Common Error(s): | |||
| Spotting: | |||
| Movement Pattern: Pull | horizontal | Target: Latissimus Dorsi | Synergist(s): Biceps, Brachialis, Rhomboids | |
| Exercise | 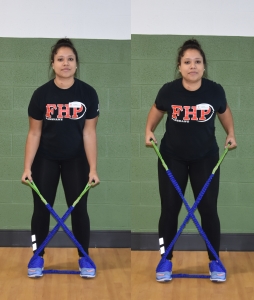 |
||
| Regressions: | Progressions: | Bent-Over Row | Inverted Row | |
| Key Teaching Points | |||
|---|---|---|---|
|
Feet shoulder width apart. |
|||
| Common Error(s): | Rounded shoulders | Rounded lower back | Forward Head Posture | ||
| Spotting: | Band/Tubing Anchoring | ||
| Movement Pattern: Pull | horizontal | Target: Deltoid (Posterior) | Synergist(s): Rhomboids, Trapezius, Triceps | |
| Exercise | 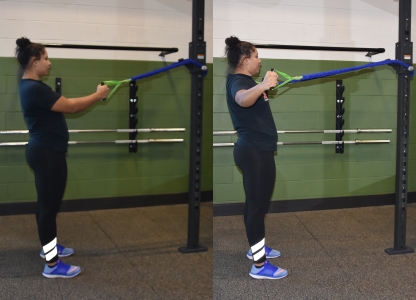 |
||
| Regressions: | Progressions: | Reverse Pec Deck | |
| Key Teaching Points | |||
|---|---|---|---|
|
Anchor band to secure structure at chest height. Feet shoulder width apart, knees slightly flexed, and core engage. Keep arms extended but slightly flexed. Engage rear deltoid as your move hands backwards. Careful to keep head and spine neutral. Resist forward heal movement. Stay balanced. |
|||
| Common Error(s): | Forward Head Posture | Not engaging core | ||
| Spotting: | Band/Tubing Anchoring | ||
| Movement Pattern: Press | horizontal | Target: Pec Major | Synergist(s): Deltoids (Anterior), Triceps | |
| Exercise |  |
||
| Regressions: | Progressions: | Chest Press | Push Up | |
| Key Teaching Points | |||
|---|---|---|---|
|
Whether seated or standing ensure a stable base and neutral spine. Resist the tendency to lurch the head forward. Remain upright and neutral. Relax the shoulders. Do not round or shrug shoulders. Grip should be neutral and comfortable. Elbow position near the body yet comfortable. Engage through the chest and triceps and push forward in a controlled fashion as described in the chest press exercise. The core must remain engaged to ensure upright posture is maintained. |
|||
| Common Error(s): | Rounded shoulders | Forward Head Posture | ||
| Spotting: | Band/Tubing Anchoring | ||
| Movement Pattern: Press | horizontal | Target: Pec Major | Synergist(s): Deltoids (Anterior) | |
| Exercise | 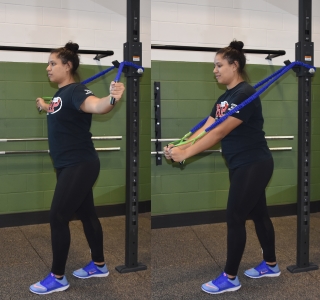 |
||
| Regressions: | Progressions: | Fly | |
| Key Teaching Points | |||
|---|---|---|---|
|
|||
| Common Error(s): | Forward Head Posture | Not engaging core | Rounded shoulders | ||
| Spotting: | Band/Tubing Anchoring | ||
| Movement Pattern: Pull | vertical | Target: Latissimus Dorsi | Synergist(s): Biceps | |
| Exercise | 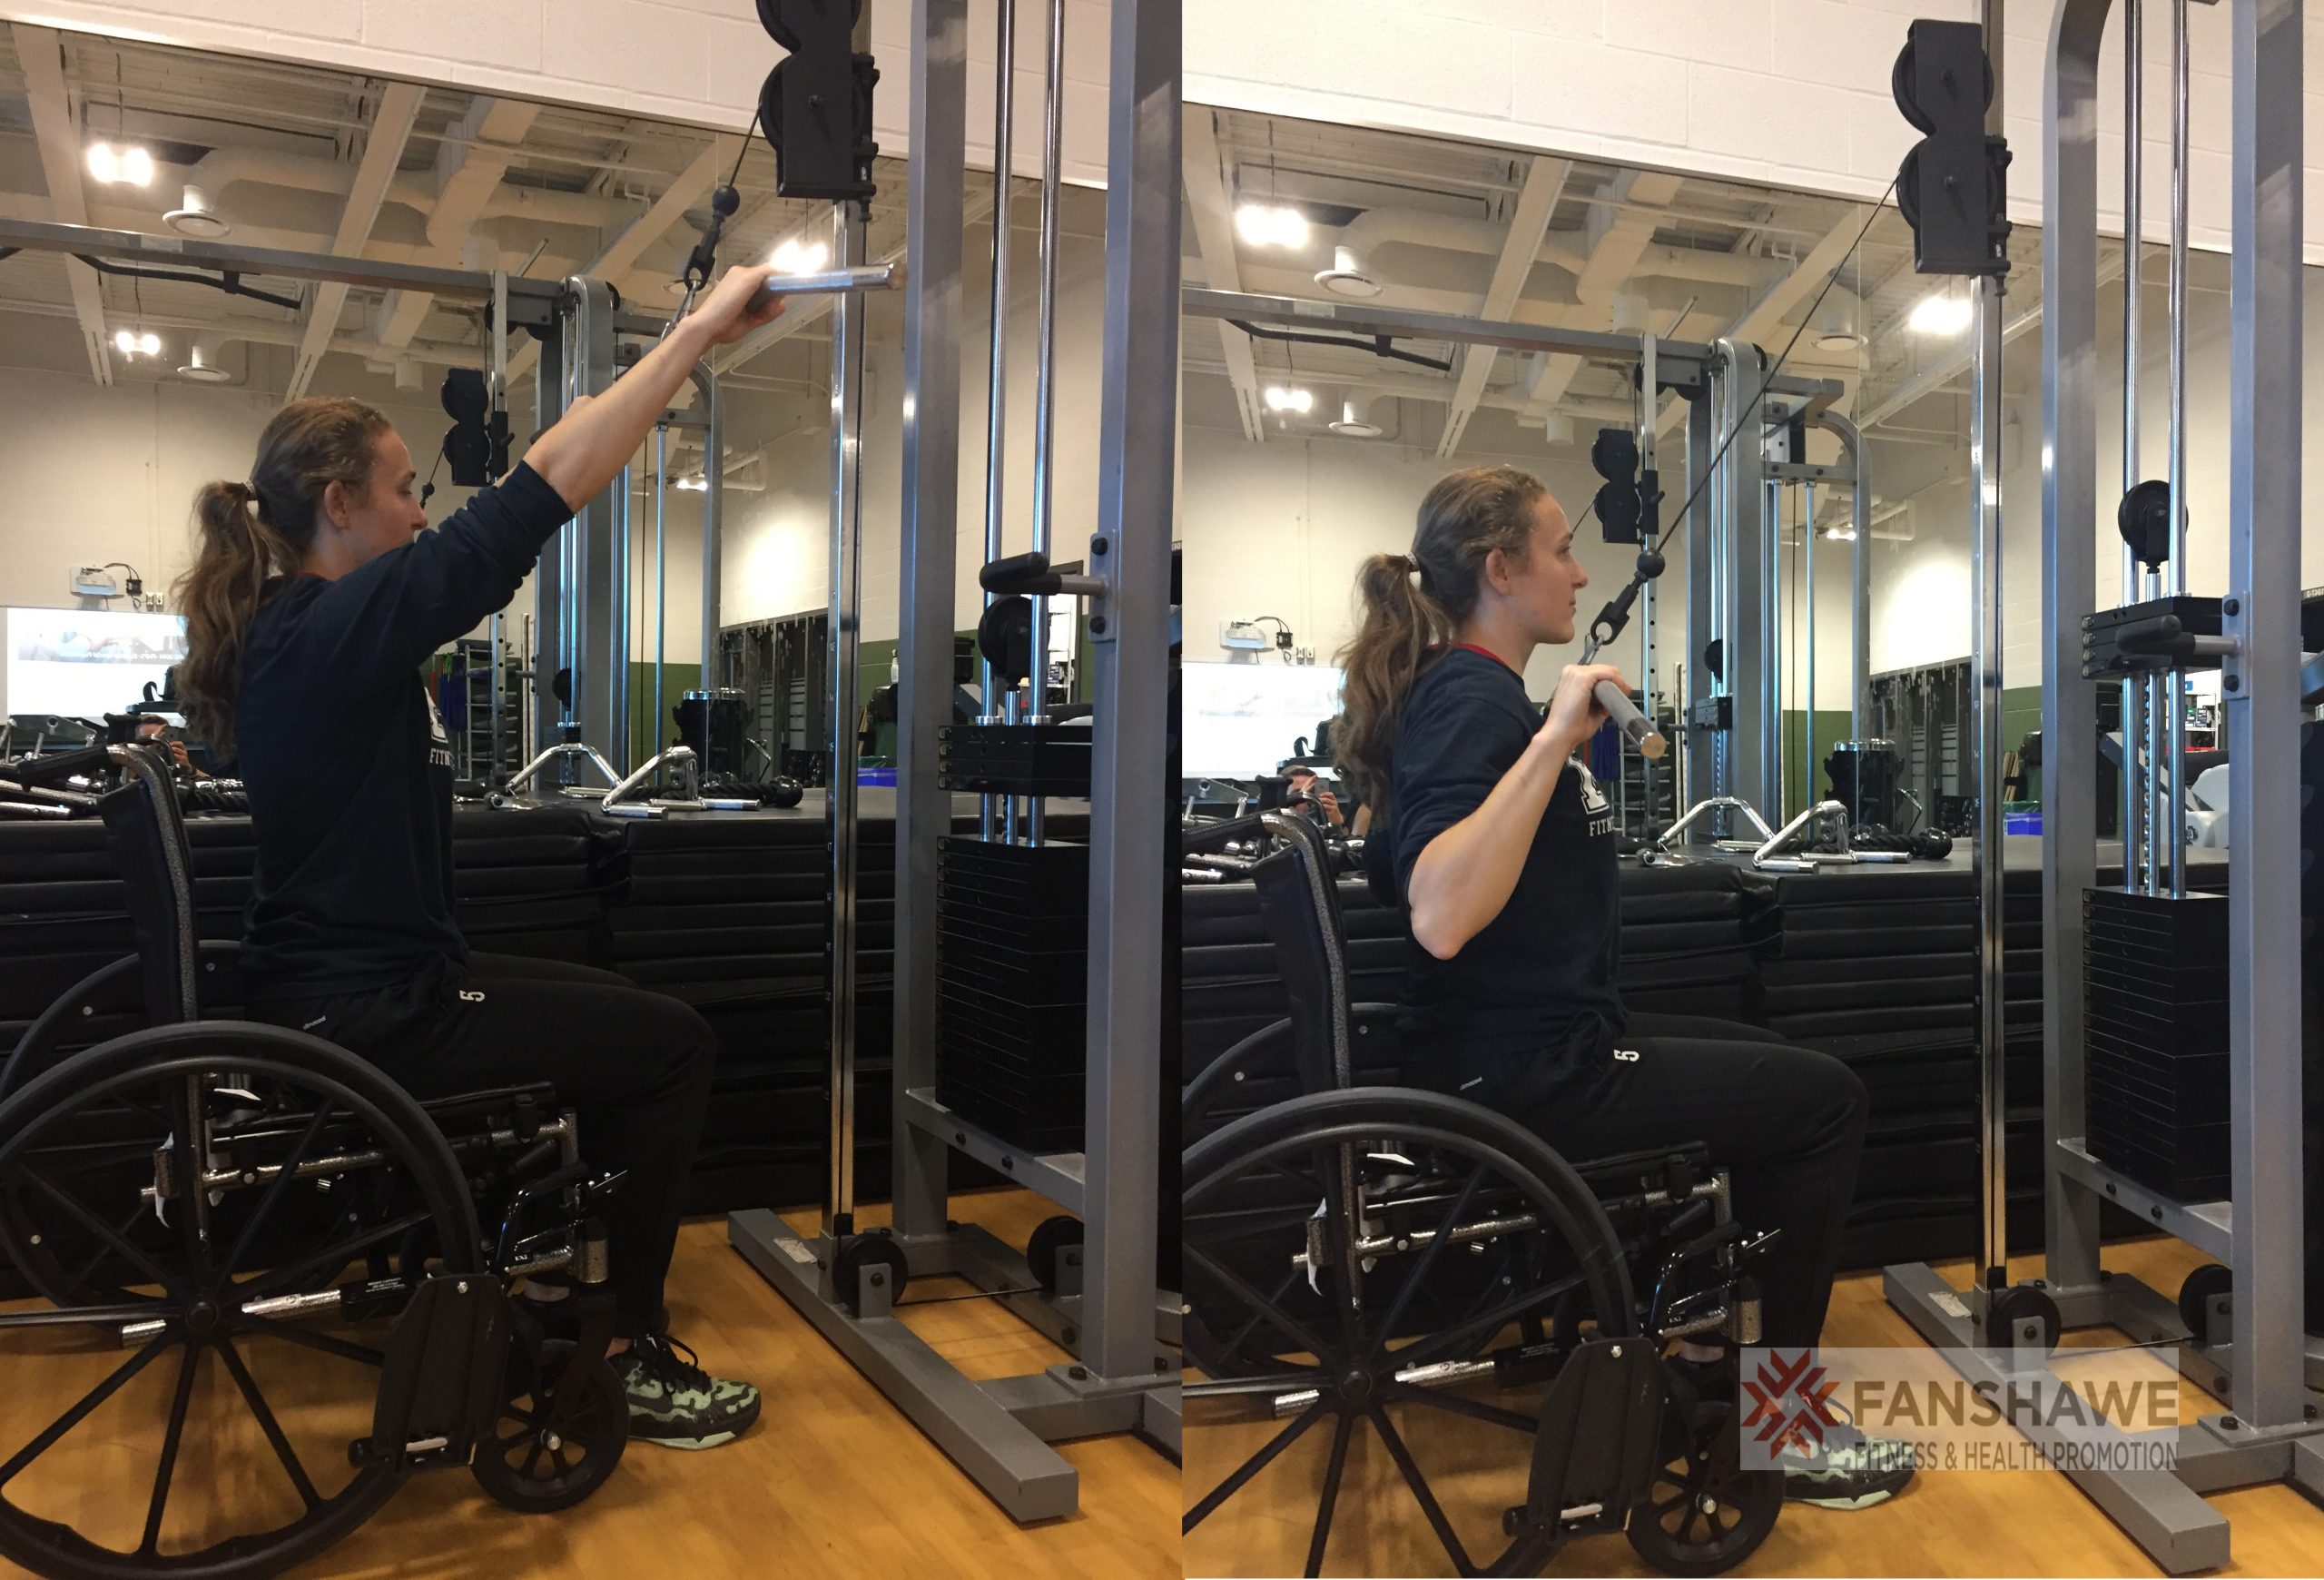 |
||
| Regressions: | Progressions: | Lat Pulldown | Inverted Row | |
| Key Teaching Points | |||
|---|---|---|---|
|
|||
| Common Error(s): | Inappropriate momentum | Forward Head Posture | ||
| Spotting: | Band/Tubing Anchoring | ||
| Movement Pattern: Single-joint | isolation | Target: Biceps | Synergist(s): | |
| Exercise | 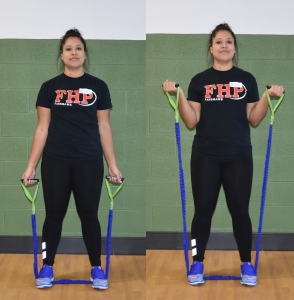 |
||
| Regressions: | Progressions: | Biceps Curl | Concentration Curl | |
| Key Teaching Points | |||
|---|---|---|---|
|
Feet shoulder width apart. Band under arch/groove of foot. Even foot pressure to keep band secure. Upright strong and neutral posture. Palms up. Hands at side in comfortable position. Elbows tight to trunk. Engage upward motion with biceps contraction through full range. |
|||
| Common Error(s): | Rounded shoulders | Inappropriate momentum | ||
| Spotting: | Band/Tubing Anchoring | ||
| Movement Pattern: Single-joint | isolation | Target: Triceps | Synergist(s): | |
| Exercise | 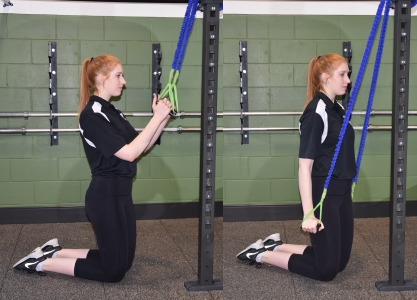 |
||
| Regressions: | Progressions: | Skullcrusher | Triceps Extension | Pushdown | |
| Key Teaching Points | ||||||
|---|---|---|---|---|---|---|
|
||||||
| Common Error(s): | Inappropriate momentum | Not engaging core | Forward Head Posture | |||||
| Spotting: | Band/Tubing Anchoring | |||||
| Movement Pattern: Single-joint | isolation | Target: Deltoid (Medial) | Synergist(s): | |
| Exercise | 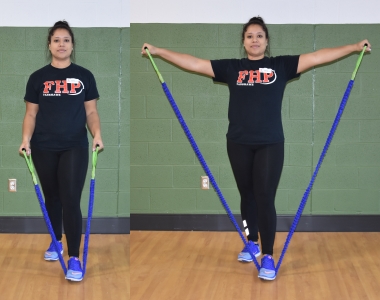 |
||
| Regressions: | Assisted Lateral Shoulder Raise | Progressions: | Lateral Shoulder Raise |
| Key Teaching Points | |||
|---|---|---|---|
|
|||
| Common Error(s): | Inappropriate momentum | Forward Head Posture | ||
| Spotting: | Band/Tubing Anchoring | ||
| Movement Pattern: Squat | Target: Quadriceps | Synergist(s): Gluteals, Hip Abductors | |
| Exercise | 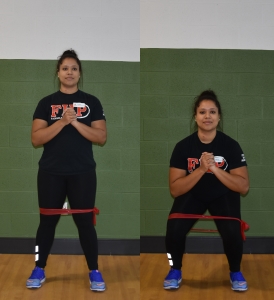 |
||
| Regressions: | Sit-to-Stand Squat | Progressions: | Front Squat |
| Key Teaching Points | |||
|---|---|---|---|
|
|||
| Common Error(s): | Valgus knees | ||
| Spotting: | Spotting Squats | ||
| Movement Pattern: Core | rotation | Target: Transverse Abdominus | Synergist(s): Obliques, Pelvic Floor, Rectus Abdominus | |
| Exercise | 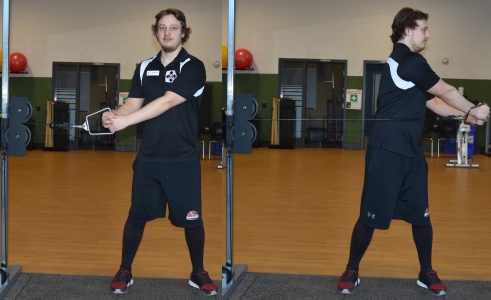 |
||
| Regressions: | Bird Dog | Progressions: | Plank with Arm Extension | Stability Ball Pike |
| Key Teaching Points | |||
|---|---|---|---|
|
|||
| Common Error(s): | Not engaging core | ||
| Spotting: | Band/Tubing Anchoring | ||
| Movement Pattern: Core | rotation | Target: Transverse Abdominus | Synergist(s): Obliques, Pelvic Floor, Rectus Abdominus | |
| Exercise | 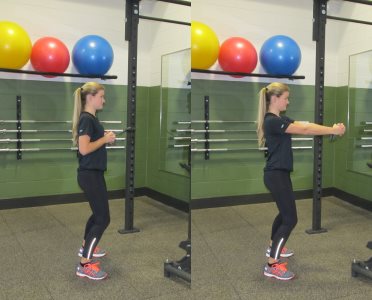 |
||
| Regressions: | Bird Dog | Progressions: | Barbell Rotation | Medicine Ball Rotational Throws |
| Key Teaching Points | |||
|---|---|---|---|
|
Feet shoulder width apart. Upright and neutral posture. Engage core and remain in good posture. Hands together gripping band or cable. Band or cable pull is perpendicular to your starting position. Complete sets on both sides. |
|||
| Common Error(s): | Not engaging core | ||
| Spotting: | Band/Tubing Anchoring | ||
| Movement Pattern: Single-joint | isolation | Target: Hamstrings | Synergist(s): Gluteals | |
| Exercise | 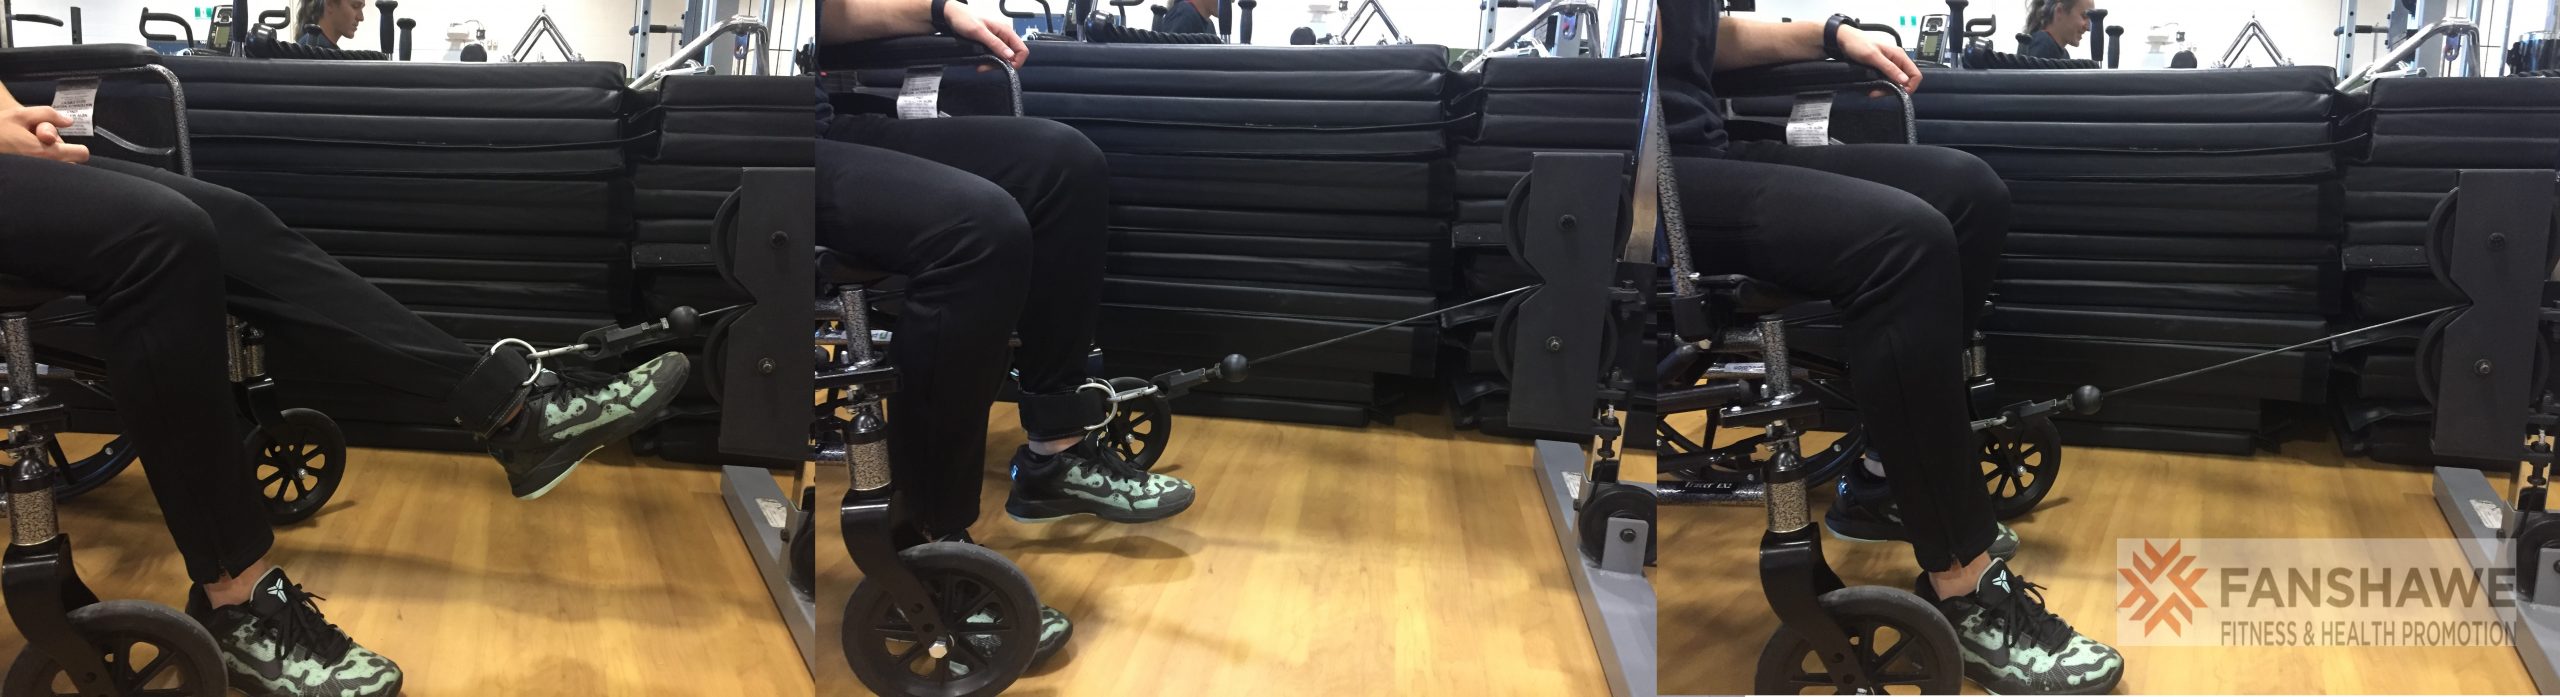 |
||
| Regressions: | Hip Bridge | Progressions: | Leg Curl |
| Key Teaching Points | |||
|---|---|---|---|
|
Seated upright. Place chair or wheelchair at appropriate distance for even load/desired resistance. Secure chair or wheelchair (i.e. lock brakes). Anchor band or cable around lower limp at ankle at one end and attach to secure structure at the other end. Use dog lead loops for bands. Use a properly secured (i.e. clip in both metal rings) ankle strap. In a controlled manor allow the leg to extend at the knee. Once the resistance has slackened, engage the core, gluts and hamstring and pull the heel back through full range. Slowly return. If possible adjust the seat height or anchor height to minimize hip flexor involvement. |
|||
| Common Error(s): | Using Excessive Momentum | ||
| Spotting: | Band/Tubing Anchoring | ||
| Movement Pattern: Single-joint | isolation | Target: Quadriceps | Synergist(s): | |
| Exercise | 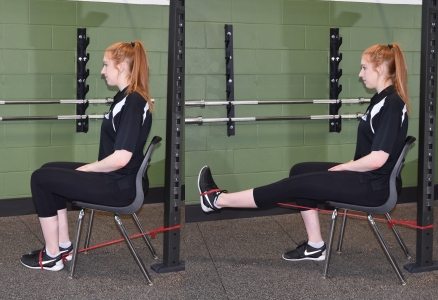 |
||
| Regressions: | Progressions: | Leg Extension | Back Squat | |
| Key Teaching Points | |||
|---|---|---|---|
|
Seated upright on a sturdy chair or bench. Anchor the band both around the lower leg/ankle and at another secure and stable location. Consider using the other leg as the anchor in situations where another suitable anchor is not possible. Engage the quadriceps and extend at the knee through full range. |
|||
| Common Error(s): | Inappropriate momentum | ||
| Spotting: | Band/Tubing Anchoring | ||
| Movement Pattern: Lower Body | Target: Quadriceps | Synergist(s): | |
| Exercise |  |
||
| Regressions: | Progressions: | ||
| Movement Pattern: Core | stabilization | Target: Transverse Abdominus | Synergist(s): Obliques, Rectus Abdominus | |
| Exercise | 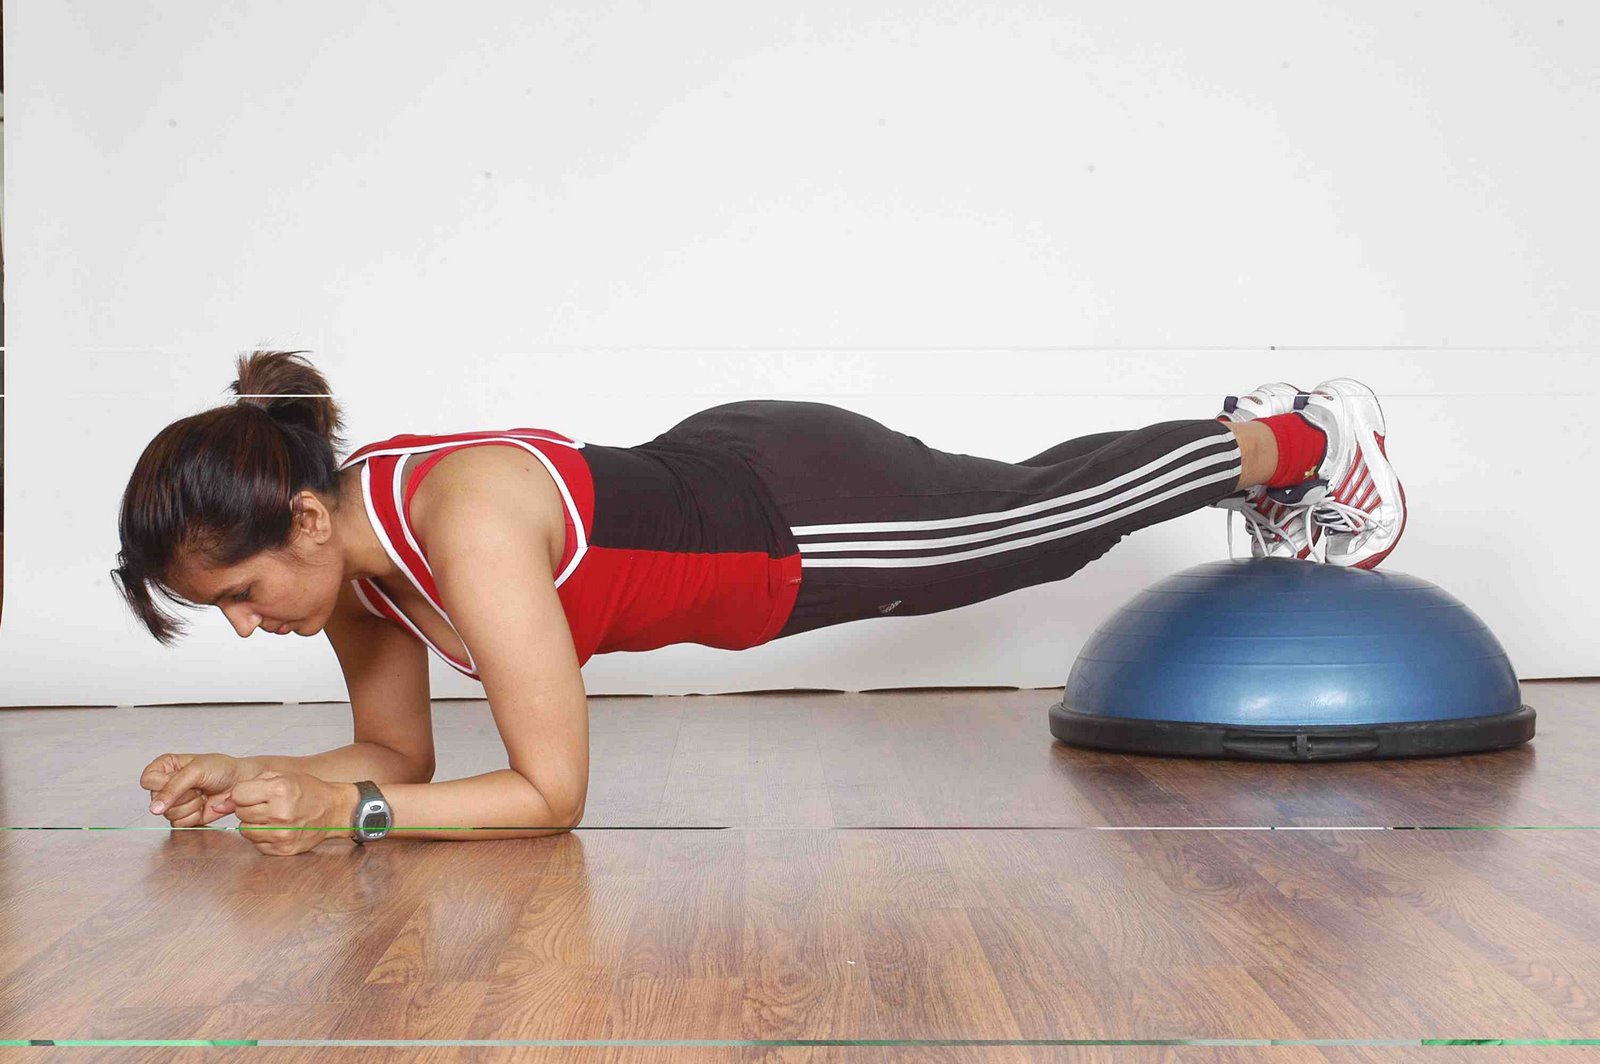 |
||
| Regressions: | Plank | Progressions: | TRX Plank | TRX Mountain Climber |
| Key Teaching Points | |||
|---|---|---|---|
|
Same set-up as traditional plank. Careful attention on establishing proper position and engaging the core musculature to secure that position as an unstable surface requires additional abdominal effort. |
|||
| Common Error(s): | Not engaging core | Sagging lower back | ||
| Spotting: | |||
| Movement Pattern: Core | stabilization | Target: Transverse Abdominus | Synergist(s): Deltoids (Anterior), Obliques, Pec Major, Rectus Abdominus, Triceps | |
| Exercise | 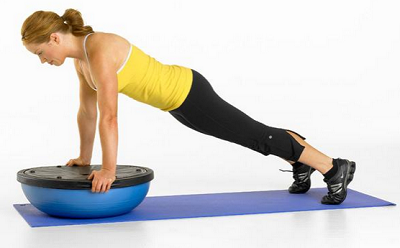 |
||
| Regressions: | Push Up | Progressions: | TRX Spiderman Push-Up |
| Key Teaching Points | |||
|---|---|---|---|
|
Same set up as typical push up. Careful attention to initial set-up of hand position as surface is unstable. Do your best to place hands in a neutral position while remaining secure. |
|||
| Common Error(s): | Not engaging core | Forward Head Posture | Sagging lower back | ||
| Spotting: | Mirror Client Level | ||
| Movement Pattern: Lunge | Target: Quadriceps | Synergist(s): Gluteals, Hamstrings, Quadratus Lumborum, Rectus Abdominus, Transverse Abdominus | |
| Exercise | 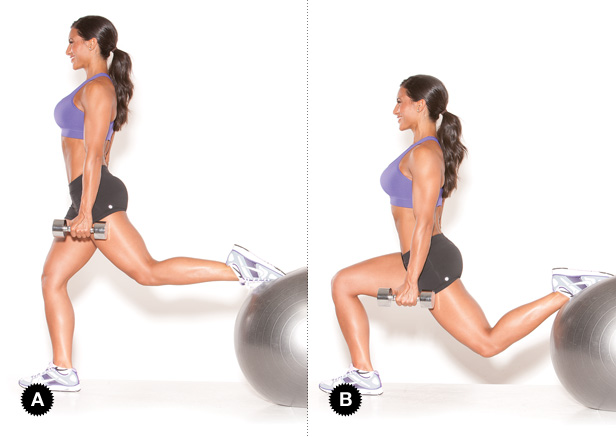 |
||
| Regressions: | Walking Lunge | Split Squat | Progressions: | |
| Key Teaching Points | |||
|---|---|---|---|
|
Same neutral setup as seen with a split squat lunge. Knees at 90 degrees. Upright and neutral posture. About shoulder width or slightly less foot spacing. Carefully place back leg on stability ball with foot plantar flexed. Consider using a wall, chair, dowel or spotter to initiate and exit the position safely. Lower in a controlled manner. The range will often be limited by tight hip flexors/quads in the back leg. Use quads/gluts/hams to drive back upwards. This motions should be within pain free range. |
|||
| Common Error(s): | Valgus knees | ||
| Spotting: | Travel alongside client | ||
| Movement Pattern: Core | stabilization | Target: Transverse Abdominus | Synergist(s): Obliques, Rectus Abdominus | |
| Exercise | 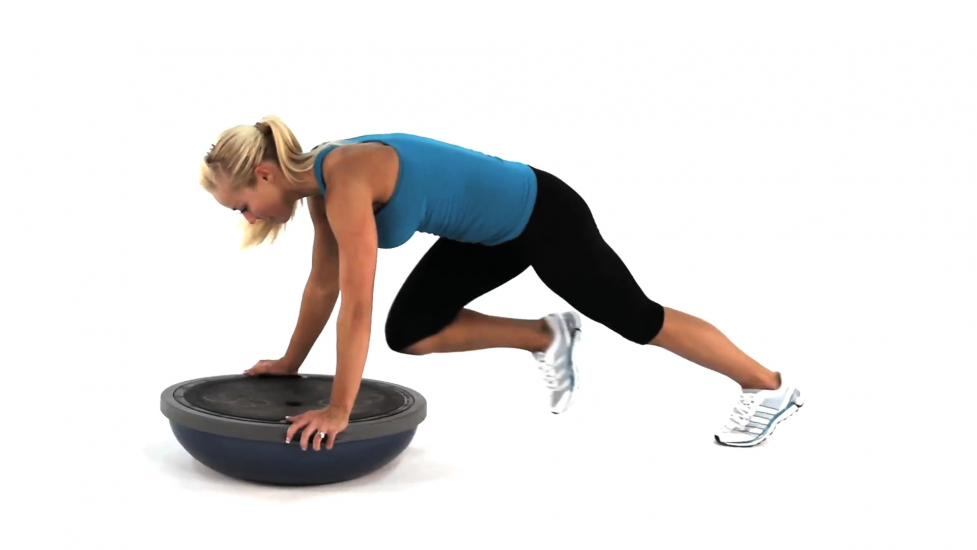 |
||
| Regressions: | Plank | Mountain Climber | Progressions: | Stability Ball Pike | TRX Mountain Climber |
| Key Teaching Points | |||
|---|---|---|---|
|
Similar hand position set-up to push up (hands on bosu black). Make sure core is engage. Establish a proper plank/staring push-up position with stable neutral hand grip and spine position. Alternate bringing one knee up towards the elbow of the same side and then the other knee, and repeat. Make sure core is engaged and position remains neutral. The speed can be picked up once good form is established. |
|||
| Common Error(s): | Not engaging core | Sagging lower back | ||
| Spotting: | Mirror Client Level | ||
| Movement Pattern: Squat | Target: Quadriceps | Synergist(s): Foot Arch, Gastrocnemius, Gluteals, Hamstrings, Hip Abductors, Hip Adductors, Rectus Abdominus, Soleus | |
| Exercise | 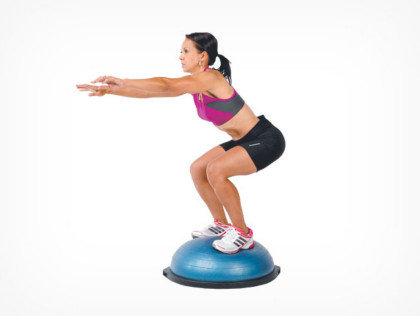 |
||
| Regressions: | Wall Squat | Progressions: | |
| Key Teaching Points | |||
|---|---|---|---|
|
Same set up as a standard body weight squat plus carefully establish staring and exit positions as surface is unstable. Consider using a wall, chair, dowel or spotter to help obtain the initial position. |
|||
| Common Error(s): | Valgus knees | Foot/ankle collapse | ||
| Spotting: | Instability training | ||
| Movement Pattern: Core | extension, Core | rotation, Core | stabilization | Target: Transverse Abdominus | Synergist(s): Gluteals, Rectus Abdominus, Rhomboids, Trapezius | |
| Exercise | 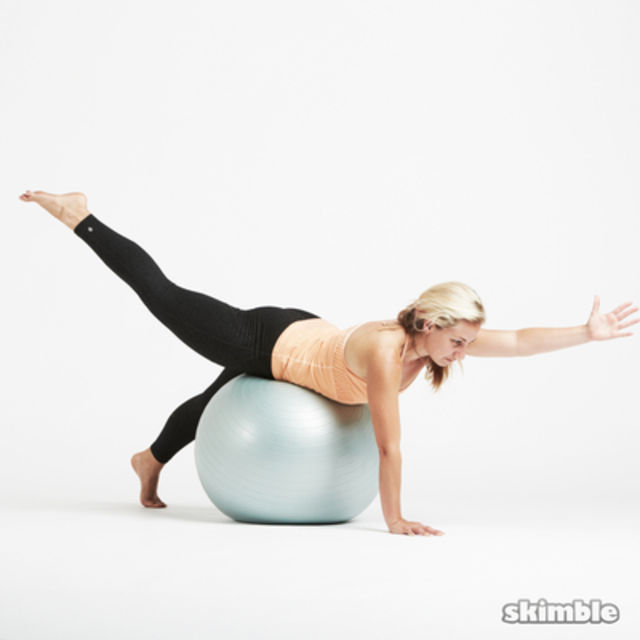 |
||
| Regressions: | Bird Dog | Progressions: | |
| Key Teaching Points | |||
|---|---|---|---|
|
Same position as the bird dog plus the added balance necessary to remain stable on the stability ball. Maintain good spine posture, especially of the head and neck, allowing the opposing arm and leg to elevate to maximum range without losing neutral posture or over arching lower back. During the entire movement keep the core engaged. Spotters stay close and at client level. |
|||
| Common Error(s): | Forward Head Posture | Sagging lower back | Not engaging core | ||
| Spotting: | Instability training | ||
| Movement Pattern: Core | stabilization | Target: Transverse Abdominus | Synergist(s): Pelvic Floor | |
| Exercise | 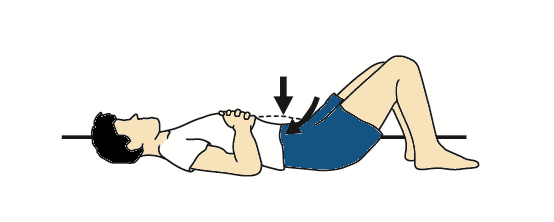 |
||
| Regressions: | Progressions: | Bird Dog | |
| Key Teaching Points | |||
|---|---|---|---|
|
While lying supine on your back with your knees bent and feet flat on the floor place either a BP cuff or folded towel in the small of your back directly beneath your navel point. When using a BP cuff make sure the pressure reads approximately 80 mmHg when lying on it at rest. While still breathing imagine drawing your belly button towards your spine. Your abdomen should depress downwards rather than expand upwards. Also pull up from your pelvic floor by initiating the muscles that stop urine flow. When done correctly the pressure on the towel / BP cuff should remain the same or go up slightly; 10-15mmHg (not go down or up significantly) while maintaining a neutral spine and breathing. Clients can start by completing 10-15 hold/relax reps. Then progress to holding for 10 seconds. Finally, alternating leg lifts while holding the contraction. Once this is completed successfully clients should be progressed and encouraged to use their intrinsic core during regular exercises. |
|||
| Common Error(s): | Not engaging core | Forward Head Posture | ||
| Spotting: | |||
| Movement Pattern: Gait | Target: Quadriceps | Synergist(s): | |
| Exercise | 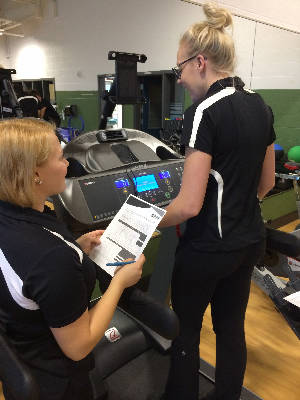 |
||
| Regressions: | Progressions: | ||
| Movement Pattern: Pull | horizontal | Target: Latissimus Dorsi | Synergist(s): Biceps, Rhomboids, Transverse Abdominus | |
| Exercise | 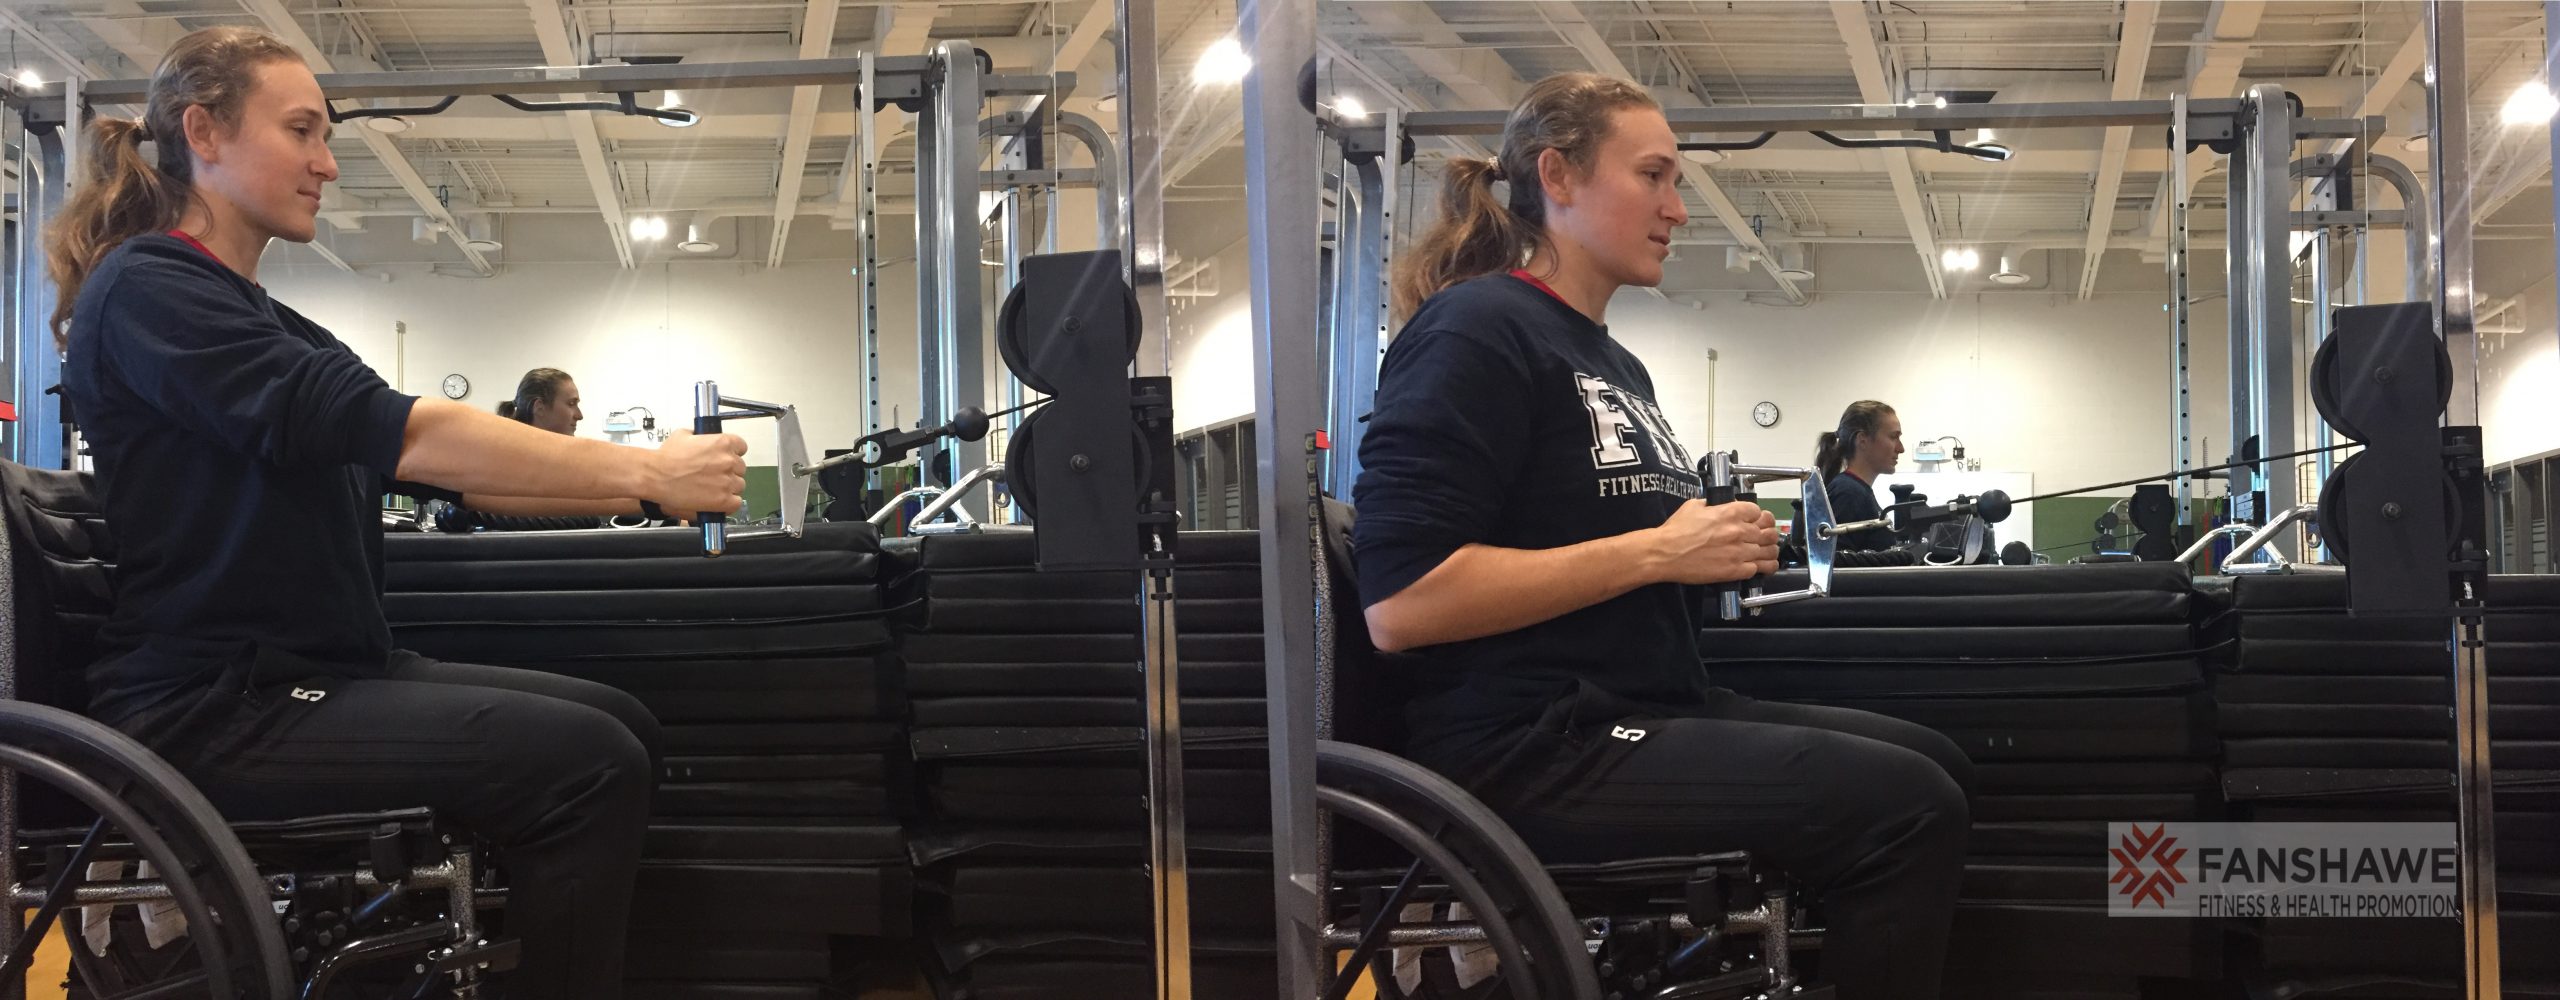 |
||
| Regressions: | Progressions: | ||
| Key Teaching Points | |||
|---|---|---|---|
|
|||
| Common Error(s): | Inappropriate momentum | Rounded shoulders | ||
| Spotting: | Cables | ||
| Movement Pattern: Single-joint | isolation | Target: Quadriceps | Synergist(s): | |
| Exercise | 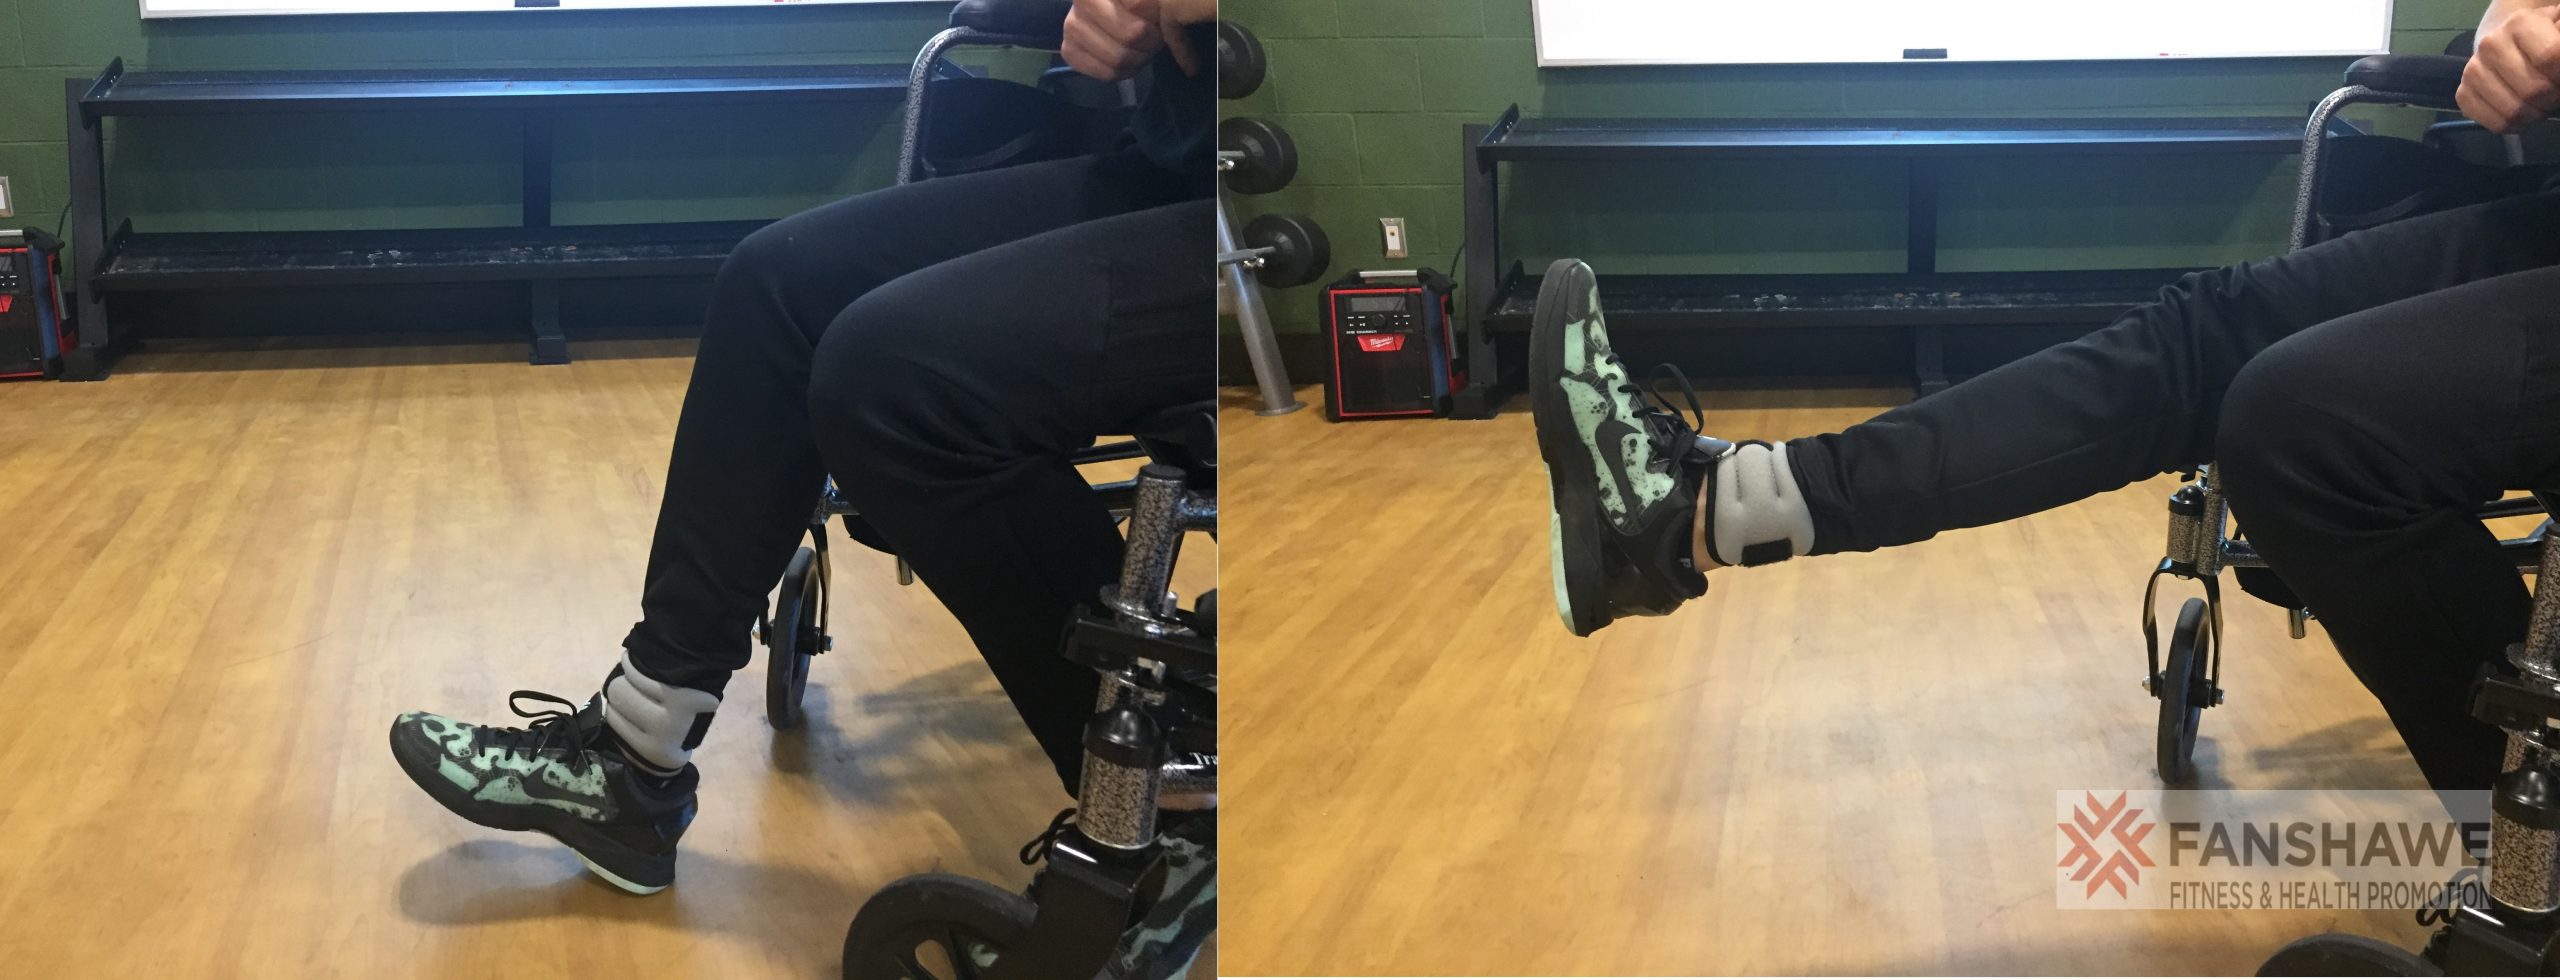 |
||
| Regressions: | Progressions: | | Sit-to-Stand Squat | |
| Key Teaching Points | |||
|---|---|---|---|
|
Secure ankle straps around both ankles. Seated upright. Place one foot securely on the floor (or foot pedal if wheelchair is being used). Raise the opposite foot until the knee is full extended. Engage the quadriceps muscle as you extend the leg. Make sure wheelchair brakes are engaged. Adjust foot pedals as required. |
|||
| Common Error(s): | Bouncing Weights | ||
| Spotting: | Mirror Client Level | ||
| Movement Pattern: Single-joint | isolation | Target: Triceps | Synergist(s): | |
| Exercise | 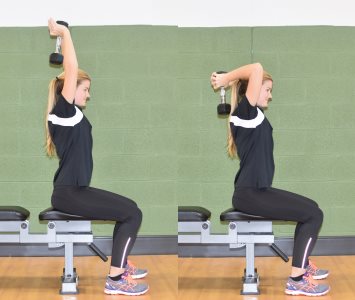 |
||
| Regressions: | Triceps Kickback | Progressions: | Dips |
| Key Teaching Points | |||
|---|---|---|---|
|
Seated upright. Carefully place DB overhead. Use help of trainer if available. Secure DB by holding DB handle tightly within overlapping hands. Start with elbows flexed. Initiate movement by engaging the triceps as you extend the elbows. Remain upright. Careful not to allow the DB to contact the head. Control the movement back down to the starting position. Spot at the wrists of the client. |
|||
| Common Error(s): | Inappropriate momentum | Forward Head Posture | ||
| Spotting: | |||
| Movement Pattern: Single-joint | isolation | Target: Triceps | Synergist(s): | |
| Exercise | 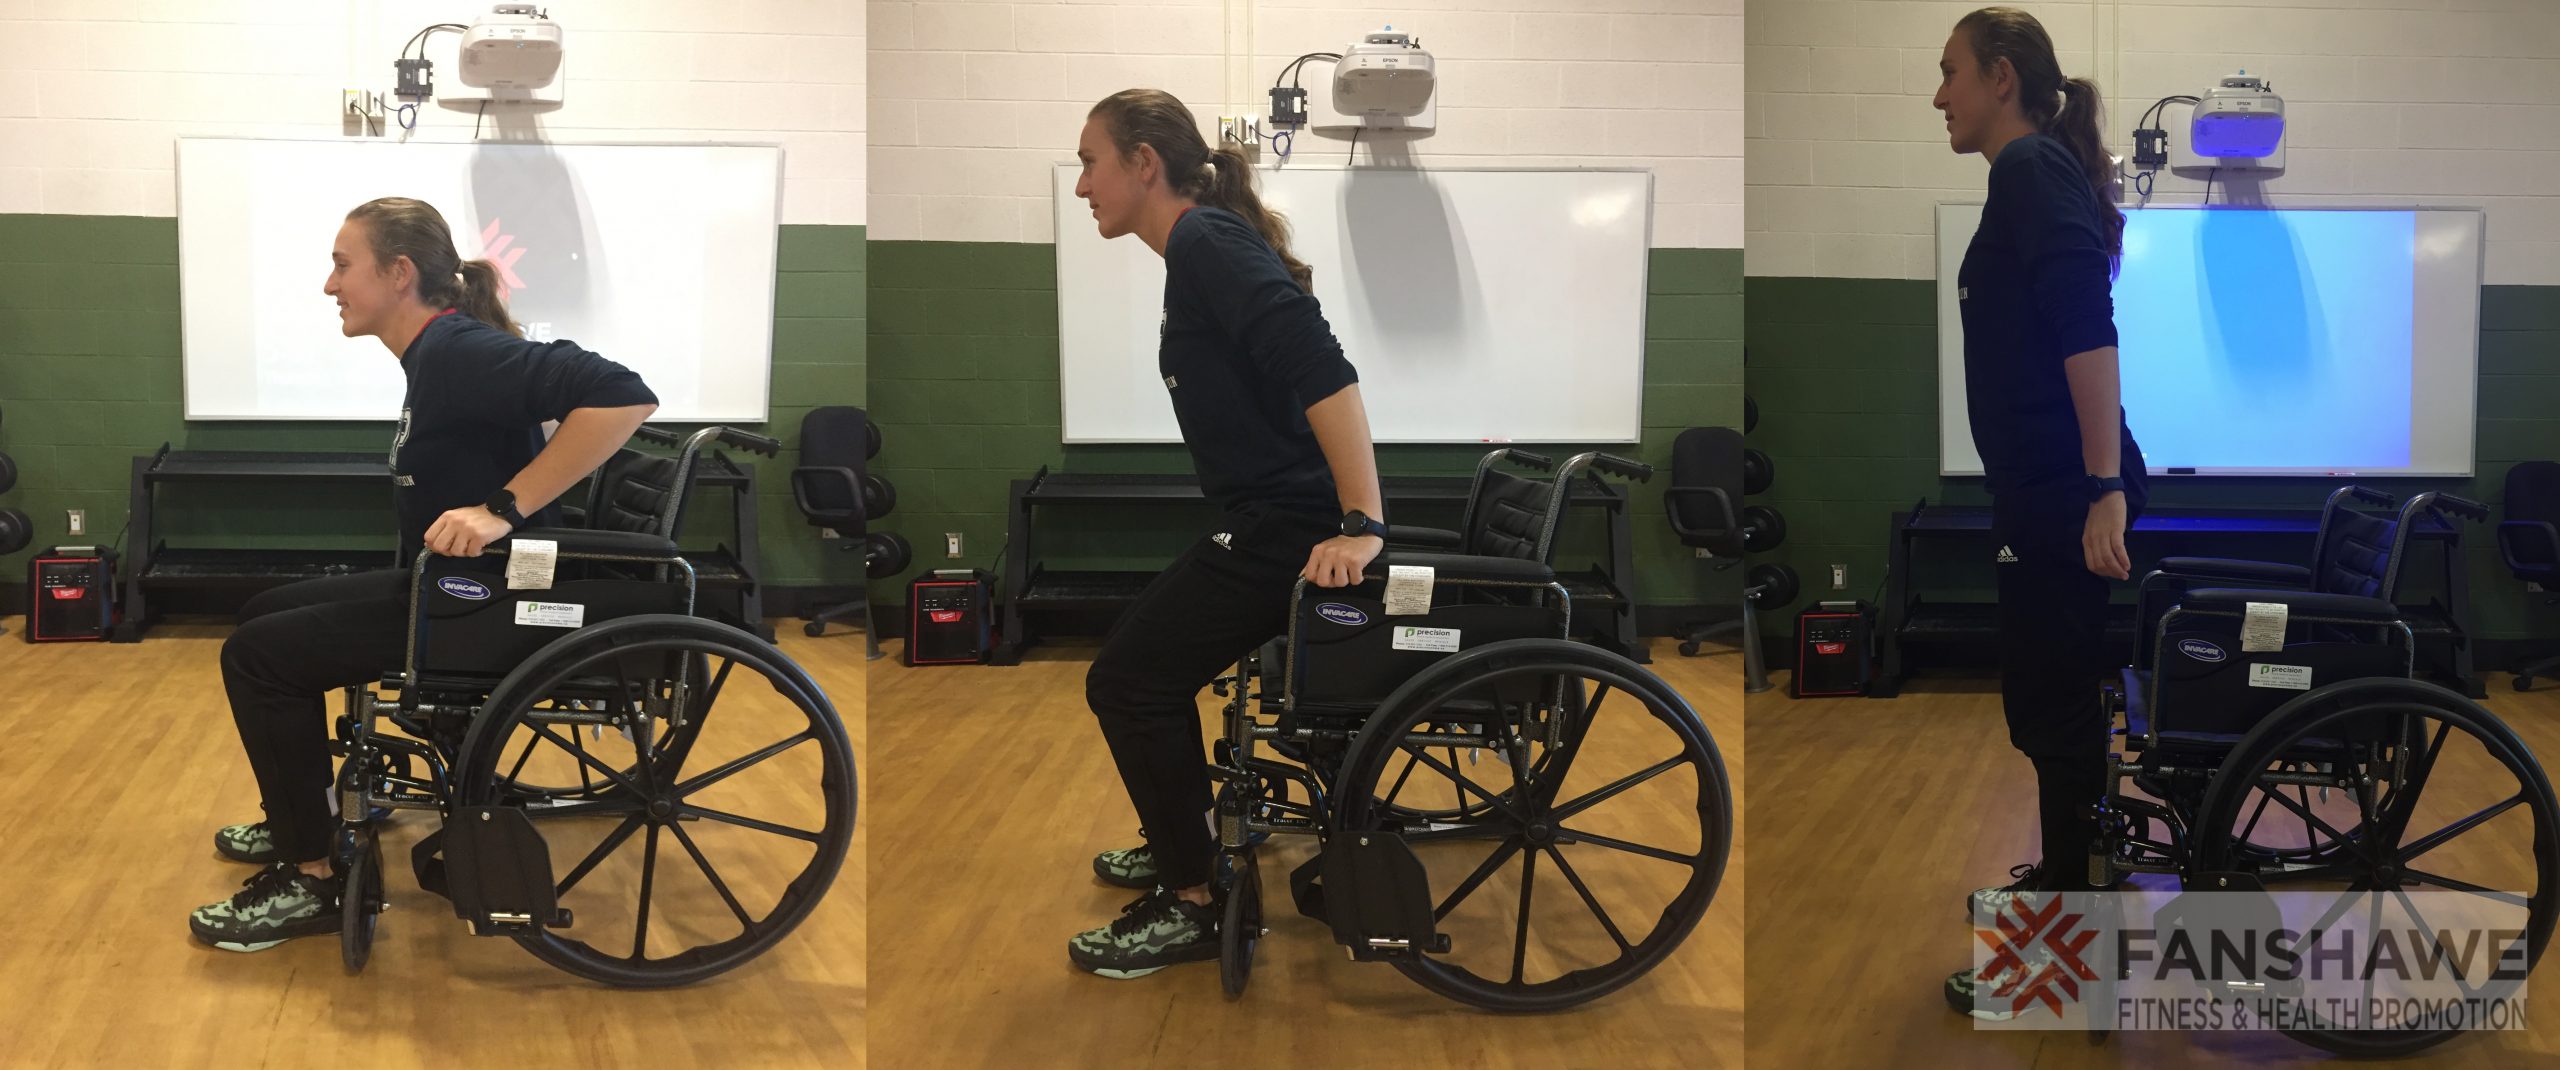 |
||
| Regressions: | Progressions: | ||
| Key Teaching Points | |||
|---|---|---|---|
|
As tolerated. While seated upright in wheelchair or arm chair with feet secured and flat on foot pedals or floor. Wheelchair brakes engaged or chair secure against the wall. The client engages the triceps muscles by putting pressure through the hands that are on the arm of the chair. The client attempts to lift up as tolerated while minimizing the assistance from the legs. Slowly return back to a fully seated position. The range of motion may be limited depending on strength. Even an isometric contraction is considered beneficial. |
|||
| Common Error(s): | Inappropriate momentum | ||
| Spotting: | |||
| Movement Pattern: Press | horizontal | Target: Pec Major | Synergist(s): Deltoids (Anterior), Triceps | |
| Exercise | 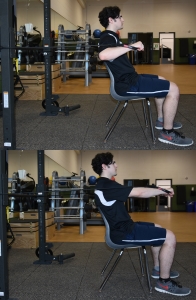 |
||
| Regressions: | Progressions: | ||
| Key Teaching Points | |||
|---|---|---|---|
|
Same instructions as band under arms chest press. But in this situation you secure the dowel end of the gym stick behind the back of the wheelchair. Once in place you can press forward with the handles. |
|||
| Common Error(s): | |||
| Spotting: | Band/Tubing Anchoring | ||
| Movement Pattern: Core | rotation | Target: Transverse Abdominus | Synergist(s): Obliques | |
| Exercise | 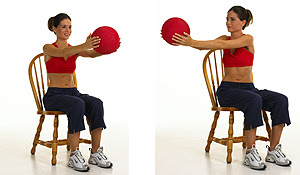 |
||
| Regressions: | Progressions: | ||
| Key Teaching Points | |||
|---|---|---|---|
|
Seated upright with slight backwards lean while still maintaining balance. Engage intrinsic core muscles. While holding medicine ball in hands slowly rotate from site to side while maintaining core contraction. Move hands farther away from the body to increase intensity. There should be no lower back pain. |
|||
| Common Error(s): | Not engaging core | ||
| Spotting: | |||
| Movement Pattern: Single-joint | isolation | Target: Hip Adductors | Synergist(s): | |
| Exercise | 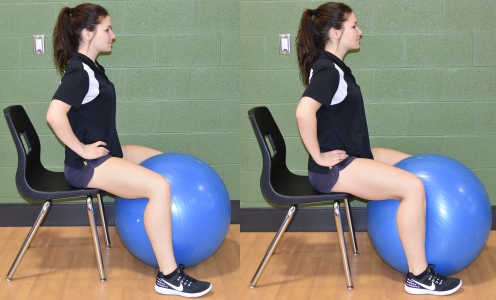 |
||
| Regressions: | Progressions: | ||
| Movement Pattern: Single-joint | isolation | Target: Hip Abductors | Synergist(s): Gluteals | |
| Exercise | 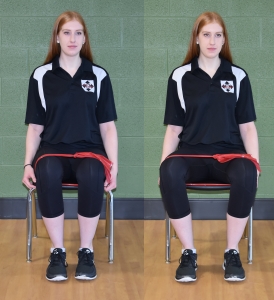 |
||
| Regressions: | Progressions: | ||
| Key Teaching Points | |||
|---|---|---|---|
|
1. Seated upright at the front of your chair. Secure a fixed loop band just above the knees at the thigh. 2. Engage the hip abductors (lateral leg muscles) and pull the band apart. 3. Slowly return back and repeat. |
|||
| Common Error(s): | Inappropriate momentum | ||
| Spotting: | |||
| Movement Pattern: Pull | horizontal | Target: Latissimus Dorsi | Synergist(s): Biceps, Rhomboids | |
| Exercise | 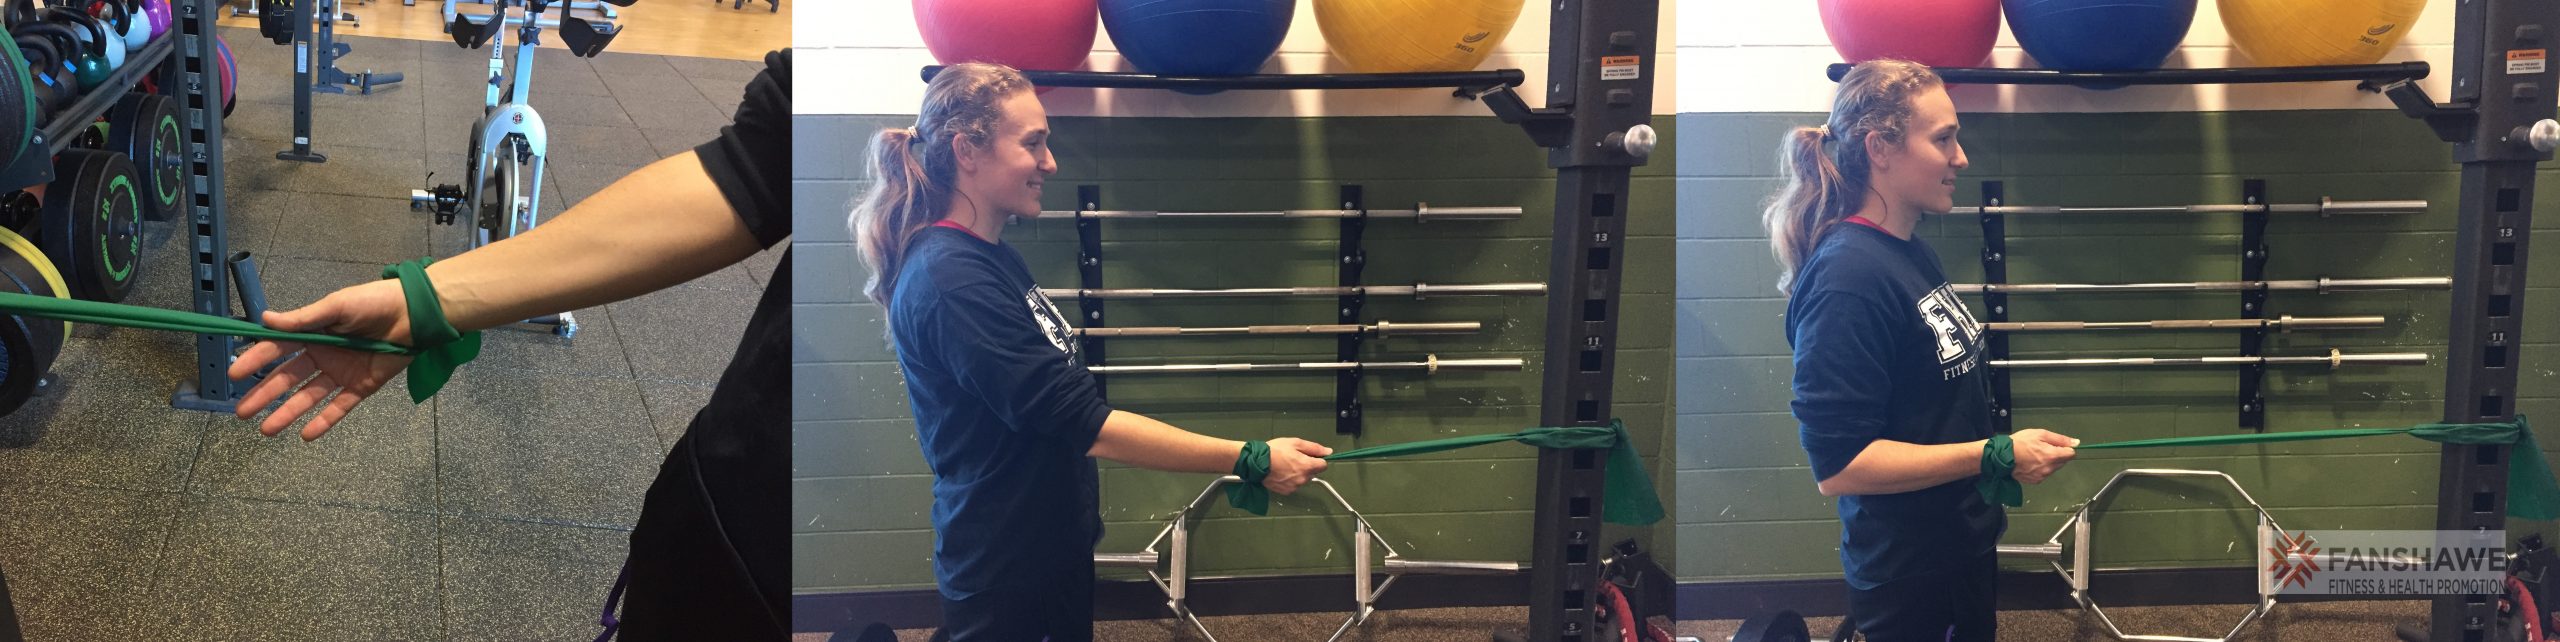 |
||
| Regressions: | Progressions: | Seated Row | |
| Key Teaching Points | |||
|---|---|---|---|
|
Using the dog loop band tying technique create two dog loops with theraband sheeting. Wrap around a secure anchor so two looped (mini handle) ends are available. Slide hand through the open loop and then wrap the band once more around the wrist so that the band is secure without requiring your client to grip the band. Proceed with band rowing technique and form. |
|||
| Common Error(s): | Rounded shoulders | ||
| Spotting: | Band/Tubing Anchoring | ||
| Movement Pattern: Press | horizontal | Target: Pec Major | Synergist(s): Deltoids (Anterior), Triceps | |
| Exercise |  |
||
| Regressions: | Progressions: | ||
| Key Teaching Points | |||
|---|---|---|---|
|
Either in standing or seated. Wrap a theraband dog loop knot or tubing handle around the wrist and into the web of the palm of the and to ensure a secure grip for those that have issues gripping/grasping. Follow instructions for band chest press. |
|||
| Common Error(s): | |||
| Spotting: | Band/Tubing Anchoring | ||
| Movement Pattern: Pull | horizontal | Target: Deltoid (Posterior) | Synergist(s): Rhomboids | |
| Exercise | 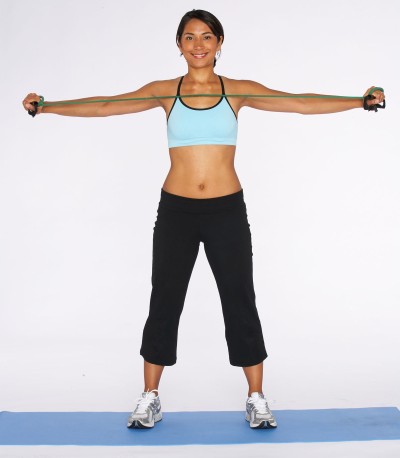 |
||
| Regressions: | Progressions: | ||
| Key Teaching Points | |||
|---|---|---|---|
|
Create a dog loop with theraband. Secure for clients with gripping/grasping weakness by placing loop around wrist and wrapping a few extra times. Once band is secure proceed with Band reverse fly technique. |
|||
| Common Error(s): | |||
| Spotting: | Band/Tubing Anchoring | ||
| Movement Pattern: Squat | Target: Quadriceps | Synergist(s): Gluteals, Hamstrings | |
| Exercise | 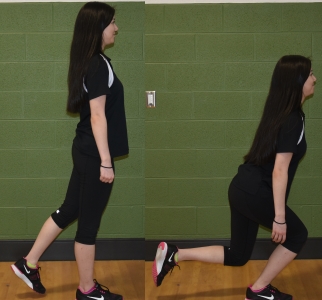 |
||
| Regressions: | Sit-to-Stand Squat | Progressions: | |
| Key Teaching Points | |||
|---|---|---|---|
|
Place a dowel (or chair/wall) on the side of the leg that is in the air to act as a self spotter if required. Squat downward on one leg allowing the opposite leg to drift backwards while maintaining a neutral spine and a strong core. Try to reach a 90 degree knee bend in the squatting leg before returning to the top. A slight forward lean (and therefore additional gluteal contraction) in order to maintain balance is allowed. Active quads, gluts, the core and ankle stabilizers during the movement. |
|||
| Common Error(s): | Foot/ankle collapse | Valgus knees | Not engaging core | ||
| Spotting: | Instability training | ||
| Movement Pattern: Pull | horizontal | Target: Latissimus Dorsi | Synergist(s): Rhomboids | |
| Exercise |  |
||
| Regressions: | Progressions: | ||
| Key Teaching Points | |||
|---|---|---|---|
|
Same set up as cable row with extra emphasis on engaging intrinsic core to prevent trunk rotation as well as focusing on scapular retraction, especially of the arm that has no load. |
|||
| Common Error(s): | Not engaging core | Rounded shoulders | ||
| Spotting: | Cables | ||
| Movement Pattern: Hinge | Target: Hamstrings | Synergist(s): Gluteals | |
| Exercise | 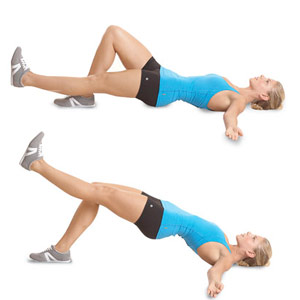 |
||
| Regressions: | Seated Leg Curl | Progressions: | Leg Curl |
| Key Teaching Points | |||
|---|---|---|---|
|
|||
| Common Error(s): | Inappropriate momentum | Arching the upper back | ||
| Spotting: | Mirror Client Level | ||
| Movement Pattern: Core | stabilization | Target: Pelvic Floor | Synergist(s): | |
| Exercise | 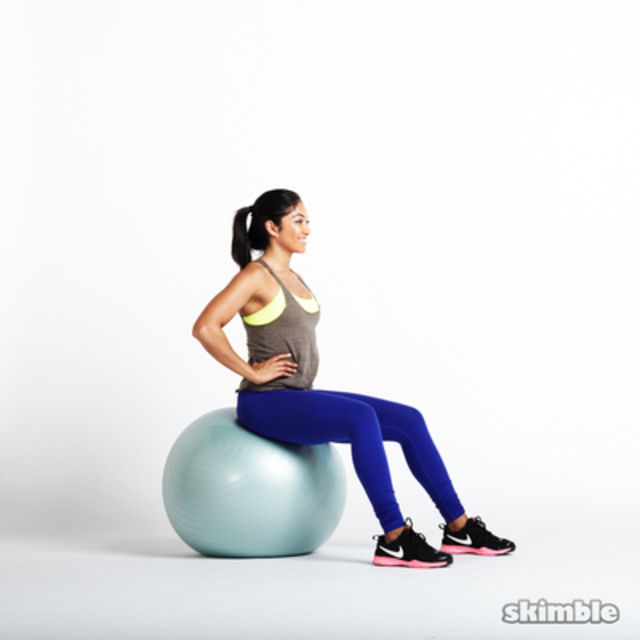 |
||
| Regressions: | Progressions: | ||
| Movement Pattern: Core | stabilization | Target: Transverse Abdominus | Synergist(s): Gluteals, Trapezius | |
| Exercise | 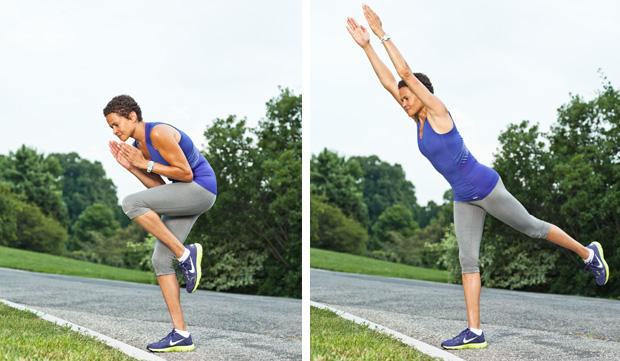 |
||
| Regressions: | Progressions: | Bird Dog | Stability Ball Bird Dog | |
| Key Teaching Points | |||
|---|---|---|---|
|
While Standing upright (with a sturdy chair, dowel or trainer for spotting purposes) extend one arm and the opposite leg to obtain the bird dog position. Engage the core and resist excessive low back extension. Keep head, neck and spine aligned. Return to original staring position and repeat with other arm and leg. |
|||
| Common Error(s): | Sagging lower back | Not engaging core | ||
| Spotting: | Instability training | ||
| Movement Pattern: Squat | Target: Gluteals | Synergist(s): Hamstrings, Quadriceps | |
| Exercise | 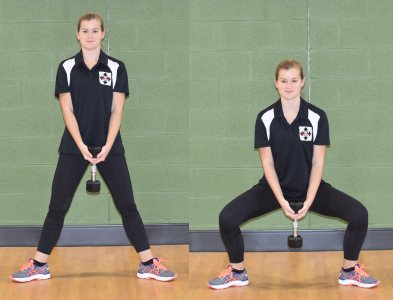 |
||
| Regressions: | Progressions: | ||
| Key Teaching Points | |||
|---|---|---|---|
|
Similar to a body weight squat while allowing for a wider stance and greater external rotation of the foot to enable a deeper squatting motion and maximal hip range/clearance. Focus on hip range of motion. Engage glut muscles at lower range to aid in upward squatting motion. |
|||
| Common Error(s): | |||
| Spotting: | Spotting Squats | ||
| Movement Pattern: Pull | vertical | Target: Trapezius | Synergist(s): | |
| Exercise |  |
||
| Regressions: | Progressions: | ||
| Key Teaching Points | |||
|---|---|---|---|
|
With hands fully supinated and at side shrug upwards engaging your trapezius muscles while elevating your shoulders upwards and backwards towards the posterior part of the head. Try to resist excessive forward head movement. Remain upright with neutral posture throughout movement. |
|||
| Common Error(s): | Forward Head Posture | ||
| Spotting: | |||
| Movement Pattern: Pull | horizontal | Target: Latissimus Dorsi | Synergist(s): Biceps, Rhomboids | |
| Exercise |  |
||
| Regressions: | Progressions: | ||
| Movement Pattern: | Target: Spinal Erectors | Synergist(s): Rectus Abdominus | |
| Exercise |  |
||
| Regressions: | Progressions: | ||
| Key Teaching Points | |||
|---|---|---|---|
|
Preparation Kneel on mat or floor. Place hands shoulder width apart. Execution Flex spine by hunching back up. Extend spine by arching back. Repeat. |
|||
| Common Error(s): | |||
| Spotting: | |||
| Movement Pattern: Core | stabilization, Gait, Whole Body | Target: Transverse Abdominus | Synergist(s): Gluteals, Hip Flexors, Quadriceps, Rectus Abdominus | |
| Exercise | 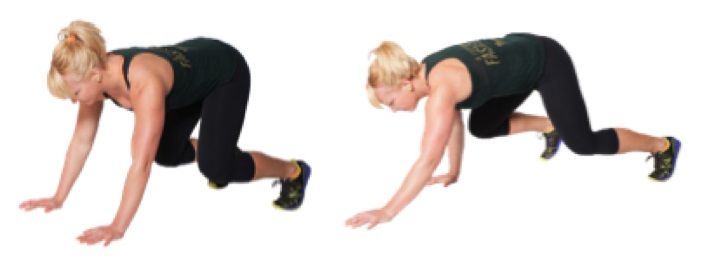 |
||
| Regressions: | Progressions: | ||
| Key Teaching Points | |||
|---|---|---|---|
|
See video. Start on hands and toes with knees just slightly off the ground. Take a strong core engaged position. Actively engage core. Resist excessive side to side rocking. Alternate hand and leg move together. Movement can be completed forward, backward and side to side. Place an object (e.g. small cone or water bottle) on back to ensure client isn’t rocking too much as the object would fall off if they were. |
|||
| Common Error(s): | |||
| Spotting: | Mirror Client Level | ||
| Movement Pattern: Whole Body | Target: Pec Major | Synergist(s): Deltoids (Anterior), Hip Flexors, Obliques, Quadriceps, Rectus Abdominus, Transverse Abdominus, Triceps | |
| Exercise | 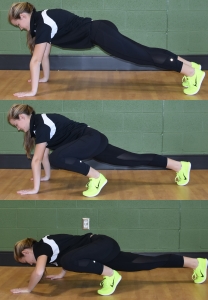 |
||
| Regressions: | Push Up | Progressions: | |
| Key Teaching Points | |||
|---|---|---|---|
|
See Video. Starting in push-up position with core engaged. Move forward by stepping alternate arm and leg in together. During this contralateral movement pattern touch moving legs knee to non-moving arms elbow and complete a partial push-up motion. Repeat. |
|||
| Common Error(s): | Not engaging core | Sagging lower back | ||
| Spotting: | Mirror Client Level | ||
| Movement Pattern: Whole Body | Target: Obliques | Synergist(s): Hip Flexors, Transverse Abdominus | |
| Exercise | 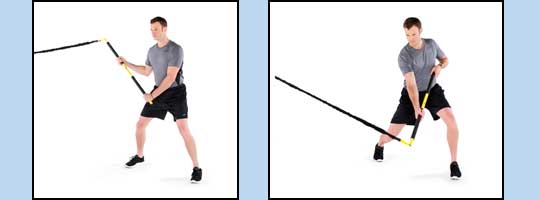 |
||
| Regressions: | Progressions: | ||
| Key Teaching Points | |||
|---|---|---|---|
|
See video. Ensure gym stick or TRX rip trainer is anchored properly above shoulder height. Core engaged. No excessive momentum when bringing band back to starting position. Explode through the shot with core engaged. |
|||
| Common Error(s): | |||
| Spotting: | Band/Tubing Anchoring | ||
| Movement Pattern: | Target: | Synergist(s): | |
| Exercise | 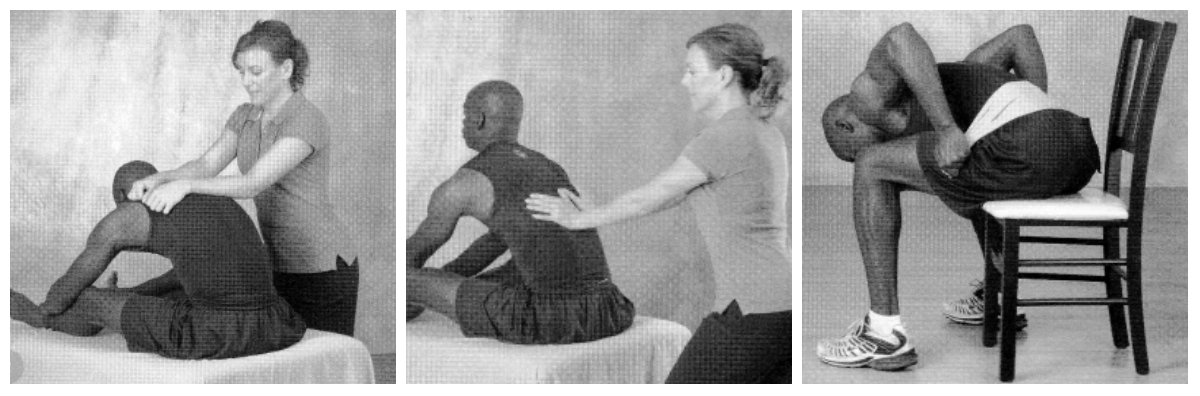 |
||
| Regressions: | Progressions: | ||
| Movement Pattern: Single-joint | isolation | Target: Gastrocnemius | Synergist(s): Peroneals, Soleus | |
| Exercise | 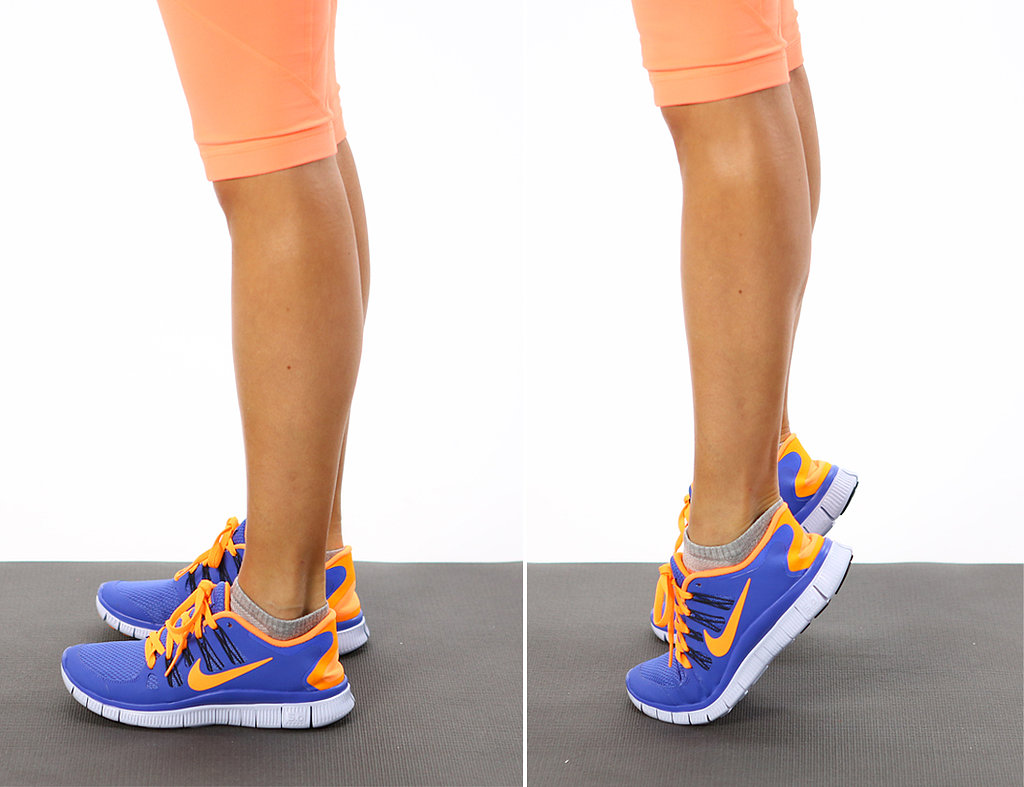 |
||
| Regressions: | Progressions: | ||
| Key Teaching Points | |||
|---|---|---|---|
|
While standing upright lift yourself completely onto your toes by engaging your calf musculature. Although it is recommended to have a spotting option close by (e.g. counter or chair) try to resist holding on in order to challenge ankle stability and balance. Progress to one leg when able. |
|||
| Common Error(s): | Inappropriate momentum | ||
| Spotting: | Instability training | ||
| Movement Pattern: Gait | Target: Peroneals | Synergist(s): Foot Arch, Gastrocnemius, Pelvic Floor, Soleus, Tibialis Anterior, Transverse Abdominus | |
| Exercise | 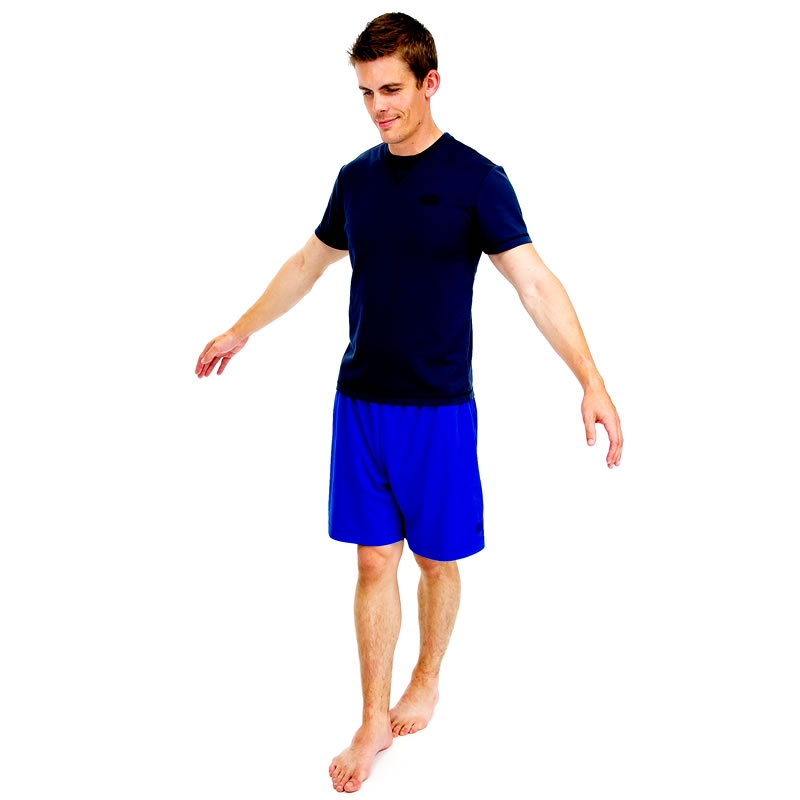 |
||
| Regressions: | Progressions: | ||
| Key Teaching Points | |||
|---|---|---|---|
|
While maintaining an upright posture walk slowly heel to toe as seen in the picture above. Make sure to have a spotting option close by, however, try to resist grabbing a hold unless required to challenge balance systems. Regressions involve looking down at feet or having hands out to the side. Progressions involve not looking down or having hands crossed in front. |
|||
| Common Error(s): | |||
| Spotting: | Instability training | ||
| Movement Pattern: Single-joint | isolation | Target: Hip Abductors | Synergist(s): | |
| Exercise |  |
||
| Regressions: | Progressions: | ||
| Key Teaching Points | |||
|---|---|---|---|
|
Standing upright. Using a spot (e.g. chair or countertop) to stabilize support leg. Secure ankle weight around the lifting leg. While maintaining good posture engage the lateral thigh / hip musculature and raise the leg away from the body. Control the movement as the leg returns to the starting position. Repeat. |
|||
| Common Error(s): | Inappropriate momentum | Inappropriate momentum | ||
| Spotting: | Consider self-spotting option | ||
| Movement Pattern: Gait, Whole Body | Target: Hamstrings | Synergist(s): Gluteals, Triceps | |
| Exercise | 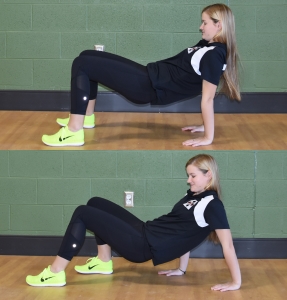 |
||
| Regressions: | Progressions: | ||
| Key Teaching Points | |||
|---|---|---|---|
|
Start seated on gluts with hands behind you and feet flat on the floor. Bridge up through pelvis so that you are in a dip type position with the weight distributed through the hands and heels. Adjust hand position to avoid and watch out for wrist pain. Walk backwards by using alternate arm and leg together. Engage hamstrings and triceps to aid in movement. |
|||
| Common Error(s): | |||
| Spotting: | Mirror Client Level | ||
| Movement Pattern: Single-joint | isolation | Target: Gluteals | Synergist(s): Piriformis | |
| Exercise | 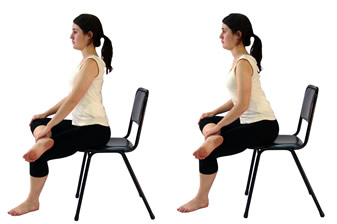 |
||
| Regressions: | Progressions: | ||
| Movement Pattern: Single-joint | isolation | Target: Gastrocnemius | Synergist(s): Soleus | |
| Exercise | 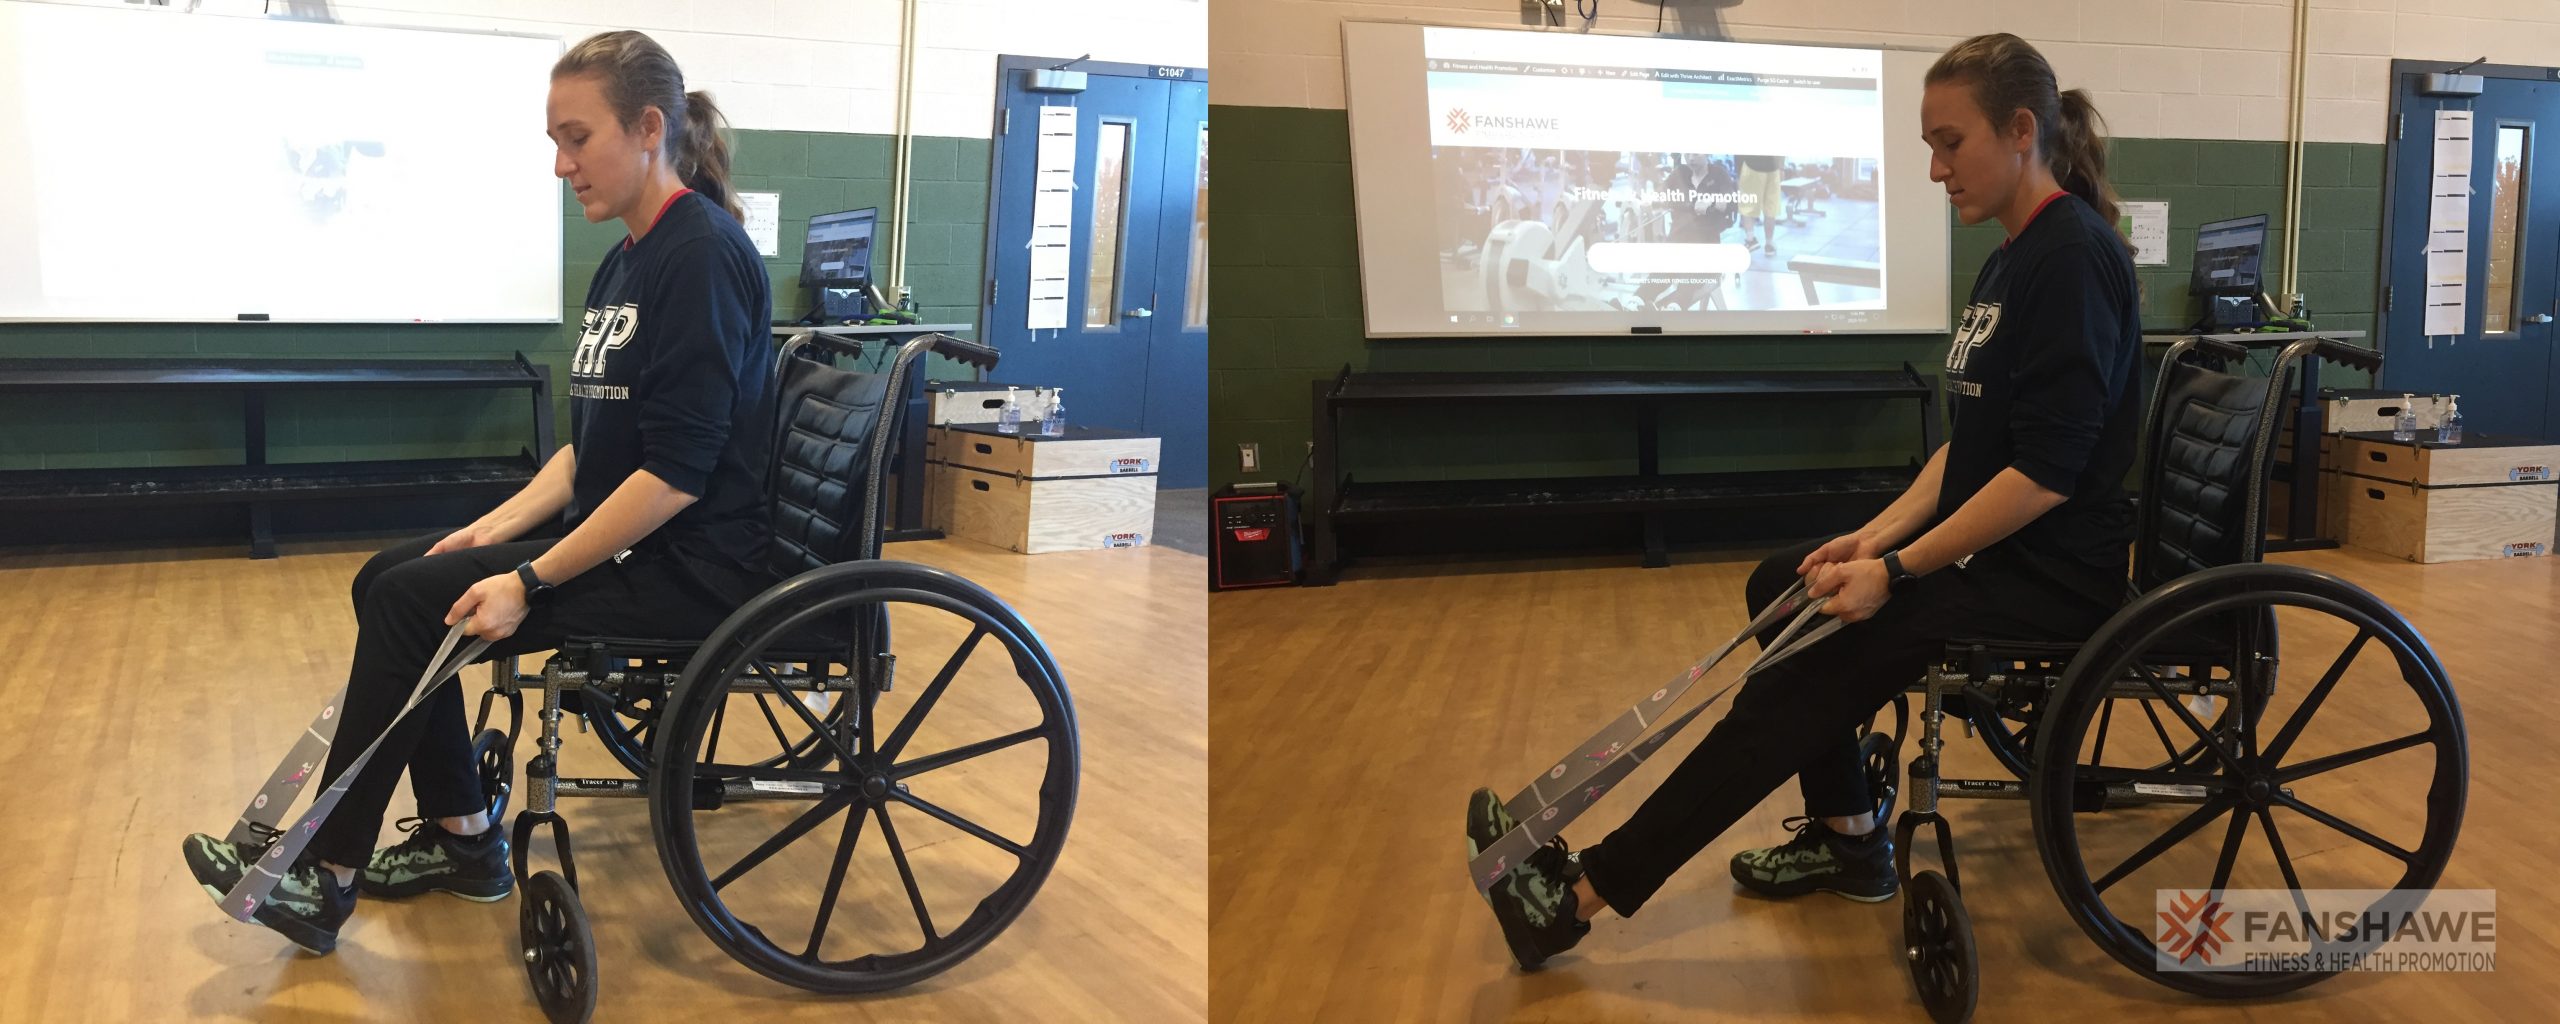 |
||
| Regressions: | Progressions: | ||
| Movement Pattern: Single-joint | isolation | Target: Hamstrings | Synergist(s): | |
| Exercise | 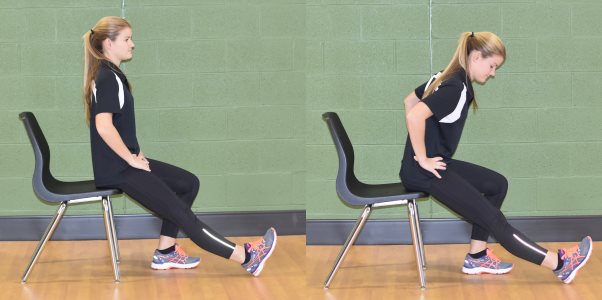 |
||
| Regressions: | Progressions: | ||
| Key Teaching Points | |||
|---|---|---|---|
|
While seated near edge of chair maintain an upright and neutral spine/posture. Keep the extended knee fully straight. Lean forward, leading with your chest and maintaining a lumbar curve and neutral pelvis. Lead with chest, not the chin. Anteriorly tilt the pelvis to intensity the stretch. Special care should be taken for clients with balance issues. Foot pedals should be removed for clients using a wheelchair. |
|||
| Common Error(s): | Forward Head Posture | Rounded lower back | ||
| Spotting: | |||
| Movement Pattern: Upper Body | Target: Spinal Erectors | Synergist(s): | |
| Exercise | 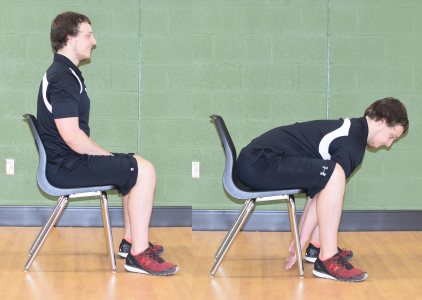 |
||
| Regressions: | Progressions: | ||
| Key Teaching Points | |||
|---|---|---|---|
|
See picture above. Remember to breath. Deepen the stretch by tucking the chin and/or extending your arms towards the ground. |
|||
| Common Error(s): | |||
| Spotting: | |||
| Movement Pattern: Single-joint | isolation | Target: Pec Major | Synergist(s): Deltoids (Anterior) | |
| Exercise | 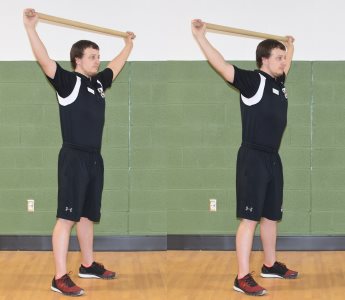 |
||
| Regressions: | Progressions: | ||
| Key Teaching Points | |||
|---|---|---|---|
|
While standing or seated grip the dowel (or stretching strap) widely. Slowly extend arms overhead with elbows extended. Engage your core so that your rib cage does not rise up and maintain a neutral pelvis. The stretch should be within the anterior chest. There should be NO pain in the back of the shoulder joint. Clients with suspected should instability SHOULD NOT partake in this exercise. |
|||
| Common Error(s): | Arching the upper back | ||
| Spotting: | |||
| Movement Pattern: Single-joint | isolation | Target: Hip Adductors | Synergist(s): | |
| Exercise | 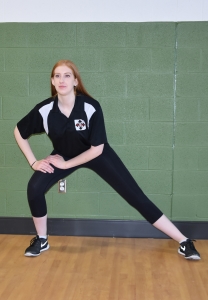 |
||
| Regressions: | Progressions: | ||
| Key Teaching Points | |||
|---|---|---|---|
|
Take a wide stance. Consider the use of a self-spotting technique. Place your hands on one knee and lean towards that side until you feel a stretch in the hip adductors (groin). Move slowly. Do not overdo the stretch. You should NOT feel pain or discomfort with the hip joint. Push through your hands onto your knee to assist coming out of the stretch. |
|||
| Common Error(s): | |||
| Spotting: | Consider self-spotting option | ||
| Movement Pattern: Single-joint | isolation | Target: Pec Major | Synergist(s): Biceps, Deltoids (Anterior) | |
| Exercise | 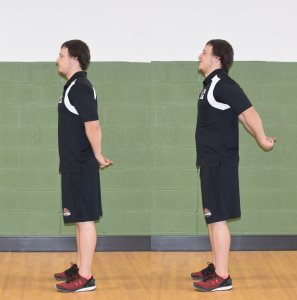 |
||
| Regressions: | Progressions: | ||
| Movement Pattern: Single-joint | isolation | Target: Latissimus Dorsi | Synergist(s): | |
| Exercise | 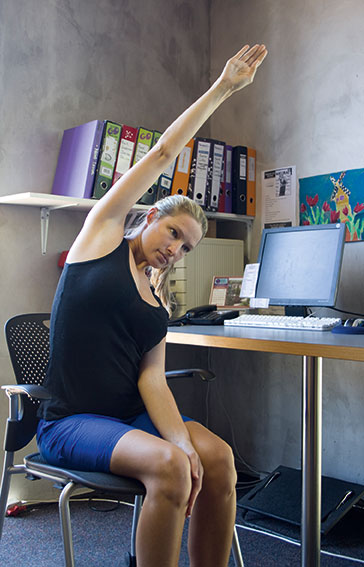 |
||
| Regressions: | Progressions: | ||
| Movement Pattern: Single-joint | isolation | Target: Hamstrings | Synergist(s): | |
| Exercise | 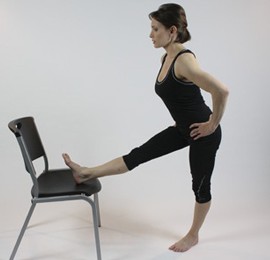 |
||
| Regressions: | Progressions: | ||
| Key Teaching Points | |||
|---|---|---|---|
|
Maintaining an upright posture and neutral spine/pelvis lean forward with the chest toward the elevated foot. Dorsiflex the foot to increase the intensity of the stretch. Do not allow the pelvis to tilt posteriorly. Consider a self spotting option for safety. |
|||
| Common Error(s): | Rounded lower back | ||
| Spotting: | Consider self-spotting option | ||
| Movement Pattern: Single-joint | isolation | Target: Hip Flexors | Synergist(s): | |
| Exercise | 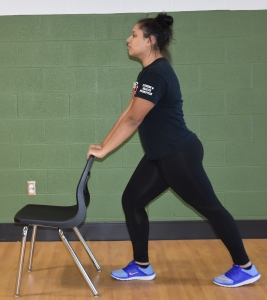 |
||
| Regressions: | Progressions: | ||
| Key Teaching Points | |||
|---|---|---|---|
|
In a staggered stance. Posteriorly tilt the pelvis and lunge forward until you feel a stretch in the hip flexors of the back leg. There should be no pain or discomfort within the hip of lower back. Bending the back knee (or the leg being stretched) will include the rectus femoris muscle. |
|||
| Common Error(s): | |||
| Spotting: | Consider self-spotting option | ||
| Movement Pattern: Single-joint | isolation | Target: IT Band | Synergist(s): | |
| Exercise | 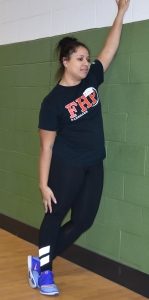 |
||
| Regressions: | Progressions: | ||
| Key Teaching Points | |||
|---|---|---|---|
|
Standing perpendicular to the wall. Slide your inside leg outwards and slightly backwards without bending forward at the waist. Brace your inside arm against the wall. Lean your inside hip towards the wall. The stretch should be in the lateral / proximal leg and pelvic area. You should NOT feel pain in your lower back. |
|||
| Common Error(s): | Torso collapses forward | ||
| Spotting: | Consider self-spotting option | ||
| Movement Pattern: Single-joint | isolation | Target: Triceps | Synergist(s): | |
| Exercise | 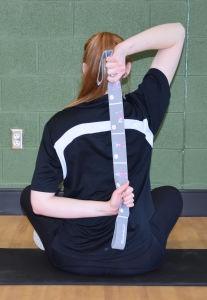 |
||
| Regressions: | Progressions: | ||
| Key Teaching Points | |||
|---|---|---|---|
|
This should NOT be done if there is a history of shoulder pain. Reach one hand behind your back from high and the other from low. Using a towel, dowel or strap apply light pressure from the down hand creating a stretch in the back of the upper arm. Alternatively you can place the lower hand on the elbow of the upper arm to apply pressure. If you apply pressure from the upper arm you will get a shoulder internal rotation stretch on the lower arm when behind the back. There should be NO pain with the shoulder joint. Resist excessive arching of the back and keep the ribs from riding upwards. |
|||
| Common Error(s): | Arching the upper back | ||
| Spotting: | |||
| Movement Pattern: Single-joint | isolation | Target: Deltoid (Posterior) | Synergist(s): | |
| Exercise | 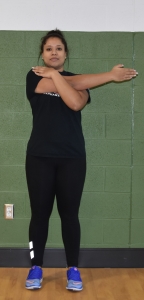 |
||
| Regressions: | Progressions: | ||
| Movement Pattern: Single-joint | isolation | Target: Wrist Flexor | Synergist(s): Wrist Extensor | |
| Exercise | 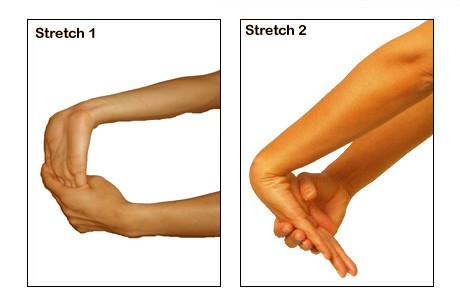 |
||
| Regressions: | Progressions: | ||
| Movement Pattern: | Target: | Synergist(s): Brachioradialis | |
| Exercise | |||
| Regressions: | Progressions: | ||
| Key Teaching Points | |||
|---|---|---|---|
| Common Error(s): | |||
| Spotting: | |||
| Movement Pattern: Gait | Target: | Synergist(s): | |
| Exercise | 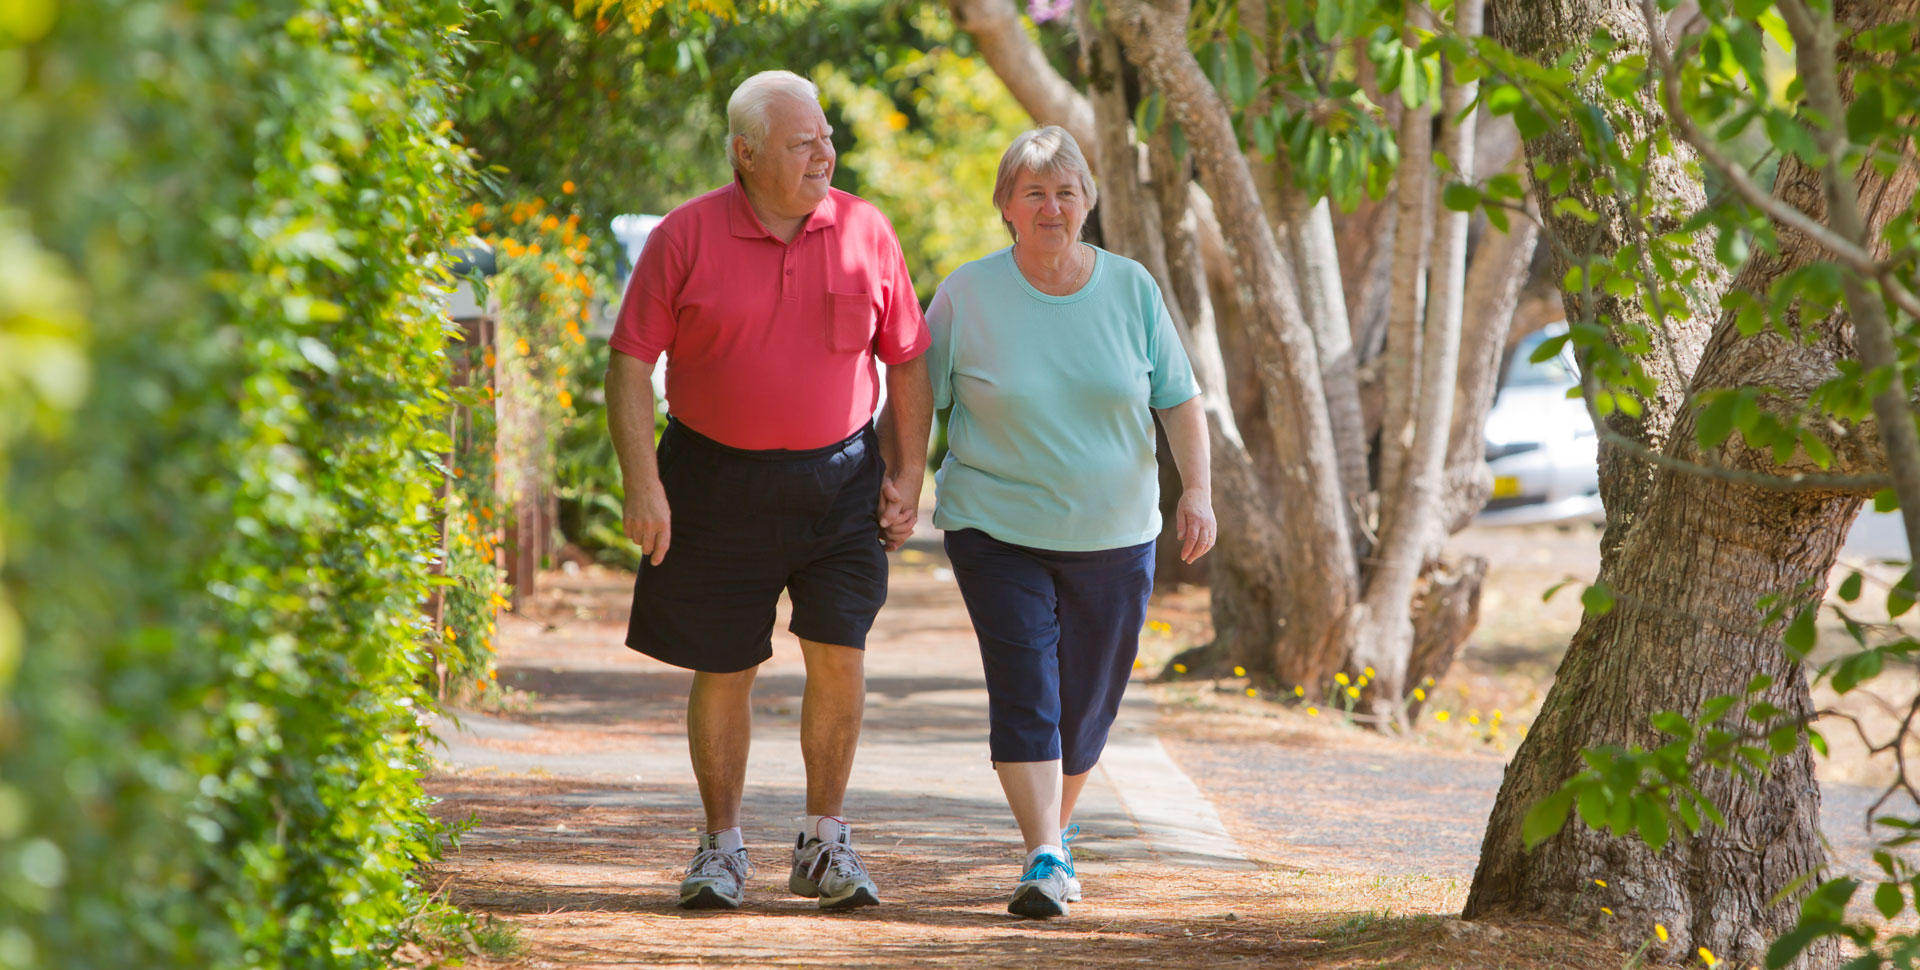 |
||
| Regressions: | Progressions: | ||
| Movement Pattern: Whole Body | Target: | Synergist(s): | |
| Exercise | |||
| Regressions: | Progressions: | ||
| Key Teaching Points | |||
|---|---|---|---|
| Common Error(s): | |||
| Spotting: | |||
| Movement Pattern: Whole Body | Target: | Synergist(s): | |
| Exercise | |||
| Regressions: | Progressions: | ||
| Key Teaching Points | |||
|---|---|---|---|
|
|||
| Common Error(s): | |||
| Spotting: | |||
| Movement Pattern: | Target: | Synergist(s): | |
| Exercise | 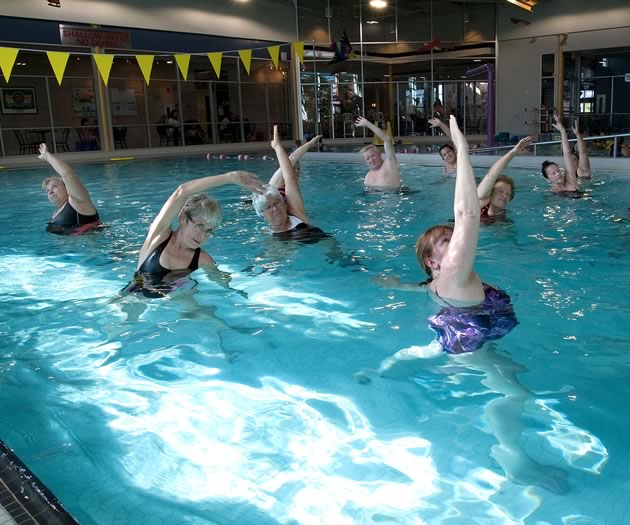 |
||
| Regressions: | Progressions: | ||
| Movement Pattern: | Target: | Synergist(s): | |
| Exercise | |||
| Regressions: | Progressions: | ||
| Key Teaching Points | |||
|---|---|---|---|
| Common Error(s): | |||
| Spotting: | |||
| Movement Pattern: Upper Body | Target: Trapezius | Synergist(s): Rhomboids | |
| Exercise | 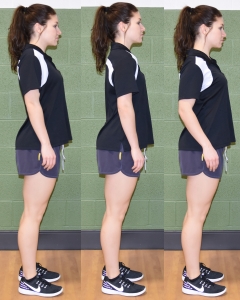 |
||
| Regressions: | Progressions: | ||
| Key Teaching Points | |||
|---|---|---|---|
|
The focus is on your shoulder blades. Elevate, Abduct (protract), Depress, Abduct (retract), Repeat. Careful not to let your head glide forward (stay neutral) or your rips elevate/pelvis anterior tilt (core strong). |
|||
| Common Error(s): | Sagging lower back | Forward Head Posture | ||
| Spotting: | |||
| Movement Pattern: | Target: Wrist Flexor | Synergist(s): Wrist Extensor | |
| Exercise | 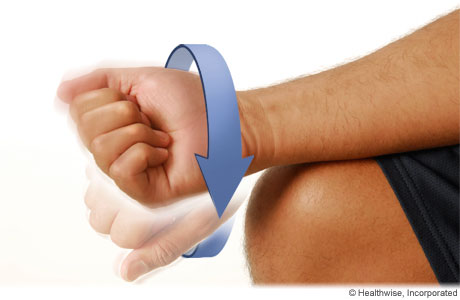 |
||
| Regressions: | Progressions: | ||
| Movement Pattern: Lower Body | Target: Hip Flexors | Synergist(s): Gluteals, TFL | |
| Exercise | 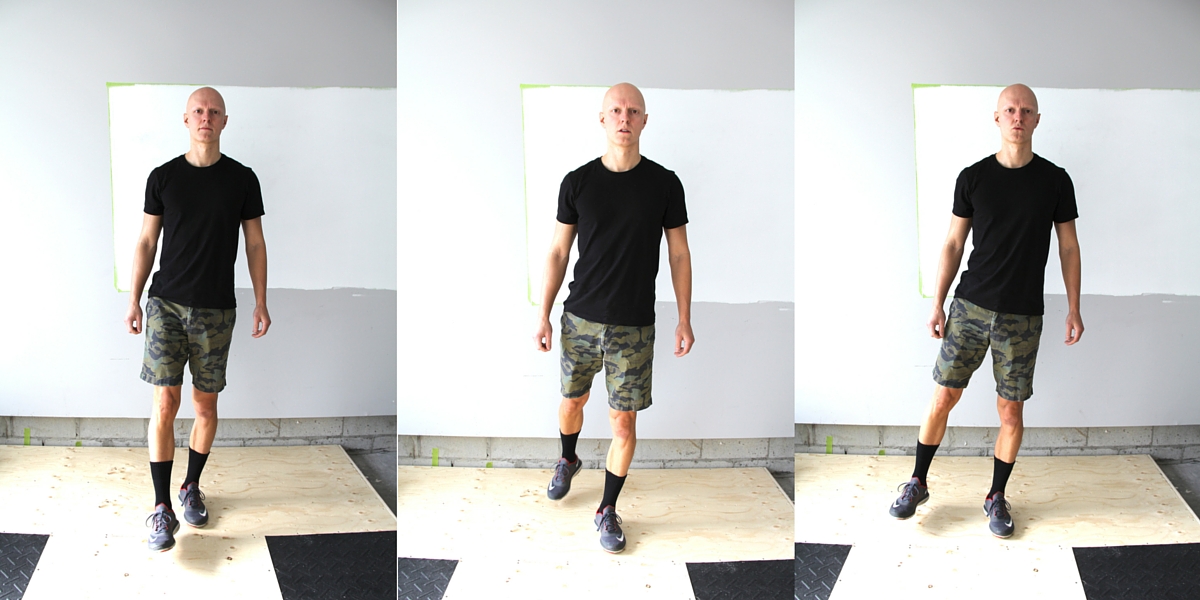 |
||
| Regressions: | Progressions: | ||
| Key Teaching Points | |||
|---|---|---|---|
1. Activate your glutes by lifting one leg out to the side.2. Draw circles with that leg, feeling your glutes.3. Consider a self-spotting option. Without a spot, this becomes more of a balance exercise than a hip mobility one.4. Try to maximize the pain-free hip range (flexion, abduction, extension, repeat). |
|||
| Common Error(s): | Not engaging core | ||
| Spotting: | Consider self-spotting option | ||
| Movement Pattern: | Target: | Synergist(s): | |
| Exercise | 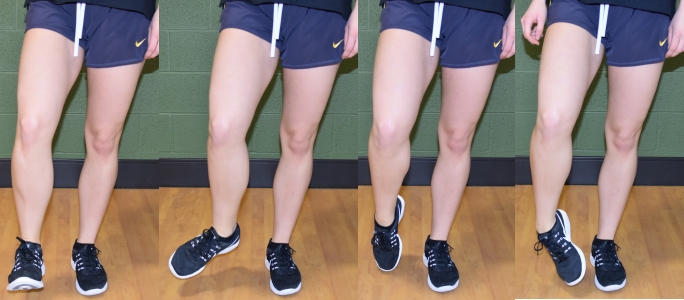 |
||
| Regressions: | Progressions: | ||
| Key Teaching Points | |||
|---|---|---|---|
| Common Error(s): | |||
| Spotting: | |||
| Movement Pattern: Lower Body | Target: Hip Flexors | Synergist(s): Rectus Abdominus | |
| Exercise | |||
| Regressions: | Progressions: | ||
| Key Teaching Points | |||
|---|---|---|---|
|
|||
| Common Error(s): | Using Excessive Momentum | ||
| Spotting: | |||
| Movement Pattern: | Target: | Synergist(s): | |
| Exercise | 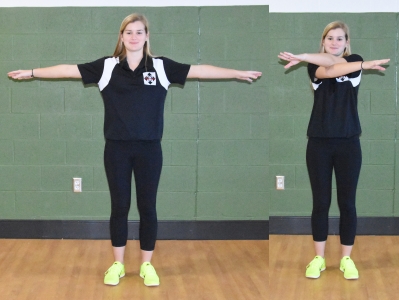 |
||
| Regressions: | Progressions: | ||
| Movement Pattern: Upper Body | Target: Latissimus Dorsi | Synergist(s): Obliques | |
| Exercise | 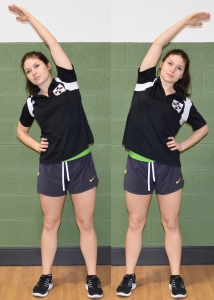 |
||
| Regressions: | Progressions: | ||
| Key Teaching Points | |||
|---|---|---|---|
|
|||
| Common Error(s): | |||
| Spotting: | |||
| Movement Pattern: Whole Body | Target: Hip Flexors | Synergist(s): | |
| Exercise | 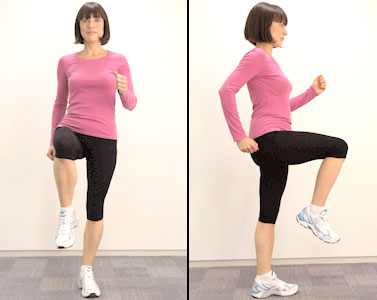 |
||
| Regressions: | Progressions: | ||
| Key Teaching Points | |||
|---|---|---|---|
|
Remain upright and maintain good posture. Elevate knees as high as possible without losing ideal spine posture. Include the arms if wanted. |
|||
| Common Error(s): | |||
| Spotting: | |||
| Movement Pattern: | Target: | Synergist(s): | |
| Exercise | |||
| Regressions: | Progressions: | ||
| Movement Pattern: Whole Body | Target: | Synergist(s): | |
| Exercise | 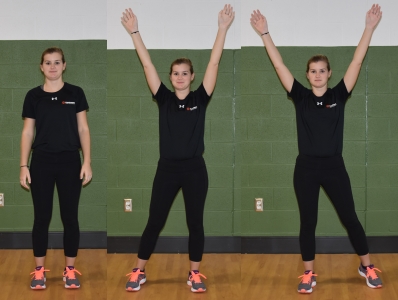 |
||
| Regressions: | Progressions: | ||
| Key Teaching Points | |||
|---|---|---|---|
|
Without jumping mimic a jumping jack motion. Maximize shoulder range of motion. A slight bend of the knee is acceptable. |
|||
| Common Error(s): | |||
| Spotting: | |||
| Movement Pattern: | Target: | Synergist(s): | |
| Exercise | 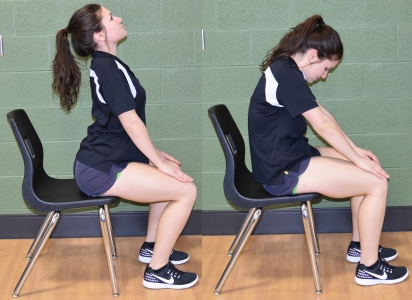 |
||
| Regressions: | Progressions: | ||
| Movement Pattern: | Target: | Synergist(s): | |
| Exercise | 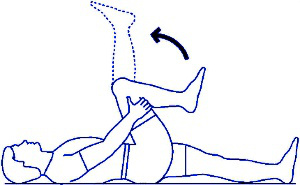 |
||
| Regressions: | Progressions: | ||
| Key Teaching Points | |||
|---|---|---|---|
|
Complete with both legs up. |
|||
| Common Error(s): | |||
| Spotting: | |||
| Movement Pattern: Upper Body | Target: Deltoids (Anterior) | Synergist(s): | |
| Exercise | 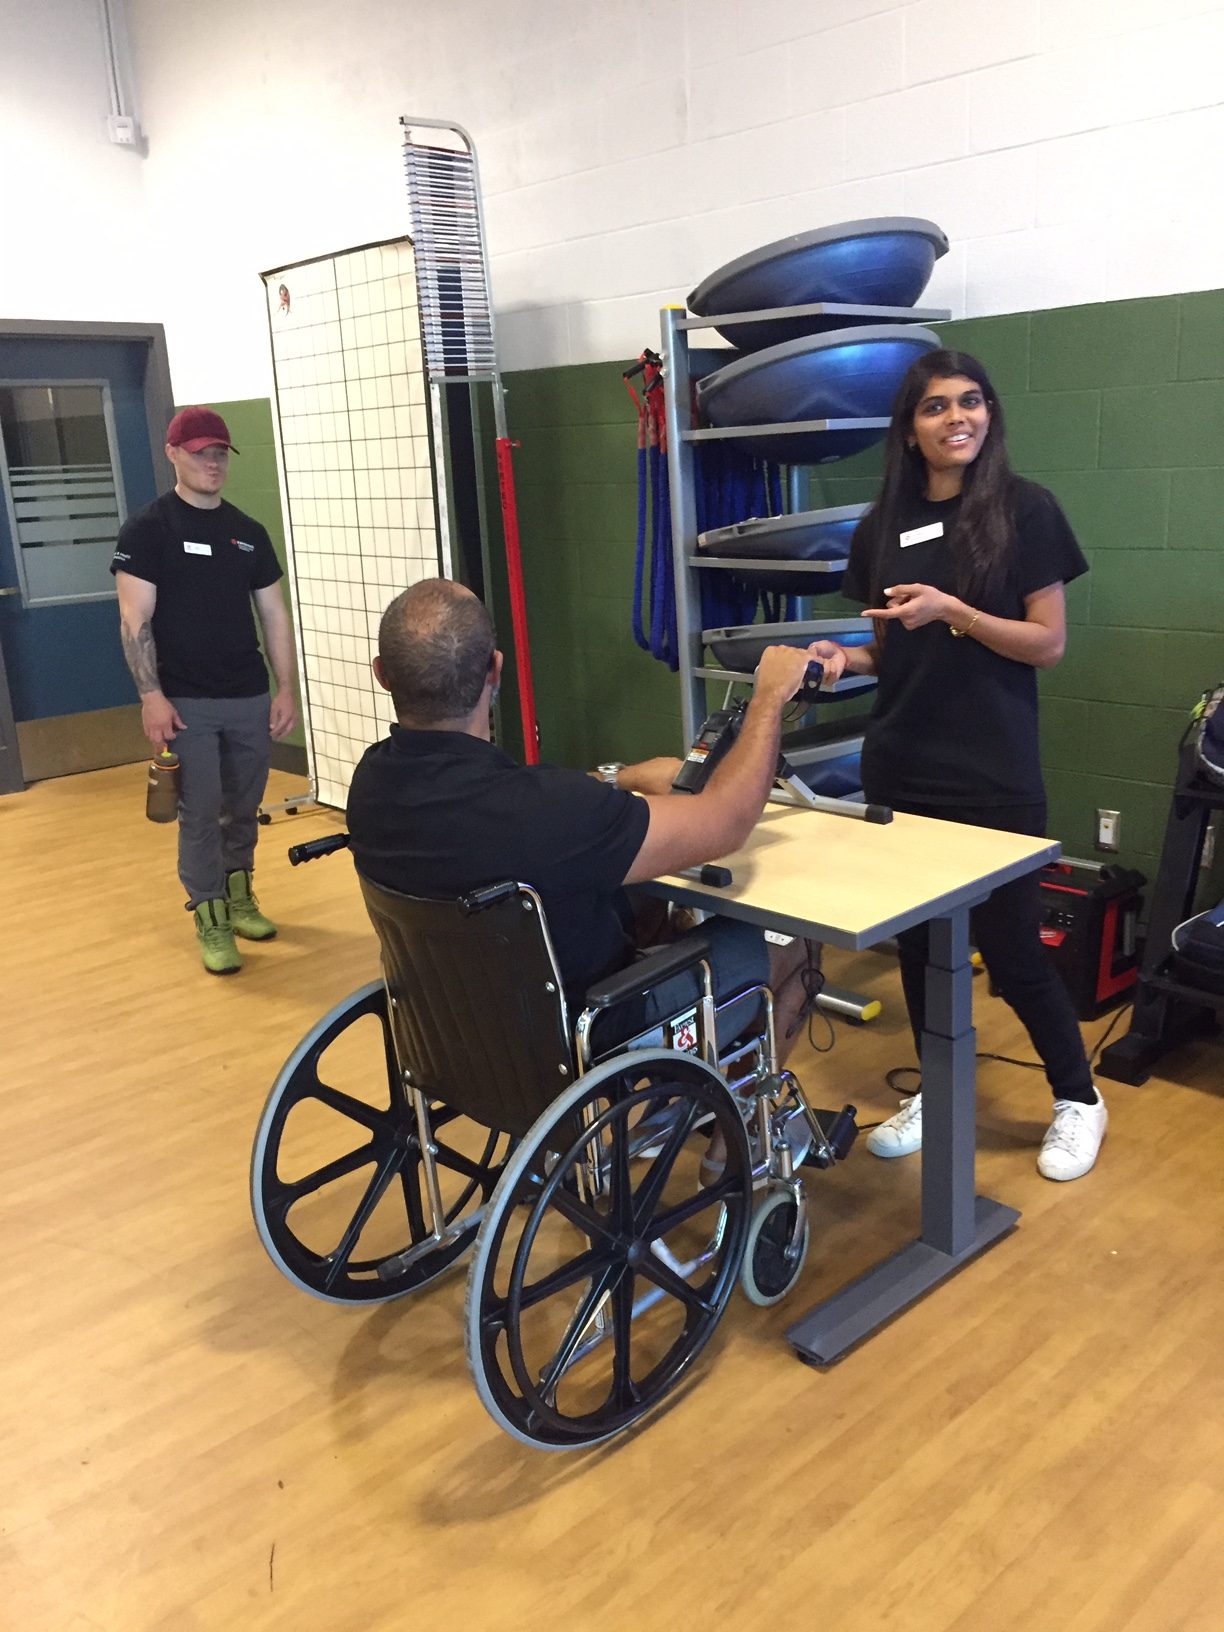 |
||
| Regressions: | Progressions: | ||
| Key Teaching Points | |||
|---|---|---|---|
|
Ensure the client is in a secure seated position. Wheelchair locked or chair secure against wall. If possible adjust the height of the table so that the arm crank is between shoulder and navel height. Ensure that the arm crank is secure to table. Engage core. While maintaining an upright posture begin arm cranking. Caution: shoulder fatigue before aerobic fatigue. Make sure to check on your clients shoulder fatigue regularly. |
|||
| Common Error(s): | Rounded shoulders | Rounded lower back | Not engaging core | ||
| Spotting: | |||
| Movement Pattern: Lower Body | Target: Hip Flexors | Synergist(s): | |
| Exercise | 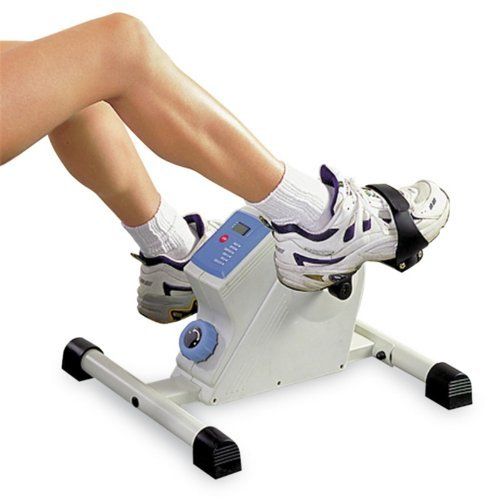 |
||
| Regressions: | Progressions: | ||
| Movement Pattern: | Target: | Synergist(s): | |
| Exercise | 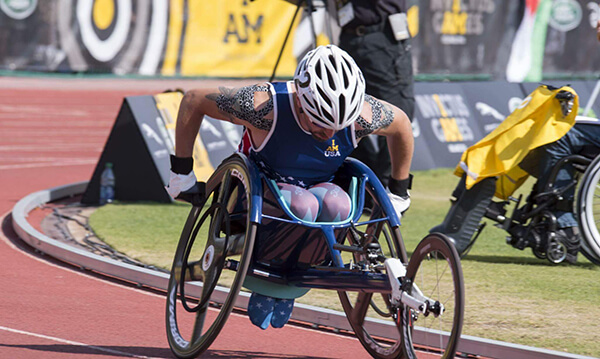 |
||
| Regressions: | Progressions: | ||
| Key Teaching Points | |||
|---|---|---|---|
| Common Error(s): | |||
| Spotting: | |||
| Movement Pattern: | Target: | Synergist(s): | |
| Exercise | 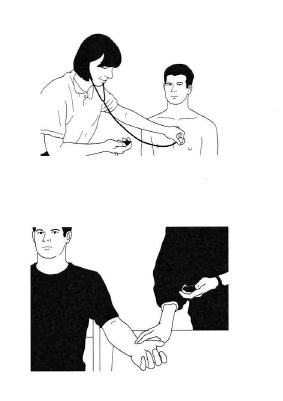 |
||
| Regressions: | Progressions: | ||
| Movement Pattern: | Target: | Synergist(s): | |
| Exercise | 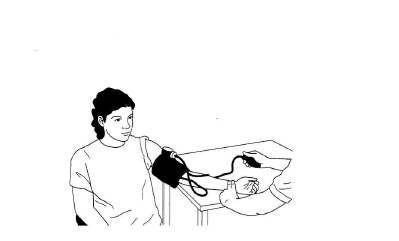 |
||
| Regressions: | Progressions: | ||
| Movement Pattern: | Target: | Synergist(s): | |
| Exercise |  |
||
| Regressions: | Progressions: | ||
| Key Teaching Points | |||
|---|---|---|---|
|
Generally, 1-RM testing is conducted on advanced lifters using compound (multi-joint) movements such as: squat, leg press, bench press, deadlift, power clean, snatch. If you need to estimate a client’s 1-RM, use the calculator here: 1-RM Calculator 1-RM Warm-up Protocol N.B. Have client spend 5-10 minutes warming up (combination general and dynamic is ideal).
Testing Protocol For loads above 90% of hypothetical 1-RM, look to increase by:
Use up to three attempts (and not more than 5) to determine actual 1 RM with 2-4 min rest between each effort. If an athlete fails on a lift, give them 2-4 minutes rest and re-attempt the lift by decreasing the load (from the failed attempt):
|
|||
| Common Error(s): | |||
| Spotting: | 2 person spotting | ||
| Movement Pattern: | Target: | Synergist(s): | |
| Exercise |  |
||
| Regressions: | Progressions: | ||
| Movement Pattern: | Target: | Synergist(s): | |
| Exercise | 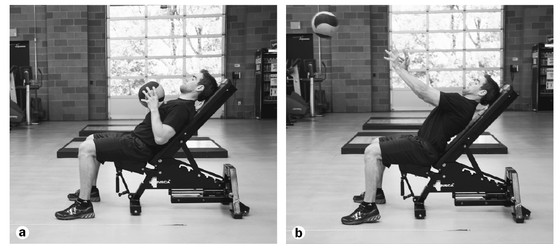 |
||
| Regressions: | Progressions: | ||
| Key Teaching Points | |||
|---|---|---|---|
|
The following protocol is adapted from (Clemons, Campbell, and Jeansonne 2010) Equipment
Procedure
|
|||
| Common Error(s): | |||
| Spotting: | |||
| Movement Pattern: | Target: | Synergist(s): | |
| Exercise |  |
||
| Regressions: | Progressions: | ||
| Key Teaching Points | |||
|---|---|---|---|
|
Weight
Height
Additional resource: BMI Table |
|||
| Common Error(s): | |||
| Spotting: | |||
| Movement Pattern: Lunge | Target: Gluteals | Synergist(s): Quadriceps | |
| Exercise | 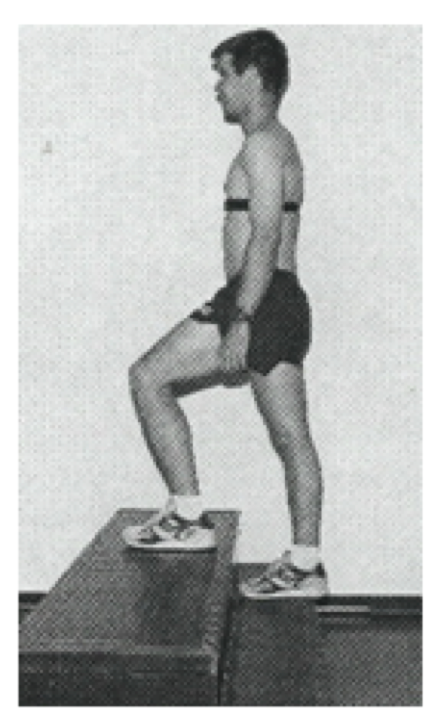 |
||
| Regressions: | Progressions: | ||
| Key Teaching Points | |||
|---|---|---|---|
|
Pre-Exercise
During Exercise
Post-Exercise
|
|||
| Common Error(s): | |||
| Spotting: | |||
| Movement Pattern: | Target: | Synergist(s): | |
| Exercise | 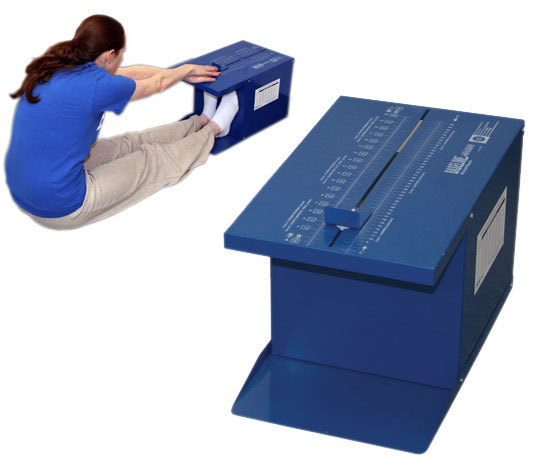 |
||
| Regressions: | Progressions: | ||
| Key Teaching Points | |||
|---|---|---|---|
|
|||
| Common Error(s): | |||
| Spotting: | |||
| Movement Pattern: Lower Body | Target: | Synergist(s): Gastrocnemius | |
| Exercise | 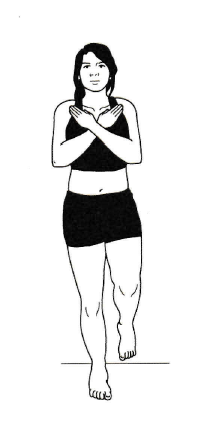 |
||
| Regressions: | Progressions: | ||
| Key Teaching Points | |||
|---|---|---|---|
|
|||
| Common Error(s): | Using Excessive Momentum | ||
| Spotting: | |||
| Movement Pattern: | Target: | Synergist(s): | |
| Exercise | 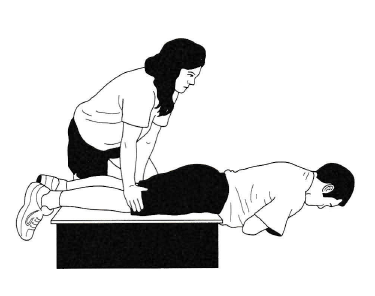 |
||
| Regressions: | Progressions: | ||
| Key Teaching Points | |||
|---|---|---|---|
|
|||
| Common Error(s): | |||
| Spotting: | |||
| Movement Pattern: Upper Body | Target: Rhomboids | Synergist(s): | |
| Exercise | 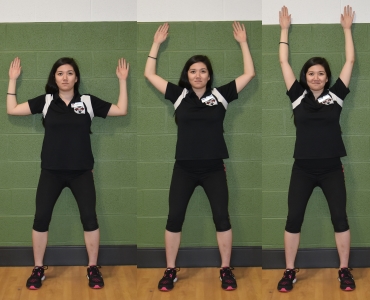 |
||
| Regressions: | Progressions: | ||
| Key Teaching Points | |||
|---|---|---|---|
|
|||
| Common Error(s): | Arching the upper back | Not engaging core | Rounded shoulders | ||
| Spotting: | |||
| Movement Pattern: Single-joint | isolation | Target: Sternoclenomastoid | Synergist(s): | |
| Exercise | 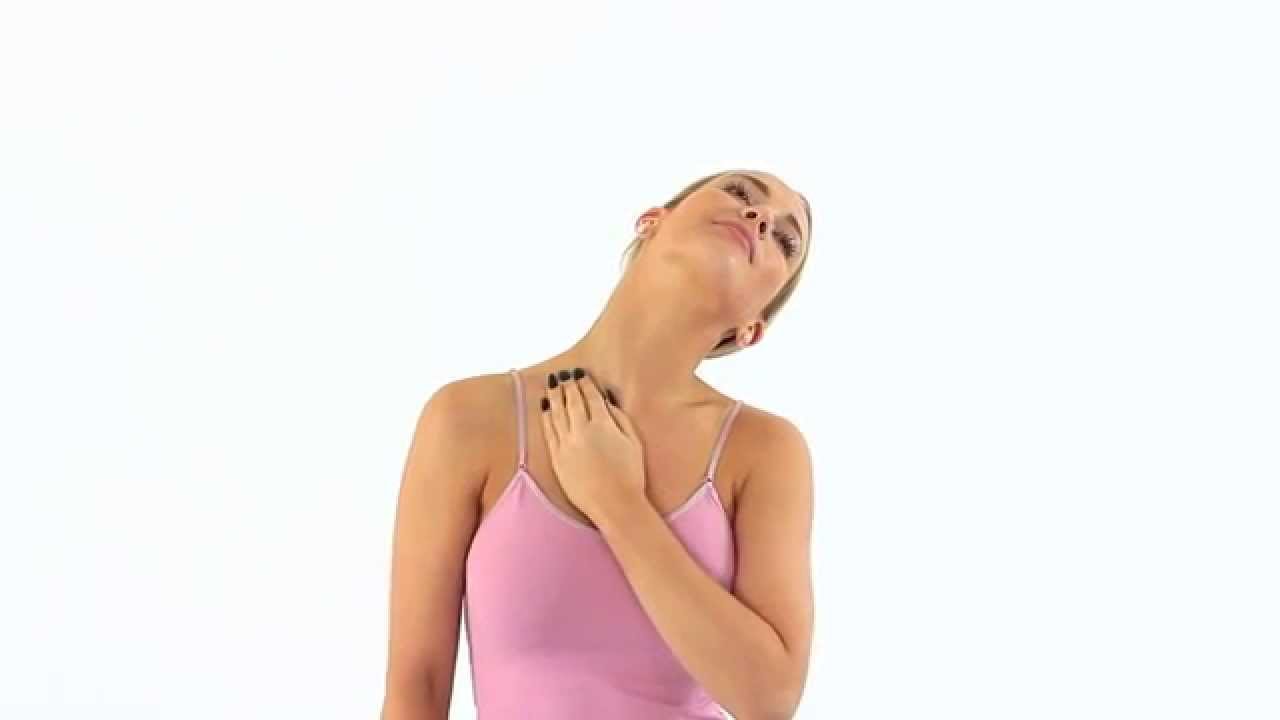 |
||
| Regressions: | Progressions: | ||
| Key Teaching Points | |||
|---|---|---|---|
|
|||
| Common Error(s): | |||
| Spotting: | |||
| Movement Pattern: | Target: | Synergist(s): | |
| Exercise | 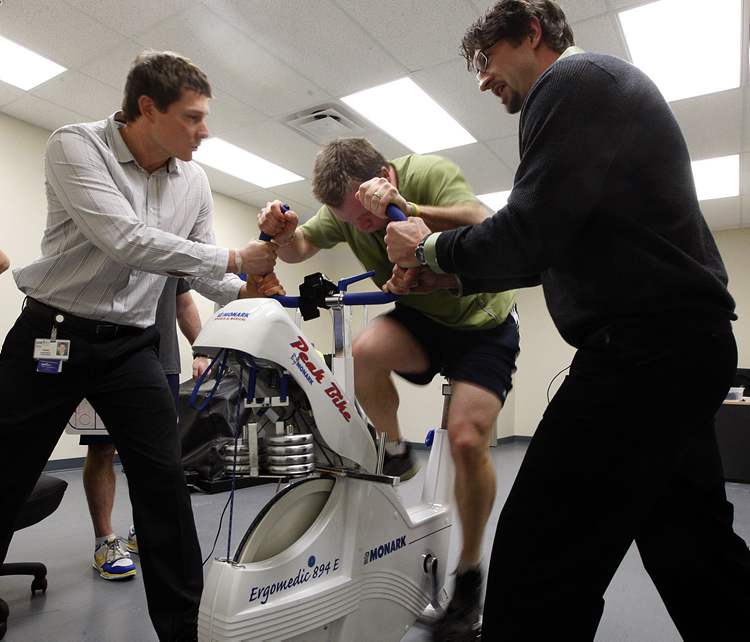 |
||
| Regressions: | Progressions: | ||
| Key Teaching Points | |||
|---|---|---|---|
|
The Wingate test requires the subject to pedal a mechanically braked bicycle ergometer (an arm ergometer can also be used), for 30 seconds, at an “all out” pace. A counter is used to record revolutions of the flywheel in 5-second intervals (alternatively, some bikes are equipped with a watt meter). Although the actual Wingate test is performed in a 30-second time span, the individual is advised to complete a warm-up (3-5 minutes), followed by a recovery cool down (2-5 minutes). On commencing the test (usually by a verbal signal from the tester), the individual pedals “all out” with little to no resistance. Within 3 seconds, the predetermined fixed resistance is applied to the flywheel and remains there for the duration of the 30-second test. For the Monark ergometers we use in lab, you will need to manually record the watt readings at every 5 seconds, for the duration of the test and transfer them to your performance sheet: Performance Data Collection Resistance Test Scores
|
|||
| Common Error(s): | |||
| Spotting: | |||
| Movement Pattern: | Target: | Synergist(s): | |
| Exercise | 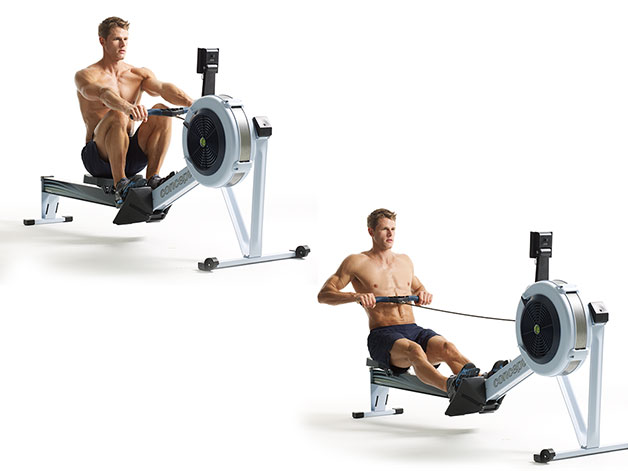 |
||
| Regressions: | Progressions: | ||
| Key Teaching Points | |||||||||||||||||||||
|---|---|---|---|---|---|---|---|---|---|---|---|---|---|---|---|---|---|---|---|---|---|
|
10 Sec Peak Power Test Peak Power is measured with a 10s erg test. Warm up by rowing easy for 5-10 minutes. At the end of your warm up come to a full stop and let the fly wheel stop. On a Concept II set the drag factor to 190. The high drag factor is necessary to provide adequate resistance so that you can hit a true peak power. Set your monitor so that you can see the watts for each stroke. From a stop row as hard and as fast as possible for 10 seconds, recording the highest power you see on any stroke. Rest for 3-5 minutes and repeat again. There is a slight learning effect when you first do this test so you might want to do it 2-3 times to get a true peak power score. 1-Min Test Warm up by rowing easy for 5-10 minutes. At the end of your warm up come to a full stop and let the fly wheel stop. For this test, you will want the drag factor set as follow: males – 130, females: – 110. Set your monitor so that you can see the watts for each stroke. From a stop row as hard and as fast as possible for a full minute, recording your distance covered and the average watts you output for the test. Performance Standards Because body weight will have a significant impact on rowing performance power to weight ratios have been developed for men and women at different performance levels (table 1).
These ranges have been developed based on the scores of top performers in each category. |
|||||||||||||||||||||
| Common Error(s): | |||||||||||||||||||||
| Spotting: | |||||||||||||||||||||
| Movement Pattern: | Target: Quadriceps | Synergist(s): Gastrocnemius, Hamstrings | |
| Exercise | 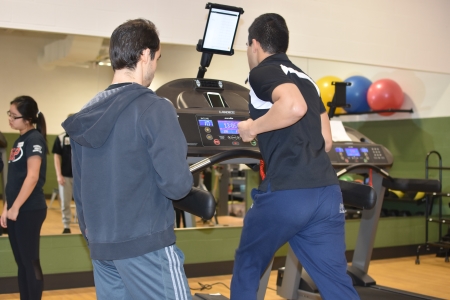 |
||
| Regressions: | Progressions: | ||
| Key Teaching Points | ||||||||||||||||||||||||||||||||||||||||||||||||||||||||||||||||||||||||
|---|---|---|---|---|---|---|---|---|---|---|---|---|---|---|---|---|---|---|---|---|---|---|---|---|---|---|---|---|---|---|---|---|---|---|---|---|---|---|---|---|---|---|---|---|---|---|---|---|---|---|---|---|---|---|---|---|---|---|---|---|---|---|---|---|---|---|---|---|---|---|---|---|
|
ASSESSMENT Max HR (max heart rate) = (208 – 0.7 x age)
TERMINATE THE ASSESSMENT IF ANY OF THE FOLLOWING OCCURS:
Record the reason for terminating the assessment and the initial time the THR was exceeded (if applicable). Record time in minutes and convert second(s)into decimal. Use the test time (TT) the participant completed the assessment (i.e. exceeded the THR) along with the treadmill conversion formula to estimate VO2 max. VO2 Max Calculation VO2 max formula = 56.981 + (1.242 × TT) – (0.805 × BMI) |
||||||||||||||||||||||||||||||||||||||||||||||||||||||||||||||||||||||||
| Common Error(s): | ||||||||||||||||||||||||||||||||||||||||||||||||||||||||||||||||||||||||
| Spotting: | ||||||||||||||||||||||||||||||||||||||||||||||||||||||||||||||||||||||||
| Movement Pattern: Squat | Target: Quadriceps | Synergist(s): Gluteals, Hamstrings | |
| Exercise | 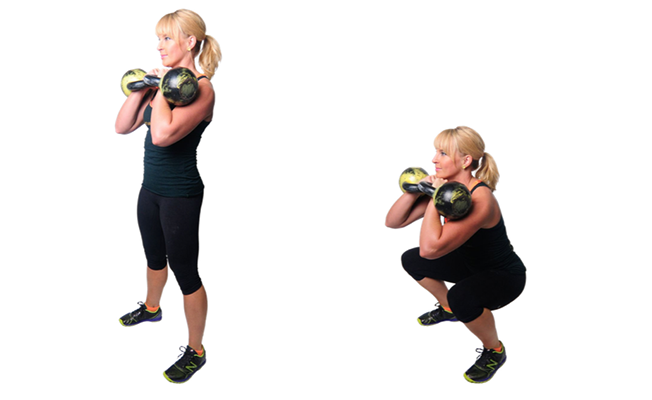 |
||
| Regressions: | Lumberjack Squat | Progressions: | Front Squat |
| Key Teaching Points | |||
|---|---|---|---|
Maintain a firm wrist while holding the kettlebells and keep the elbows point down (do not let them flare out to 90º) |
|||
| Common Error(s): | Not engaging core | Torso collapses forward | Valgus knees | ||
| Spotting: | |||
| Movement Pattern: | Target: Quadriceps | Synergist(s): | |
| Exercise | 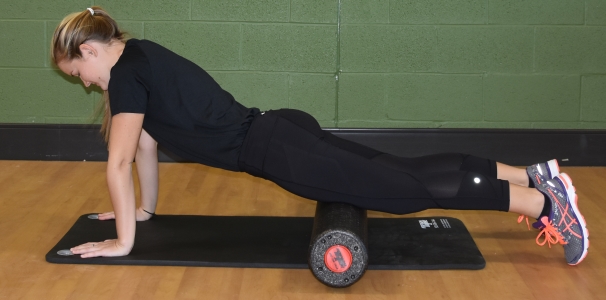 |
||
| Regressions: | Progressions: | ||
| Key Teaching Points | |||
|---|---|---|---|
|
|||
| Common Error(s): | |||
| Spotting: | |||
| Movement Pattern: | Target: Gastrocnemius | Synergist(s): Peroneals, Soleus | |
| Exercise | 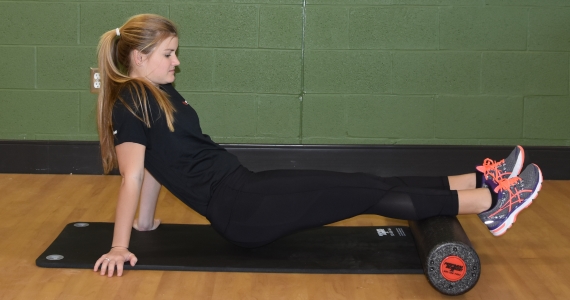 |
||
| Regressions: | Progressions: | ||
| Key Teaching Points | |||
|---|---|---|---|
|
|||
| Common Error(s): | |||
| Spotting: | |||
| Movement Pattern: | Target: Gluteals | Synergist(s): IT Band, Piriformis, TFL | |
| Exercise | 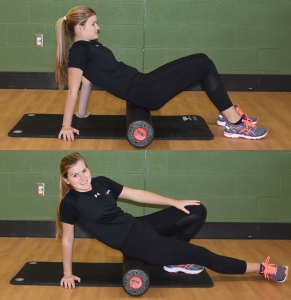 |
||
| Regressions: | Progressions: | ||
| Key Teaching Points | |||
|---|---|---|---|
|
|||
| Common Error(s): | |||
| Spotting: | |||
| Movement Pattern: | Target: Hamstrings | Synergist(s): | |
| Exercise | 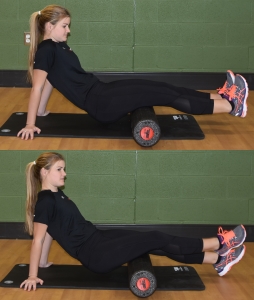 |
||
| Regressions: | Progressions: | ||
| Key Teaching Points | |||
|---|---|---|---|
|
|||
| Common Error(s): | |||
| Spotting: | |||
| Movement Pattern: | Target: Latissimus Dorsi | Synergist(s): Serratus | |
| Exercise | 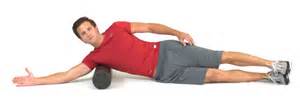 |
||
| Regressions: | Progressions: | ||
| Key Teaching Points | |||
|---|---|---|---|
|
|||
| Common Error(s): | |||
| Spotting: | |||
| Movement Pattern: | Target: Piriformis | Synergist(s): | |
| Exercise | 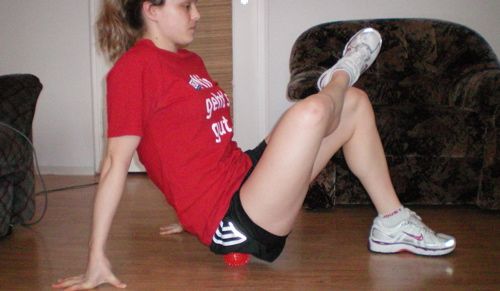 |
||
| Regressions: | Progressions: | ||
| Key Teaching Points | |||
|---|---|---|---|
|
|||
| Common Error(s): | |||
| Spotting: | |||
| Movement Pattern: | Target: Pec Minor | Synergist(s): | |
| Exercise | 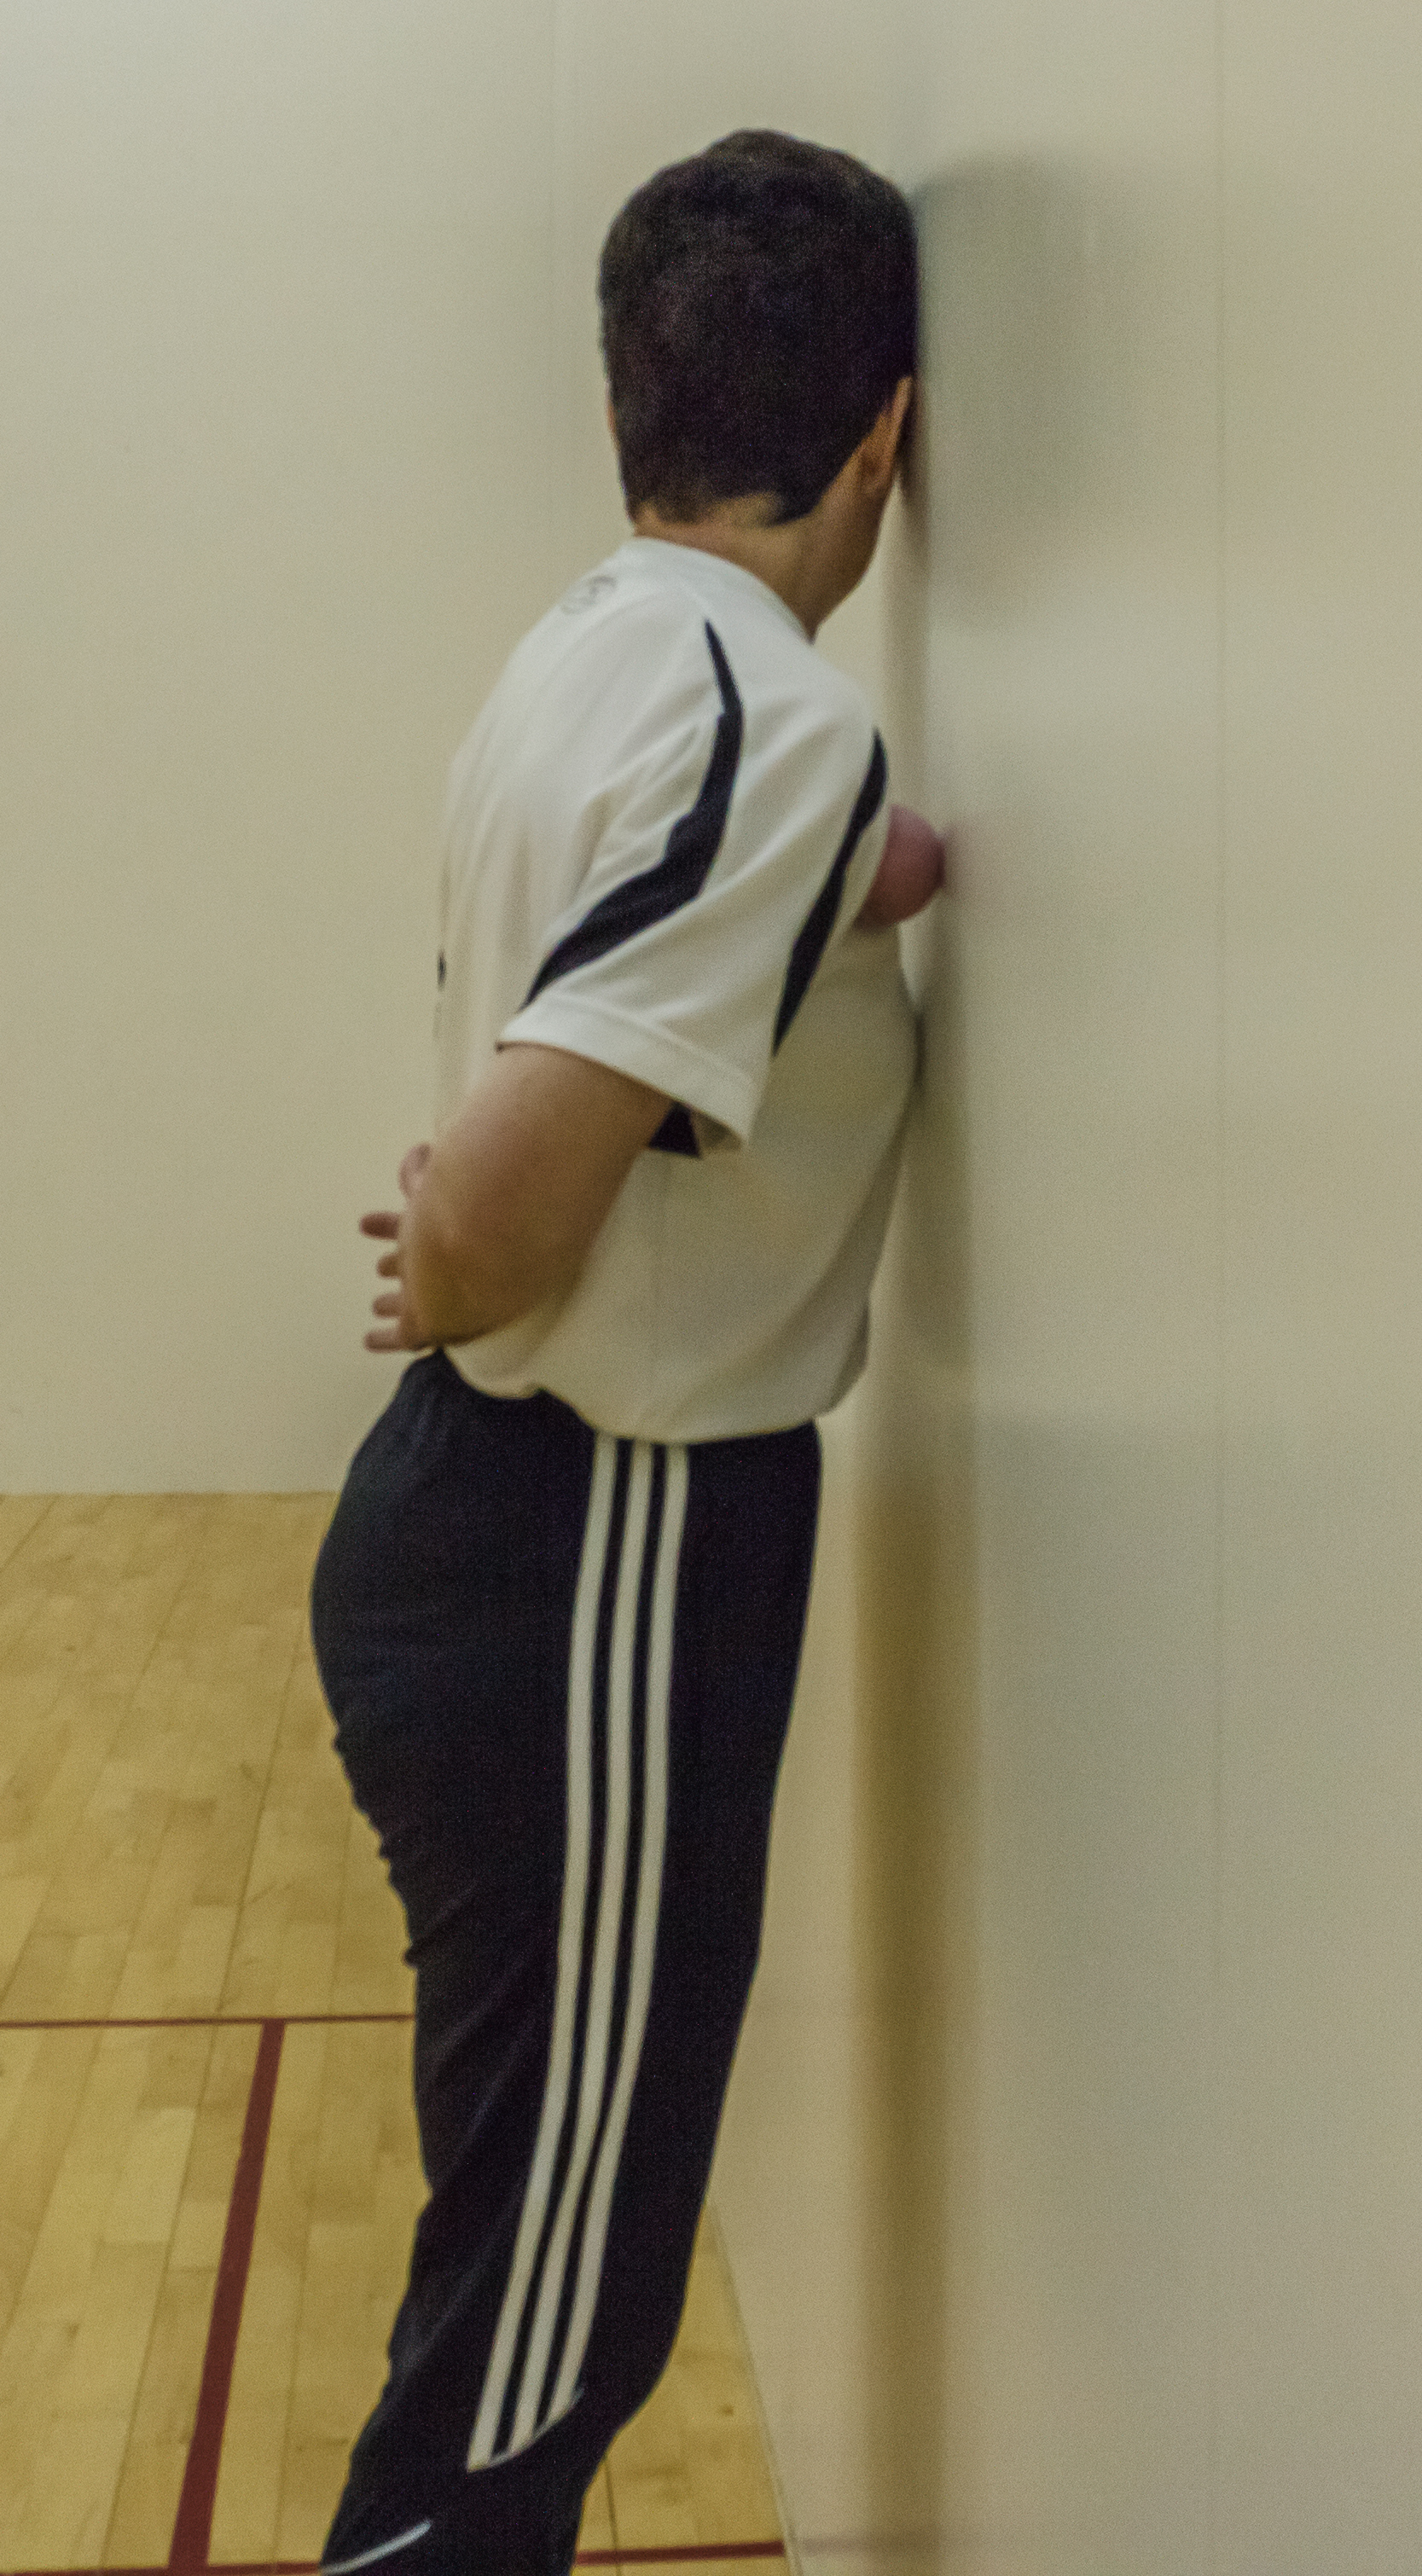 |
||
| Regressions: | Progressions: | ||
| Key Teaching Points | |||
|---|---|---|---|
|
|||
| Common Error(s): | |||
| Spotting: | |||
| Movement Pattern: | Target: Trapezius | Synergist(s): Rhomboids | |
| Exercise | 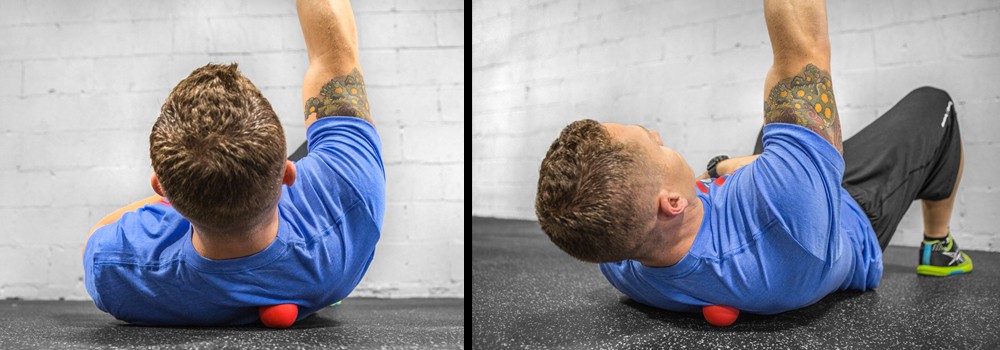 |
||
| Regressions: | Progressions: | ||
| Key Teaching Points | |||
|---|---|---|---|
|
|||
| Common Error(s): | |||
| Spotting: | |||
| Movement Pattern: | Target: Foot Arch | Synergist(s): Suboccipitals | |
| Exercise | 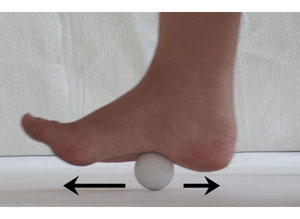 |
||
| Regressions: | Progressions: | ||
| Key Teaching Points | |||
|---|---|---|---|
|
|||
| Common Error(s): | |||
| Spotting: | |||
| Movement Pattern: | Target: Spinal Erectors | Synergist(s): Suboccipitals | |
| Exercise | 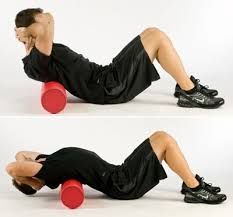 |
||
| Regressions: | Progressions: | ||
| Key Teaching Points | |||
|---|---|---|---|
|
|||
| Common Error(s): | |||
| Spotting: | |||
| Movement Pattern: | Target: | Synergist(s): Suboccipitals | |
| Exercise | 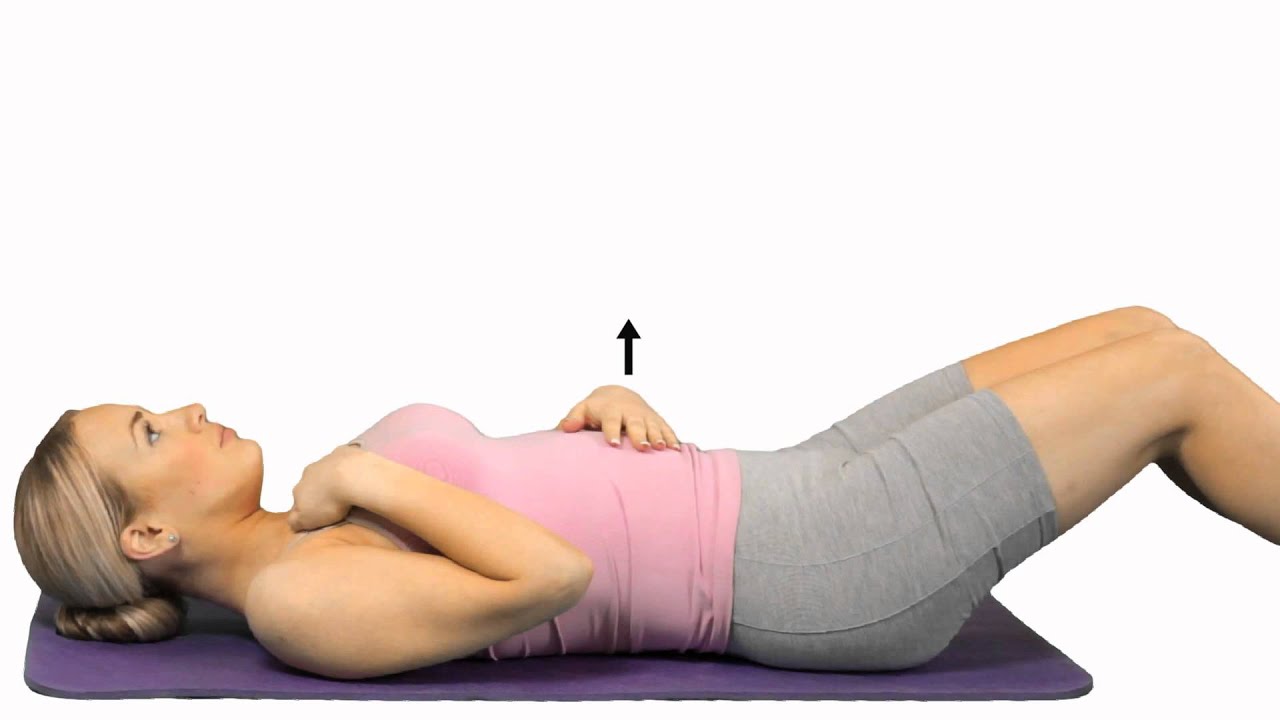 |
||
| Regressions: | Progressions: | ||
| Key Teaching Points | |||
|---|---|---|---|
|
|||
| Common Error(s): | Not engaging core | ||
| Spotting: | |||
| Movement Pattern: | Target: | Synergist(s): Suboccipitals | |
| Exercise | 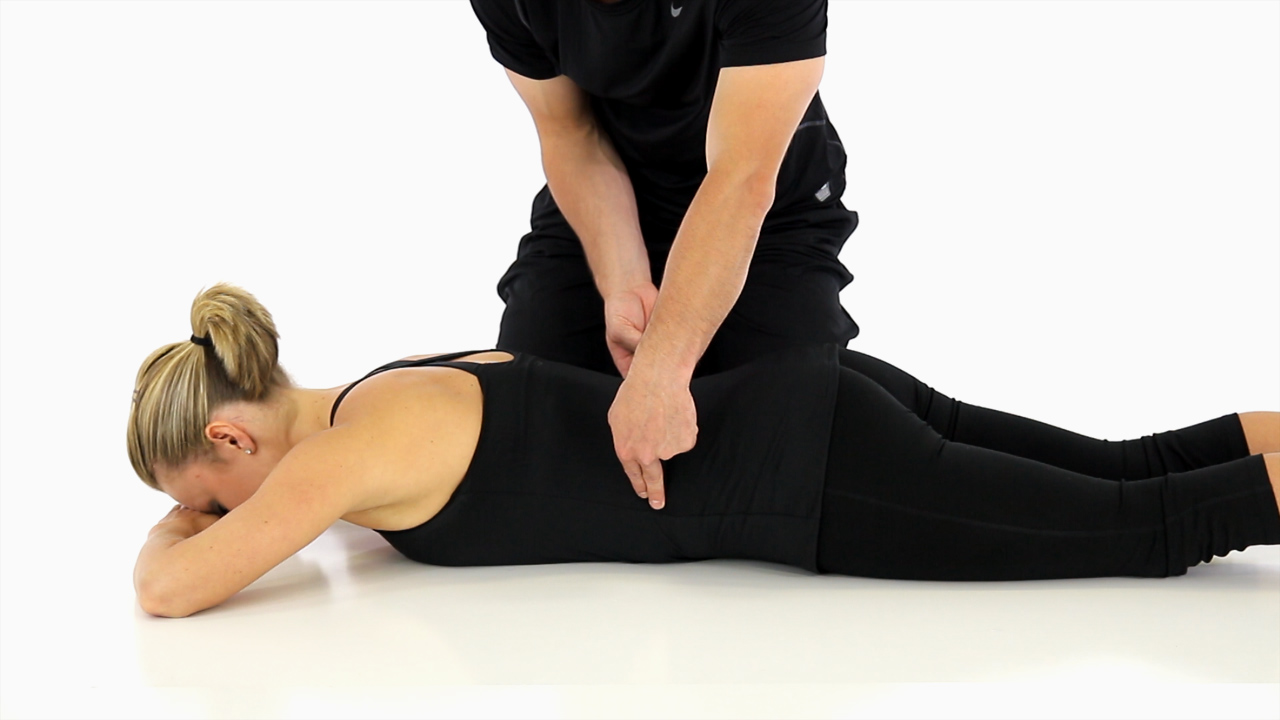 |
||
| Regressions: | Progressions: | ||
| Key Teaching Points | |||
|---|---|---|---|
| Common Error(s): | |||
| Spotting: | |||
| Movement Pattern: Whole Body | Target: Gluteals | Synergist(s): Hamstrings, Spinal Erectors, Trapezius | |
| Exercise |  |
||
| Regressions: | Snatch | Progressions: | Snatch |
| Key Teaching Points | |||
|---|---|---|---|
|
Preparation
Execution
Return
|
|||
| Common Error(s): | Rounded lower back | ||
| Spotting: | |||
| Movement Pattern: Whole Body | Target: Gluteals | Synergist(s): Hamstrings, Spinal Erectors, Trapezius | |
| Exercise |  |
||
| Regressions: | | Snatch | Progressions: | Snatch |
| Key Teaching Points | |||
|---|---|---|---|
|
Preparation
Execution
Return
|
|||
| Common Error(s): | |||
| Spotting: | |||
| Movement Pattern: | Target: Transverse Abdominus | Synergist(s): Deltoids (Anterior), Obliques | |
| Exercise | 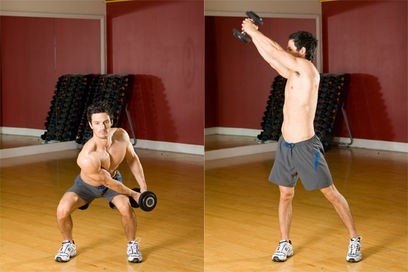 |
||
| Regressions: | Progressions: | ||
| Key Teaching Points | |||
|---|---|---|---|
|
|||
| Common Error(s): | Not engaging core | ||
| Spotting: | |||
| Movement Pattern: Whole Body | Target: | Synergist(s): Suboccipitals | |
| Exercise | 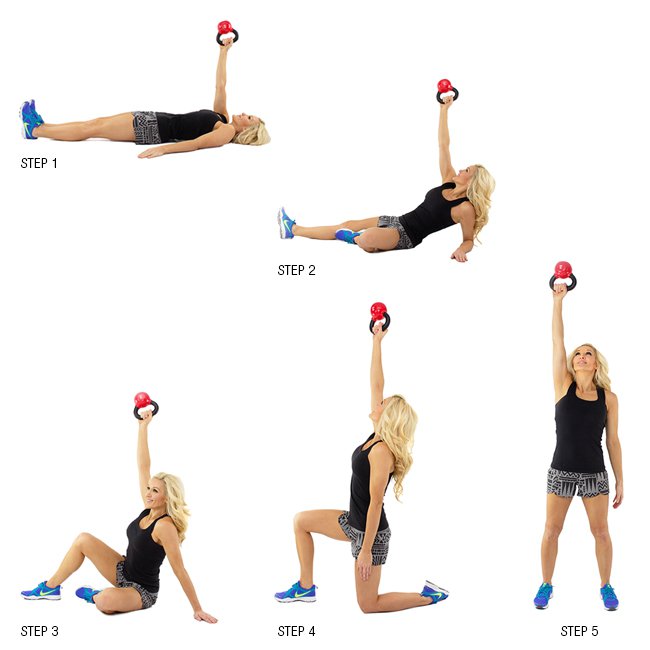 |
||
| Regressions: | Progressions: | ||
| Key Teaching Points | |||
|---|---|---|---|
|
|||
| Common Error(s): | Torso collapses forward | Foot/ankle collapse | Valgus knees | ||
| Spotting: | Mirror Client Level | ||
| Movement Pattern: Whole Body | Target: | Synergist(s): Suboccipitals | |
| Exercise | 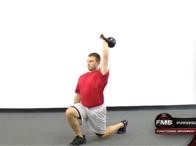 |
||
| Regressions: | Walking Lunge | Lunge with Reach | Progressions: | |
| Key Teaching Points | |||
|---|---|---|---|
|
|||
| Common Error(s): | Foot/ankle collapse | Not engaging core | Torso collapses forward | ||
| Spotting: | |||
| Movement Pattern: Whole Body | Target: | Synergist(s): Suboccipitals | |
| Exercise | 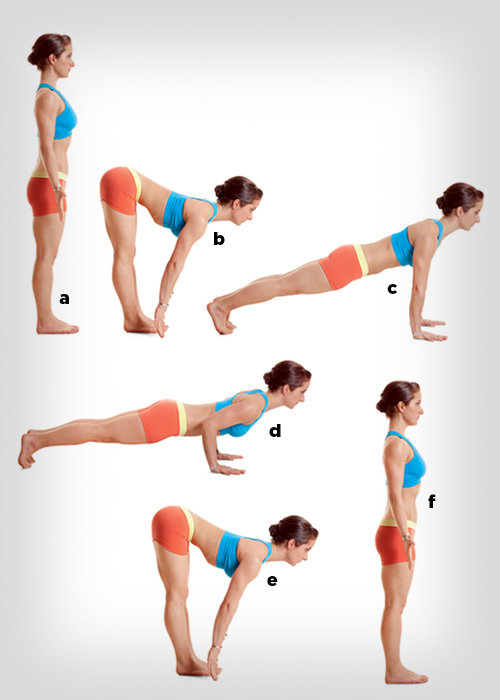 |
||
| Regressions: | Progressions: | ||
| Key Teaching Points | |||
|---|---|---|---|
|
|||
| Common Error(s): | Sagging lower back | Not engaging core | ||
| Spotting: | Mirror Client Level | ||
| Movement Pattern: | Target: | Synergist(s): Suboccipitals | |
| Exercise | 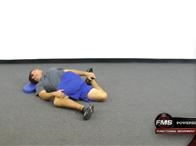 |
||
| Regressions: | Progressions: | ||
| Key Teaching Points | |||
|---|---|---|---|
|
|||
| Common Error(s): | |||
| Spotting: | |||
| Movement Pattern: | Target: | Synergist(s): Suboccipitals | |
| Exercise | 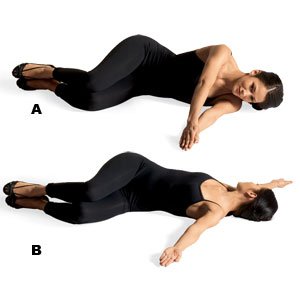 |
||
| Regressions: | Progressions: | ||
| Key Teaching Points | |||
|---|---|---|---|
|
|||
| Common Error(s): | |||
| Spotting: | |||
| Movement Pattern: | Target: | Synergist(s): Suboccipitals | |
| Exercise | 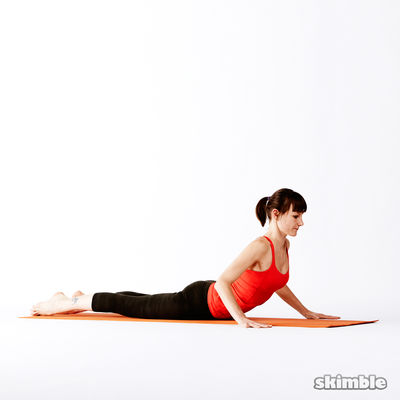 |
||
| Regressions: | Progressions: | ||
| Key Teaching Points | |||
|---|---|---|---|
|
|||
| Common Error(s): | |||
| Spotting: | |||
| Movement Pattern: Core | stabilization | Target: Transverse Abdominus | Synergist(s): Rectus Abdominus | |
| Exercise | 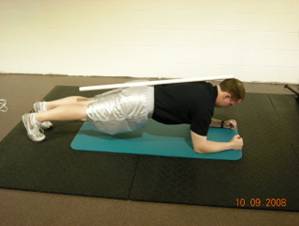 |
||
| Regressions: | Pallof Press | Progressions: | BOSU Plank |
| Key Teaching Points | |||
|---|---|---|---|
|
|||
| Common Error(s): | Sagging lower back | Rounded shoulders | Not engaging core | ||
| Spotting: | Mirror Client Level | ||
| Movement Pattern: Hinge, Whole Body | Target: Spinal Erectors | Synergist(s): Hamstrings, Quadriceps | |
| Exercise | 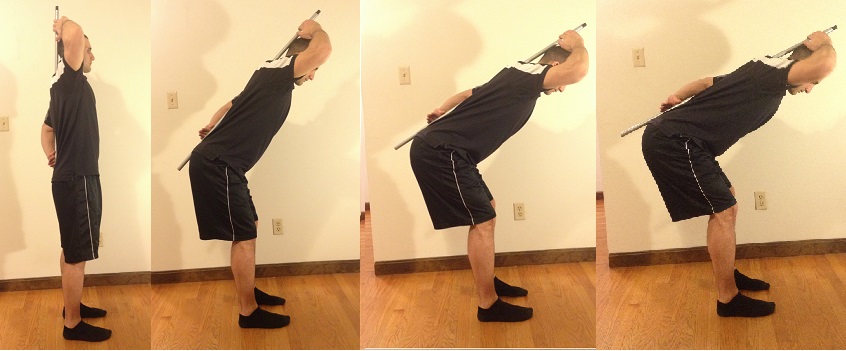 |
||
| Regressions: | Progressions: | Hip Bridge | Deadlift | |
| Key Teaching Points | |||
|---|---|---|---|
|
|||
| Common Error(s): | Torso collapses forward | Sagging lower back | Forward Head Posture | ||
| Spotting: | |||
| Movement Pattern: | Target: Pec Minor | Synergist(s): Suboccipitals | |
| Exercise | 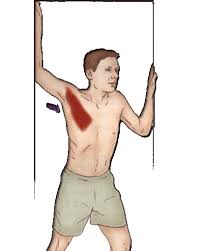 |
||
| Regressions: | Progressions: | ||
| Key Teaching Points | |||
|---|---|---|---|
|
|||
| Common Error(s): | |||
| Spotting: | |||
| Movement Pattern: Single-joint | isolation | Target: Deep Neck Flexors | Synergist(s): Suboccipitals | |
| Exercise | 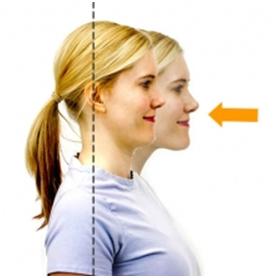 |
||
| Regressions: | Progressions: | ||
| Key Teaching Points | |||
|---|---|---|---|
|
|||
| Common Error(s): | |||
| Spotting: | |||
| Movement Pattern: Single-joint | isolation | Target: Hamstrings | Synergist(s): Gastrocnemius | |
| Exercise | 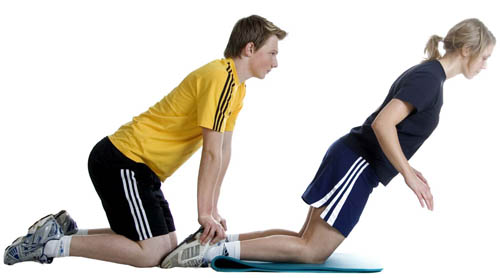 |
||
| Regressions: | Lying Leg Curl | Leg Curl | Progressions: | |
| Key Teaching Points | |||
|---|---|---|---|
Variations:
|
|||
| Common Error(s): | Not engaging core | ||
| Spotting: | |||
| Movement Pattern: Lower Body | Target: Quadriceps | Synergist(s): Gastrocnemius, Gluteals, Hamstrings | |
| Exercise | 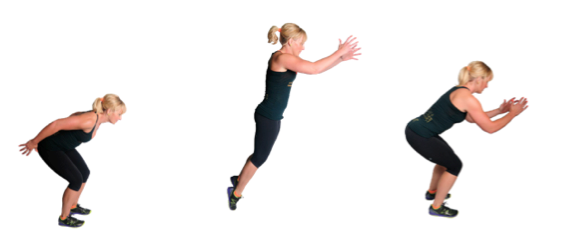 |
||
| Regressions: | Progressions: | ||
| Key Teaching Points | |||
|---|---|---|---|
|
|||
| Common Error(s): | Valgus knees | ||
| Spotting: | |||
| Movement Pattern: Lower Body | Target: Gluteals | Synergist(s): Gastrocnemius, Hamstrings, Quadriceps | |
| Exercise | 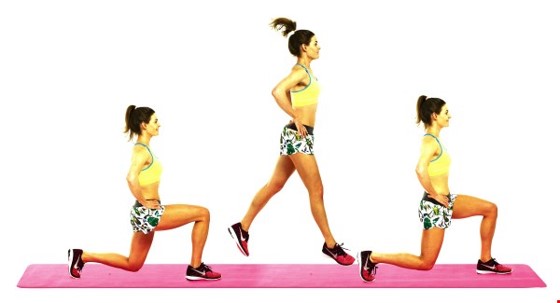 |
||
| Regressions: | Progressions: | ||
| Key Teaching Points | |||
|---|---|---|---|
N.B. Do not land in too deep of a lunge, as the stretch-shortening cycle may not be able to effectively contribute to subsequent jumps. |
|||
| Common Error(s): | Valgus knees | Torso collapses forward | Not engaging core | ||
| Spotting: | |||
| Movement Pattern: Single-joint | isolation | Target: Peroneals | Synergist(s): | |
| Exercise | 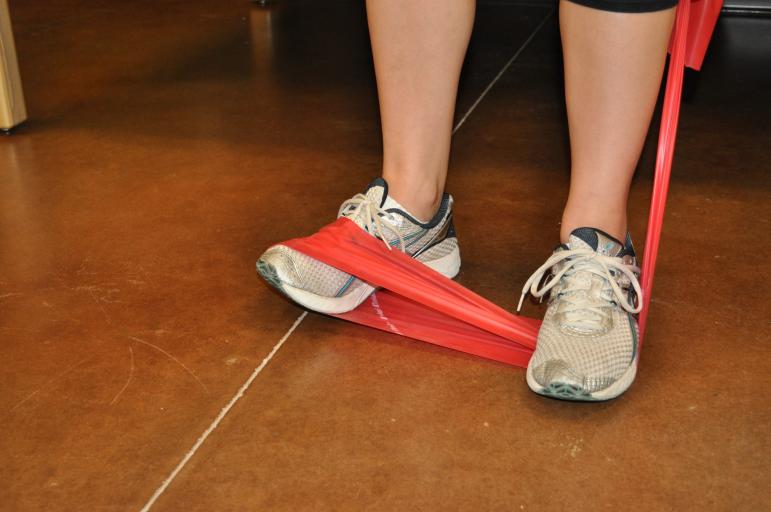 |
||
| Regressions: | Progressions: | ||
| Key Teaching Points | |||
|---|---|---|---|
|
|||
| Common Error(s): | |||
| Spotting: | Band/Tubing Anchoring | ||
| Movement Pattern: | Target: | Synergist(s): | |
| Exercise | 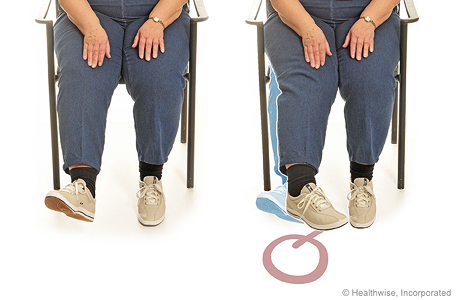 |
||
| Regressions: | Progressions: | ||
| Key Teaching Points | |||
|---|---|---|---|
|
|||
| Common Error(s): | |||
| Spotting: | |||
| Movement Pattern: Lower Body | Target: | Synergist(s): | |
| Exercise | 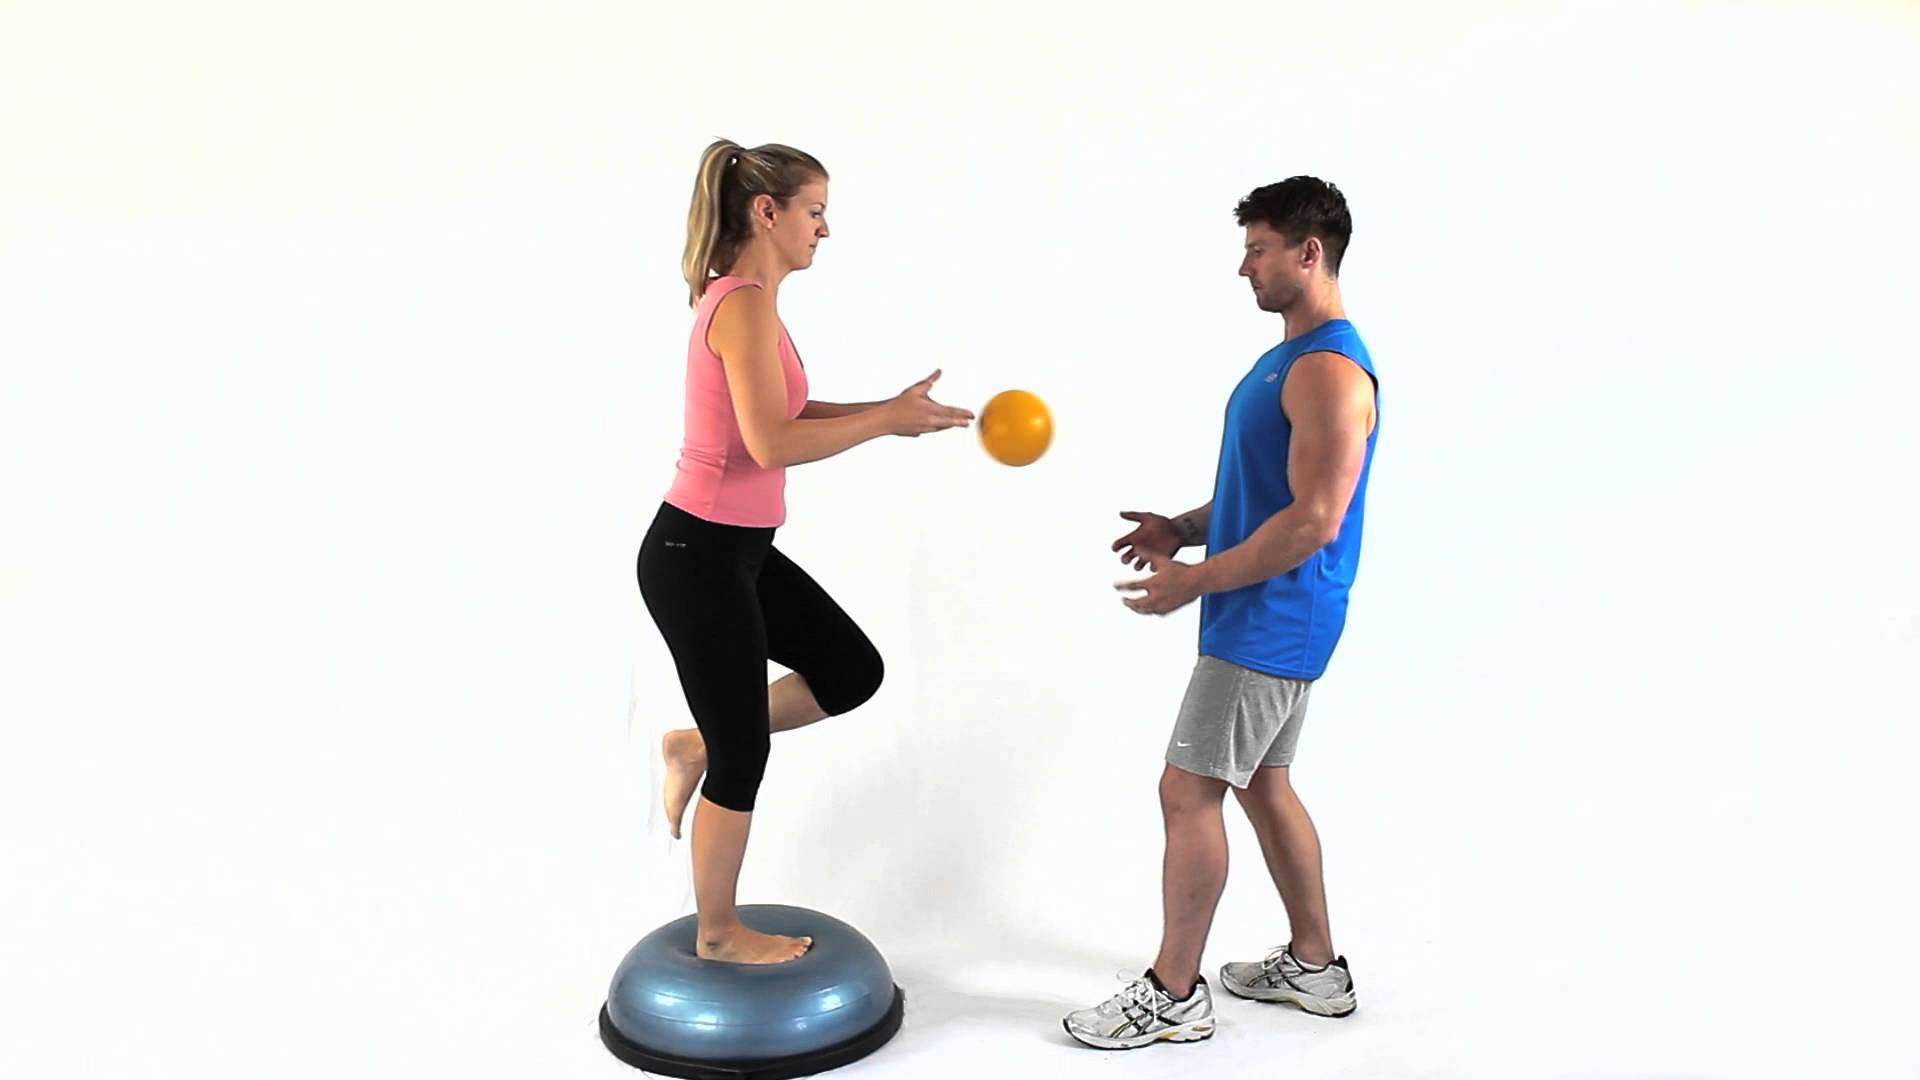 |
||
| Regressions: | Progressions: | ||
| Key Teaching Points | |||
|---|---|---|---|
|
|||
| Common Error(s): | Foot/ankle collapse | Valgus knees | ||
| Spotting: | Instability training | ||
| Movement Pattern: Lower Body | Target: Gluteals | Synergist(s): | |
| Exercise | 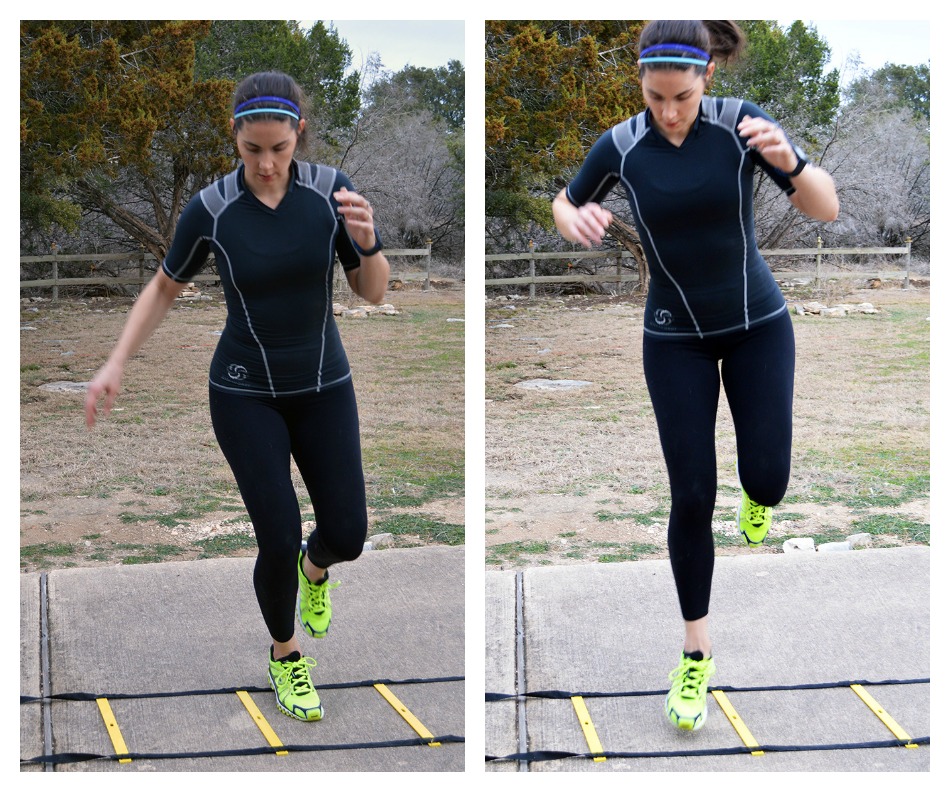 |
||
| Regressions: | Progressions: | ||
| Key Teaching Points | |||
|---|---|---|---|
|
|||
| Common Error(s): | Foot/ankle collapse | Valgus knees | Inappropriate momentum | ||
| Spotting: | Instability training | ||
| Movement Pattern: Single-joint | isolation | Target: Soleus | Synergist(s): | |
| Exercise | 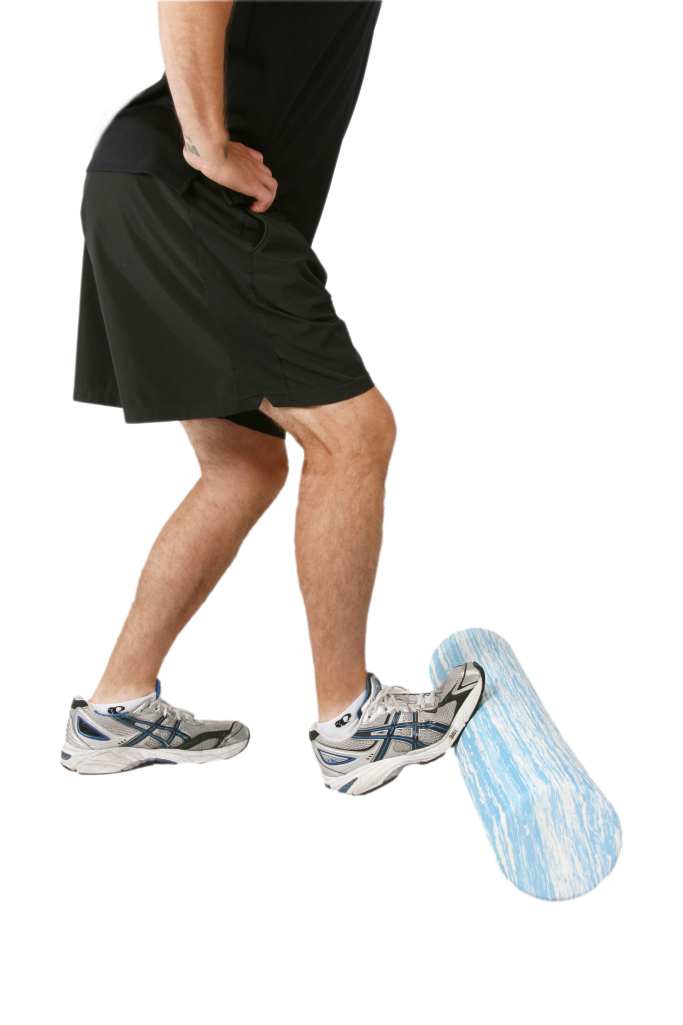 |
||
| Regressions: | Progressions: | ||
| Key Teaching Points | |||
|---|---|---|---|
|
|||
| Common Error(s): | |||
| Spotting: | |||
| Movement Pattern: Single-joint | isolation | Target: Tibialis Anterior | Synergist(s): | |
| Exercise | 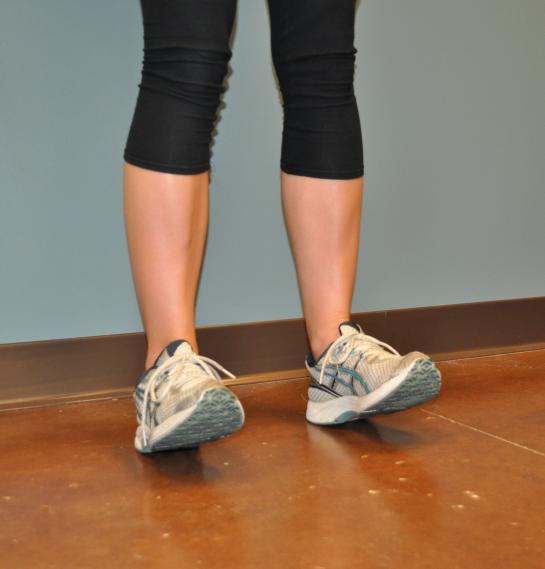 |
||
| Regressions: | Progressions: | ||
| Key Teaching Points | |||
|---|---|---|---|
|
|||
| Common Error(s): | |||
| Spotting: | |||
| Movement Pattern: Single-joint | isolation | Target: Foot Arch | Synergist(s): | |
| Exercise | 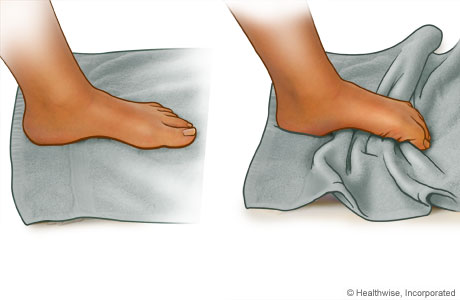 |
||
| Regressions: | Progressions: | ||
| Key Teaching Points | |||
|---|---|---|---|
|
|||
| Common Error(s): | |||
| Spotting: | |||
| Movement Pattern: Single-joint | isolation | Target: Gluteals | Synergist(s): | |
| Exercise | 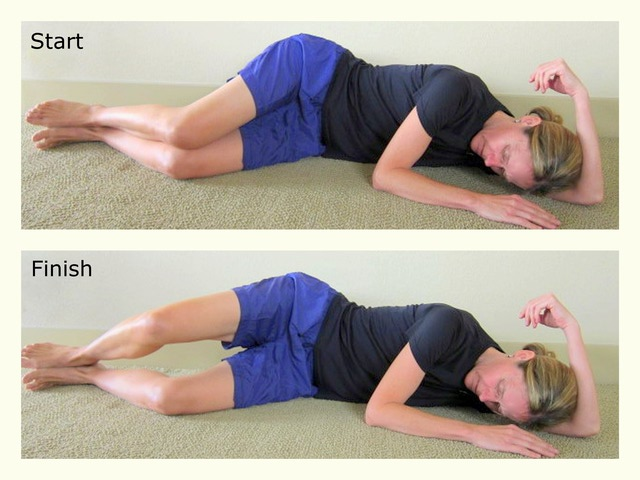 |
||
| Regressions: | Progressions: | ||
| Key Teaching Points | |||
|---|---|---|---|
|
|||
| Common Error(s): | Inappropriate momentum | ||
| Spotting: | Mirror Client Level | ||
| Movement Pattern: Hinge | Target: Hamstrings | Synergist(s): Foot Arch, Gluteals, Peroneals, Soleus, Spinal Erectors, Tibialis Anterior, Transverse Abdominus | |
| Exercise | 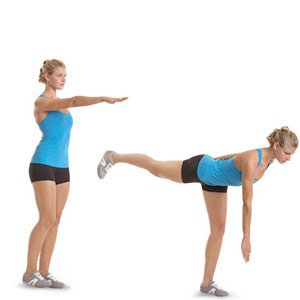 |
||
| Regressions: | Dowel Deadlift | Progressions: | Deadlift |
| Key Teaching Points | |||
|---|---|---|---|
|
|||
| Common Error(s): | Foot/ankle collapse | Valgus knees | Not engaging core | ||
| Spotting: | Consider self-spotting option | ||
| Movement Pattern: Squat | Target: Quadriceps | Synergist(s): Foot Arch, Gluteals | |
| Exercise | 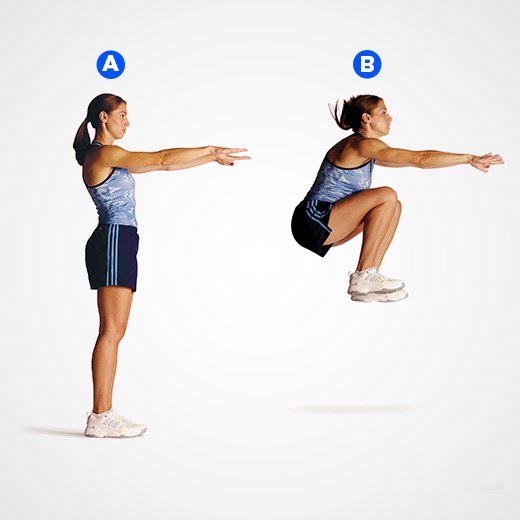 |
||
| Regressions: | Hip Abduction Squats | Progressions: | |
| Key Teaching Points | |||
|---|---|---|---|
|
|||
| Common Error(s): | Inappropriate momentum | Valgus knees | Foot/ankle collapse | ||
| Spotting: | Instability training | ||
| Movement Pattern: Gait | Target: Quadriceps | Synergist(s): Foot Arch, Gluteals, Hamstrings, Hip Abductors, Hip Adductors, Hip Flexors, Transverse Abdominus | |
| Exercise | 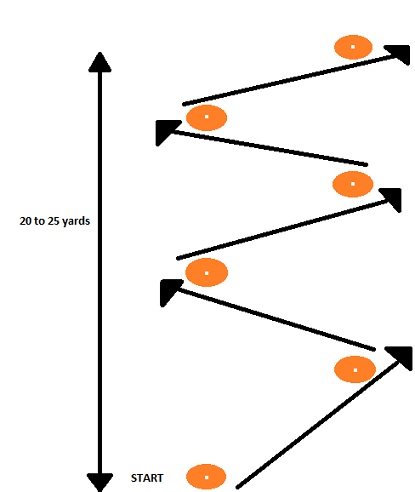 |
||
| Regressions: | Step Up | Progressions: | |
| Key Teaching Points | |||
|---|---|---|---|
|
|||
| Common Error(s): | Foot/ankle collapse | Valgus knees | ||
| Spotting: | Travel alongside client | ||
| Movement Pattern: | Target: Quadratus Lumborum | Synergist(s): Gluteals | |
| Exercise | 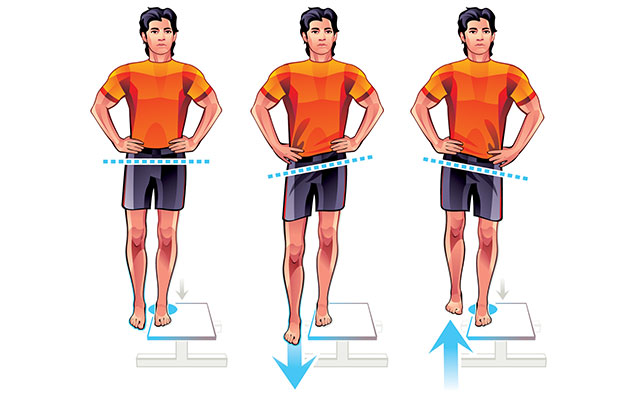 |
||
| Regressions: | Progressions: | ||
| Key Teaching Points | |||
|---|---|---|---|
|
|||
| Common Error(s): | Valgus knees | ||
| Spotting: | Consider self-spotting option | ||
| Movement Pattern: Core | stabilization | Target: Gluteals | Synergist(s): Hip Abductors, Quadratus Lumborum | |
| Exercise | 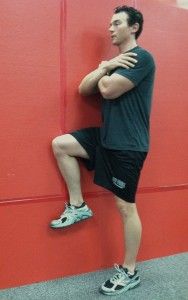 |
||
| Regressions: | Progressions: | ||
| Key Teaching Points | |||
|---|---|---|---|
|
|||
| Common Error(s): | Trendelenburg Hip Drop | ||
| Spotting: | |||
| Movement Pattern: | Target: Quadriceps | Synergist(s): Gluteals | |
| Exercise | 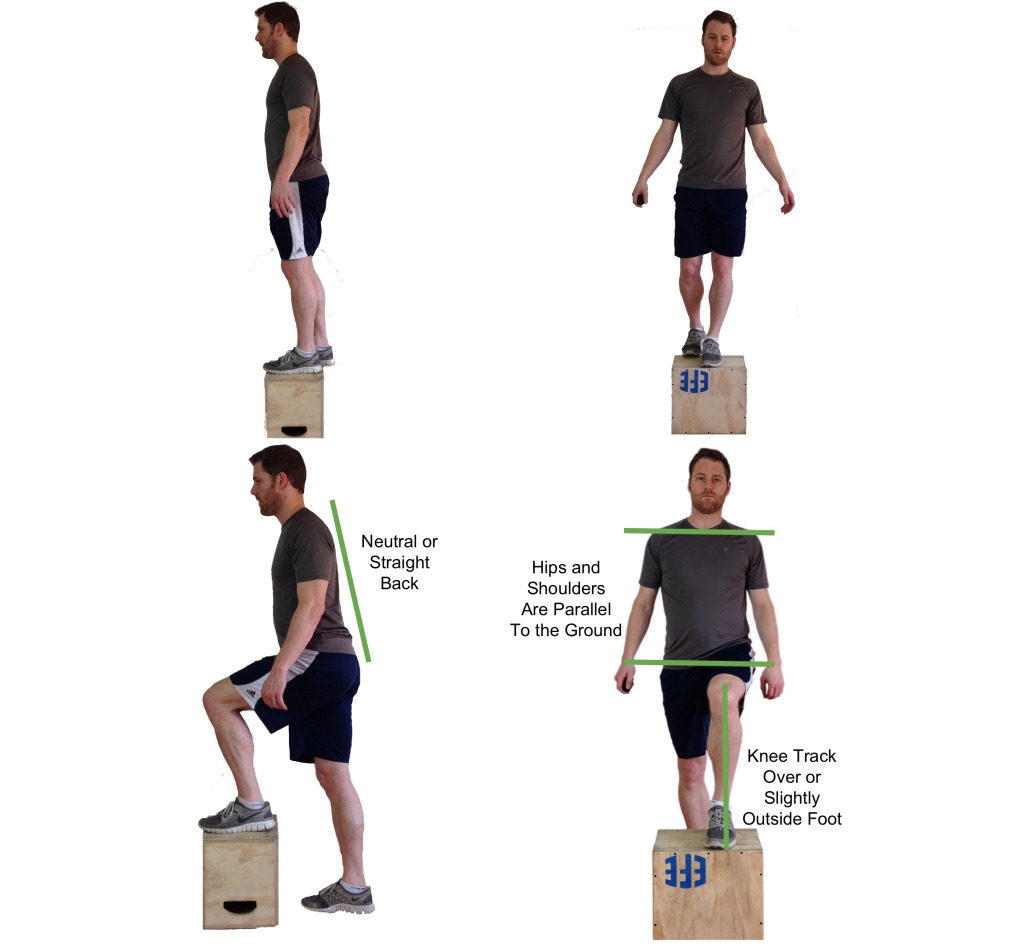 |
||
| Regressions: | Progressions: | ||
| Key Teaching Points | |||
|---|---|---|---|
|
|||
| Common Error(s): | Valgus knees | Inappropriate momentum | ||
| Spotting: | Instability training | ||
| Movement Pattern: Whole Body | Target: Rectus Abdominus | Synergist(s): Latissimus Dorsi | |
| Exercise | 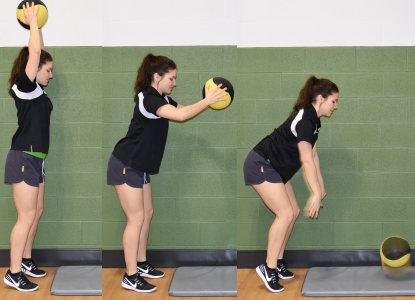 |
||
| Regressions: | Progressions: | ||
| Key Teaching Points | |||
|---|---|---|---|
N.B. Depending on the quality of your medicine balls, you may wish to throw the ball onto an exercise mat to prevent breakage and/or excessive rebound of the ball. |
|||
| Common Error(s): | Not engaging core | ||
| Spotting: | |||
| Movement Pattern: Upper Body | Target: Triceps | Synergist(s): Deltoids (Anterior), Pec Major | |
| Exercise | 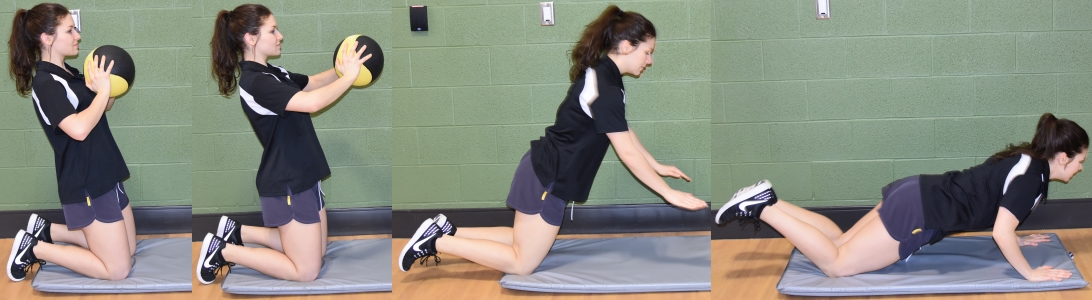 |
||
| Regressions: | Progressions: | ||
| Key Teaching Points | |||
|---|---|---|---|
Variation: Medicine Ball Throw with Run Release
|
|||
| Common Error(s): | |||
| Spotting: | |||
| Movement Pattern: Single-joint | isolation | Target: Rotator Cuff | Synergist(s): | |
| Exercise | 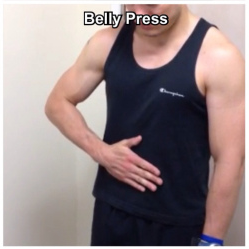 |
||
| Regressions: | Progressions: | ||
| Key Teaching Points | |||
|---|---|---|---|
|
|||
| Common Error(s): | Rounded shoulders | ||
| Spotting: | |||
| Movement Pattern: Single-joint | isolation | Target: Rotator Cuff | Synergist(s): | |
| Exercise | 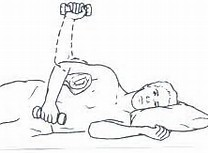 |
||
| Regressions: | Progressions: | ||
| Key Teaching Points | |||
|---|---|---|---|
|
|||
| Common Error(s): | Inappropriate momentum | ||
| Spotting: | |||
| Movement Pattern: Single-joint | isolation | Target: Rotator Cuff | Synergist(s): | |
| Exercise | 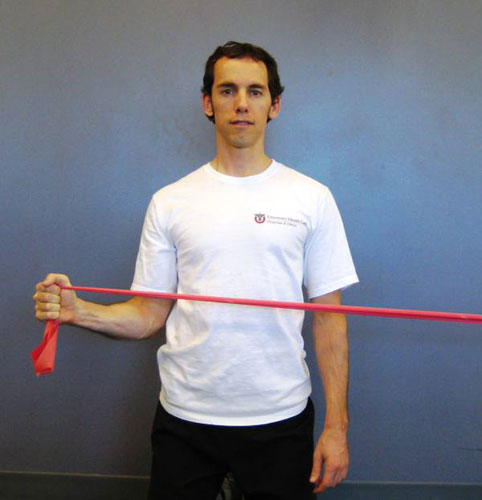 |
||
| Regressions: | Progressions: | ||
| Key Teaching Points | |||
|---|---|---|---|
|
|||
| Common Error(s): | Inappropriate momentum | ||
| Spotting: | |||
| Movement Pattern: Single-joint | isolation | Target: Rotator Cuff | Synergist(s): | |
| Exercise | 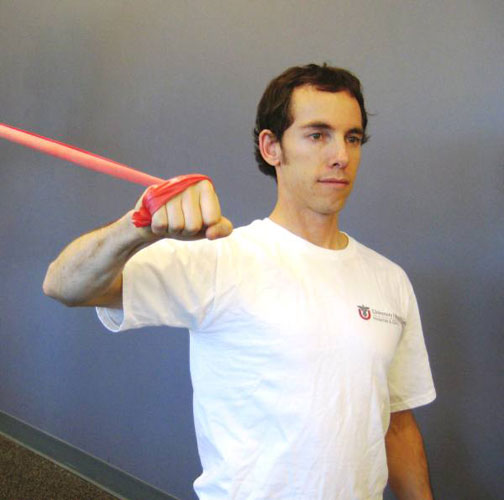 |
||
| Regressions: | Progressions: | ||
| Key Teaching Points | |||
|---|---|---|---|
|
|||
| Common Error(s): | Arching the upper back | Inappropriate momentum | ||
| Spotting: | |||
| Movement Pattern: Single-joint | isolation | Target: Rotator Cuff | Synergist(s): | |
| Exercise | 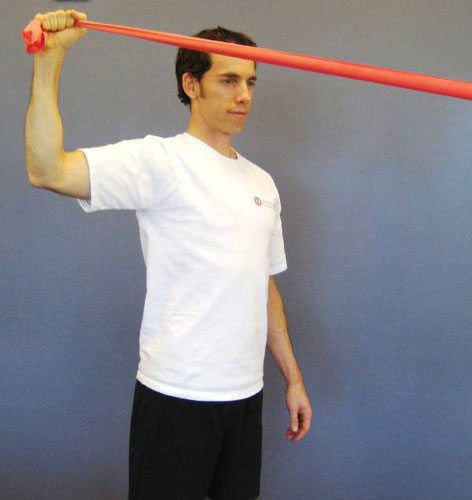 |
||
| Regressions: | Progressions: | ||
| Key Teaching Points | |||
|---|---|---|---|
|
|||
| Common Error(s): | |||
| Spotting: | |||
| Movement Pattern: Upper Body | Target: | Synergist(s): | |
| Exercise | 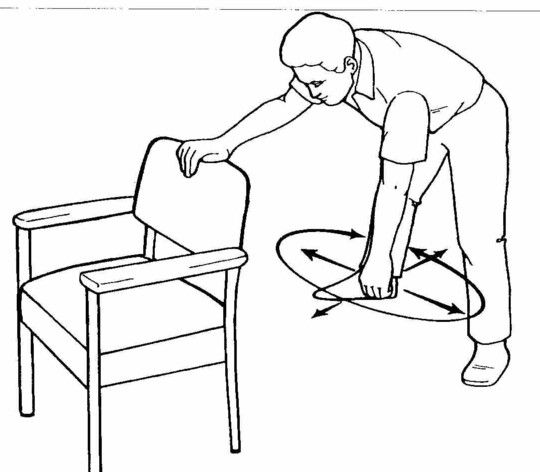 |
||
| Regressions: | Progressions: | ||
| Key Teaching Points | |||
|---|---|---|---|
|
|||
| Common Error(s): | Inappropriate momentum | ||
| Spotting: | |||
| Movement Pattern: Press | vertical | Target: Trapezius | Synergist(s): Pec Minor, Rhomboids, Serratus, Trapezius | |
| Exercise | 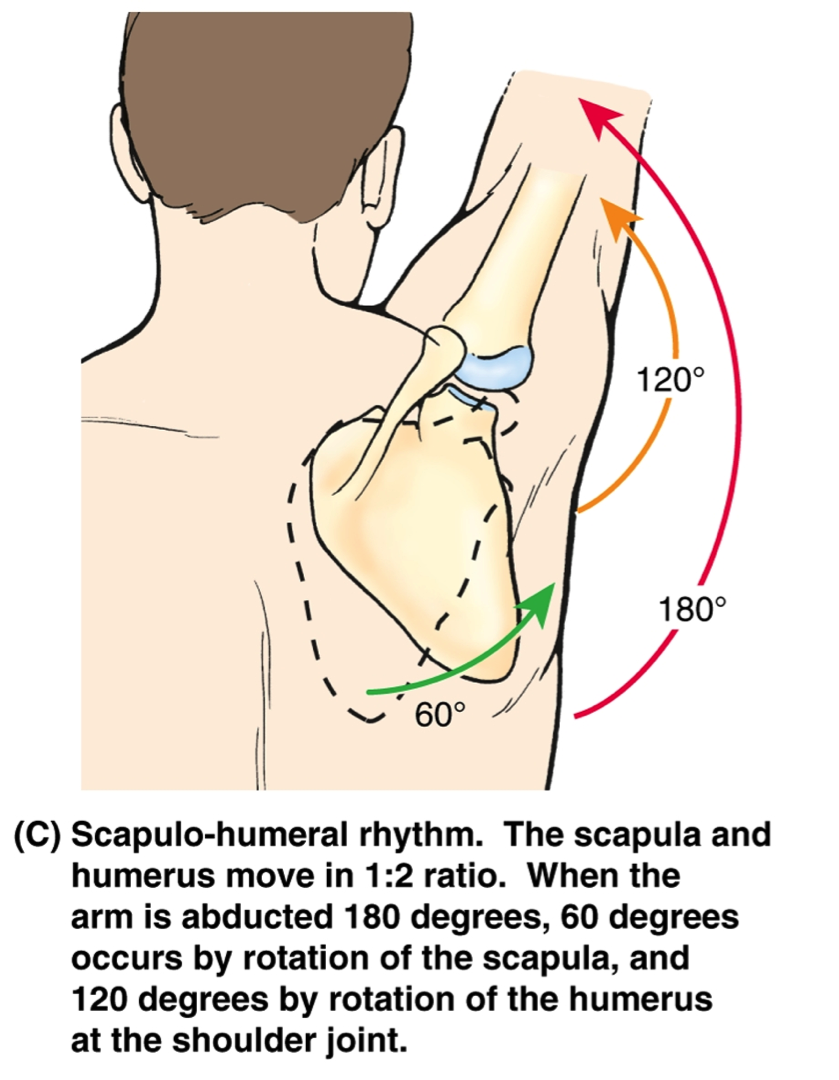 |
||
| Regressions: | Progressions: | ||
| Key Teaching Points | |||
|---|---|---|---|
|
|||
| Common Error(s): | |||
| Spotting: | |||
| Movement Pattern: Press | horizontal | Target: Serratus | Synergist(s): Pec Minor, Transverse Abdominus | |
| Exercise | 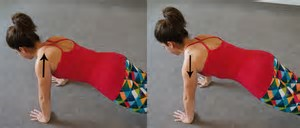 |
||
| Regressions: | Push Up | Progressions: | |
| Key Teaching Points | |||
|---|---|---|---|
|
|||
| Common Error(s): | Sagging lower back | Inappropriate momentum | ||
| Spotting: | Mirror Client Level | ||
| Movement Pattern: Core | stabilization | Target: Transverse Abdominus | Synergist(s): Pec Minor, Rhomboids, Serratus, Trapezius | |
| Exercise | 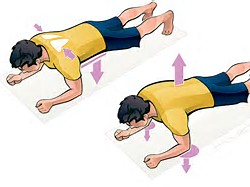 |
||
| Regressions: | Plank | Progressions: | |
| Key Teaching Points | |||
|---|---|---|---|
|
|||
| Common Error(s): | Sagging lower back | Not engaging core | ||
| Spotting: | |||
| Movement Pattern: Pull | horizontal | Target: Rhomboids | Synergist(s): Trapezius | |
| Exercise | 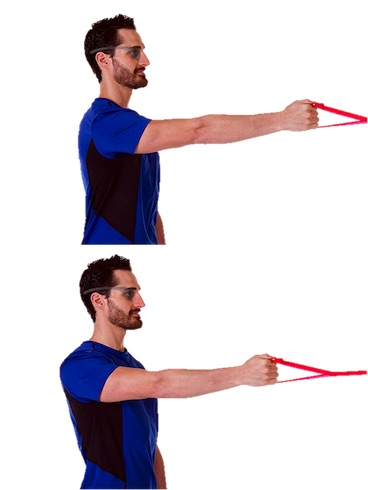 |
||
| Regressions: | Progressions: | ||
| Key Teaching Points | |||
|---|---|---|---|
|
|||
| Common Error(s): | Inappropriate momentum | Rounded shoulders | Forward Head Posture | ||
| Spotting: | |||
| Movement Pattern: Single-joint | isolation | Target: Wrist Flexor | Synergist(s): | |
| Exercise | 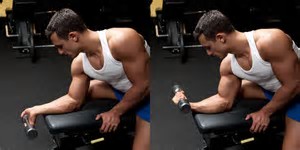 |
||
| Regressions: | Progressions: | ||
| Key Teaching Points | |||
|---|---|---|---|
|
|||
| Common Error(s): | |||
| Spotting: | |||
| Movement Pattern: Single-joint | isolation | Target: Wrist Extensor | Synergist(s): | |
| Exercise | 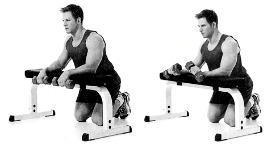 |
||
| Regressions: | Progressions: | ||
| Key Teaching Points | |||
|---|---|---|---|
|
|||
| Common Error(s): | Inappropriate momentum | ||
| Spotting: | |||
| Movement Pattern: Single-joint | isolation | Target: Wrist Supinator | Synergist(s): Wrist Pronator | |
| Exercise | 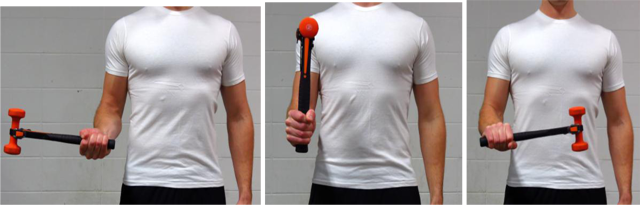 |
||
| Regressions: | Progressions: | ||
| Key Teaching Points | |||
|---|---|---|---|
|
|||
| Common Error(s): | Using Excessive Momentum | ||
| Spotting: | |||
| Movement Pattern: Whole Body | Target: Quadriceps | Synergist(s): | |
| Exercise | |||
| Regressions: | Progressions: | ||
| Key Teaching Points | |||
|---|---|---|---|
|
A multiple exercise workout done in succession. |
|||
| Common Error(s): | |||
| Spotting: | |||
| Movement Pattern: Gait | Target: Quadriceps | Synergist(s): Gastrocnemius, Gluteals, Hamstrings | |
| Exercise |  |
||
| Regressions: | Walking | Progressions: | |
| Key Teaching Points | |||
|---|---|---|---|
| Common Error(s): | |||
| Spotting: | |||
| Movement Pattern: Single-joint | isolation | Target: Hip Abductors | Synergist(s): | |
| Exercise | |
||
| Regressions: | Progressions: | ||
| Key Teaching Points | |||
|---|---|---|---|
|
|||
| Common Error(s): | |||
| Spotting: | |||
| Movement Pattern: Core | stabilization | Target: Transverse Abdominus | Synergist(s): | |
| Exercise | 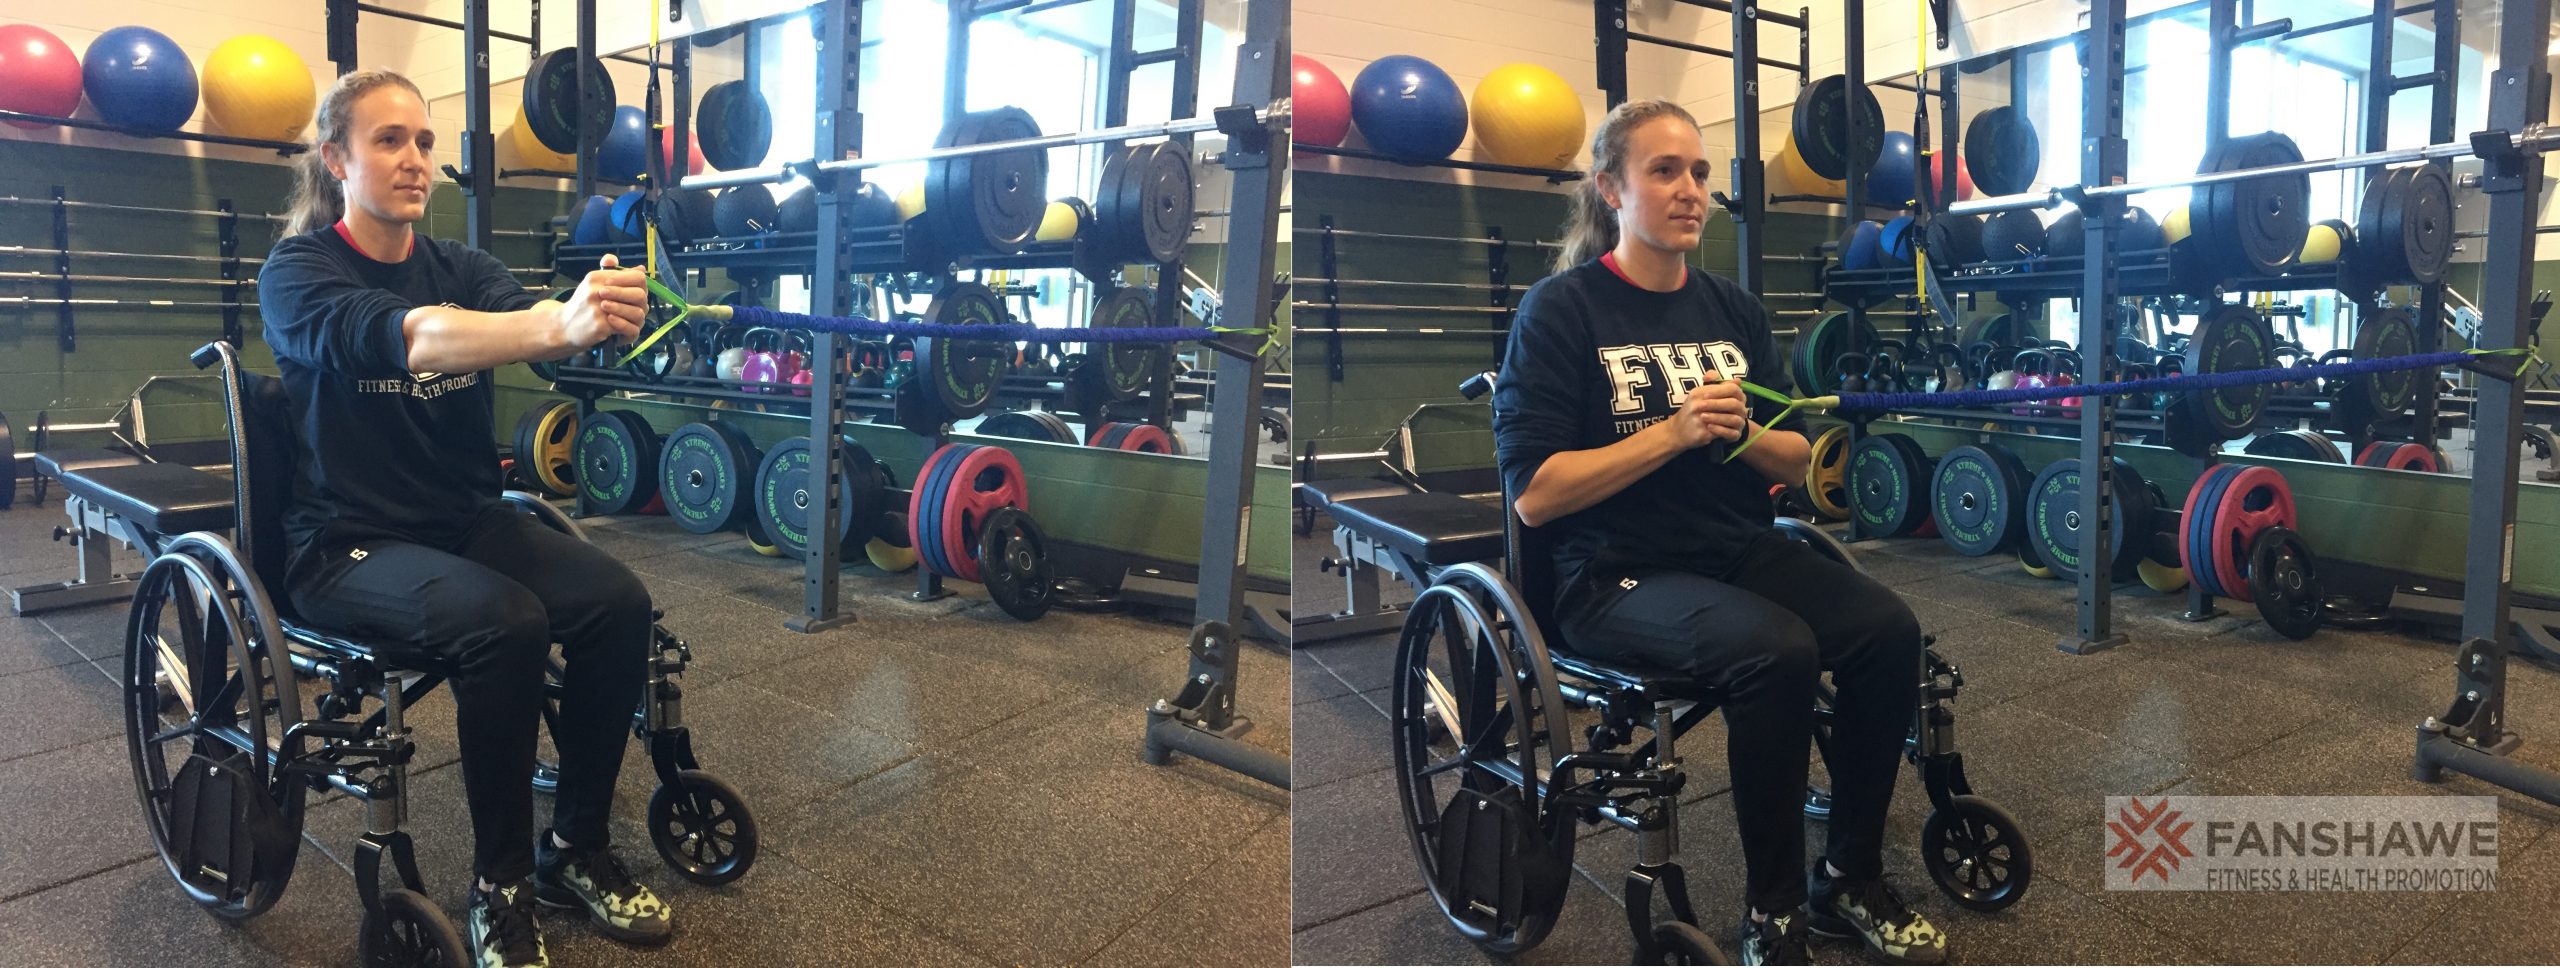 |
||
| Regressions: | Progressions: | ||
| Key Teaching Points | |||
|---|---|---|---|
|
|||
| Common Error(s): | Not engaging core | ||
| Spotting: | Mirror Client Level | ||
| Movement Pattern: Single-joint | isolation | Target: Hamstrings | Synergist(s): Gluteals | |
| Exercise | 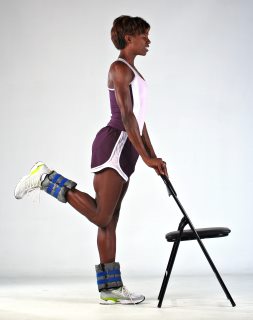 |
||
| Regressions: | Progressions: | ||
| Key Teaching Points | |||
|---|---|---|---|
|
1. Keep hands on the chair for balance, flex your knee without moving your hip joint as shown in the picture. 2. Do some repetition then do same protocol with other leg. |
|||
| Common Error(s): | |||
| Spotting: | Consider self-spotting option | ||
| Movement Pattern: Core | rotation | Target: Obliques | Synergist(s): | |
| Exercise | 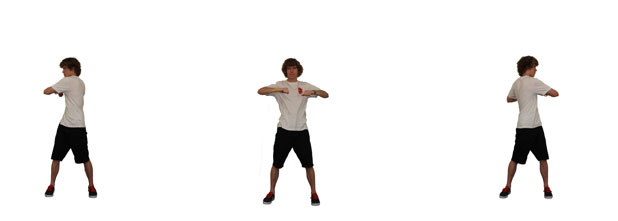 |
||
| Regressions: | Progressions: | ||
| Key Teaching Points | |||
|---|---|---|---|
|
|||
| Common Error(s): | |||
| Spotting: | |||
| Movement Pattern: | Target: | Synergist(s): | |
| Exercise | 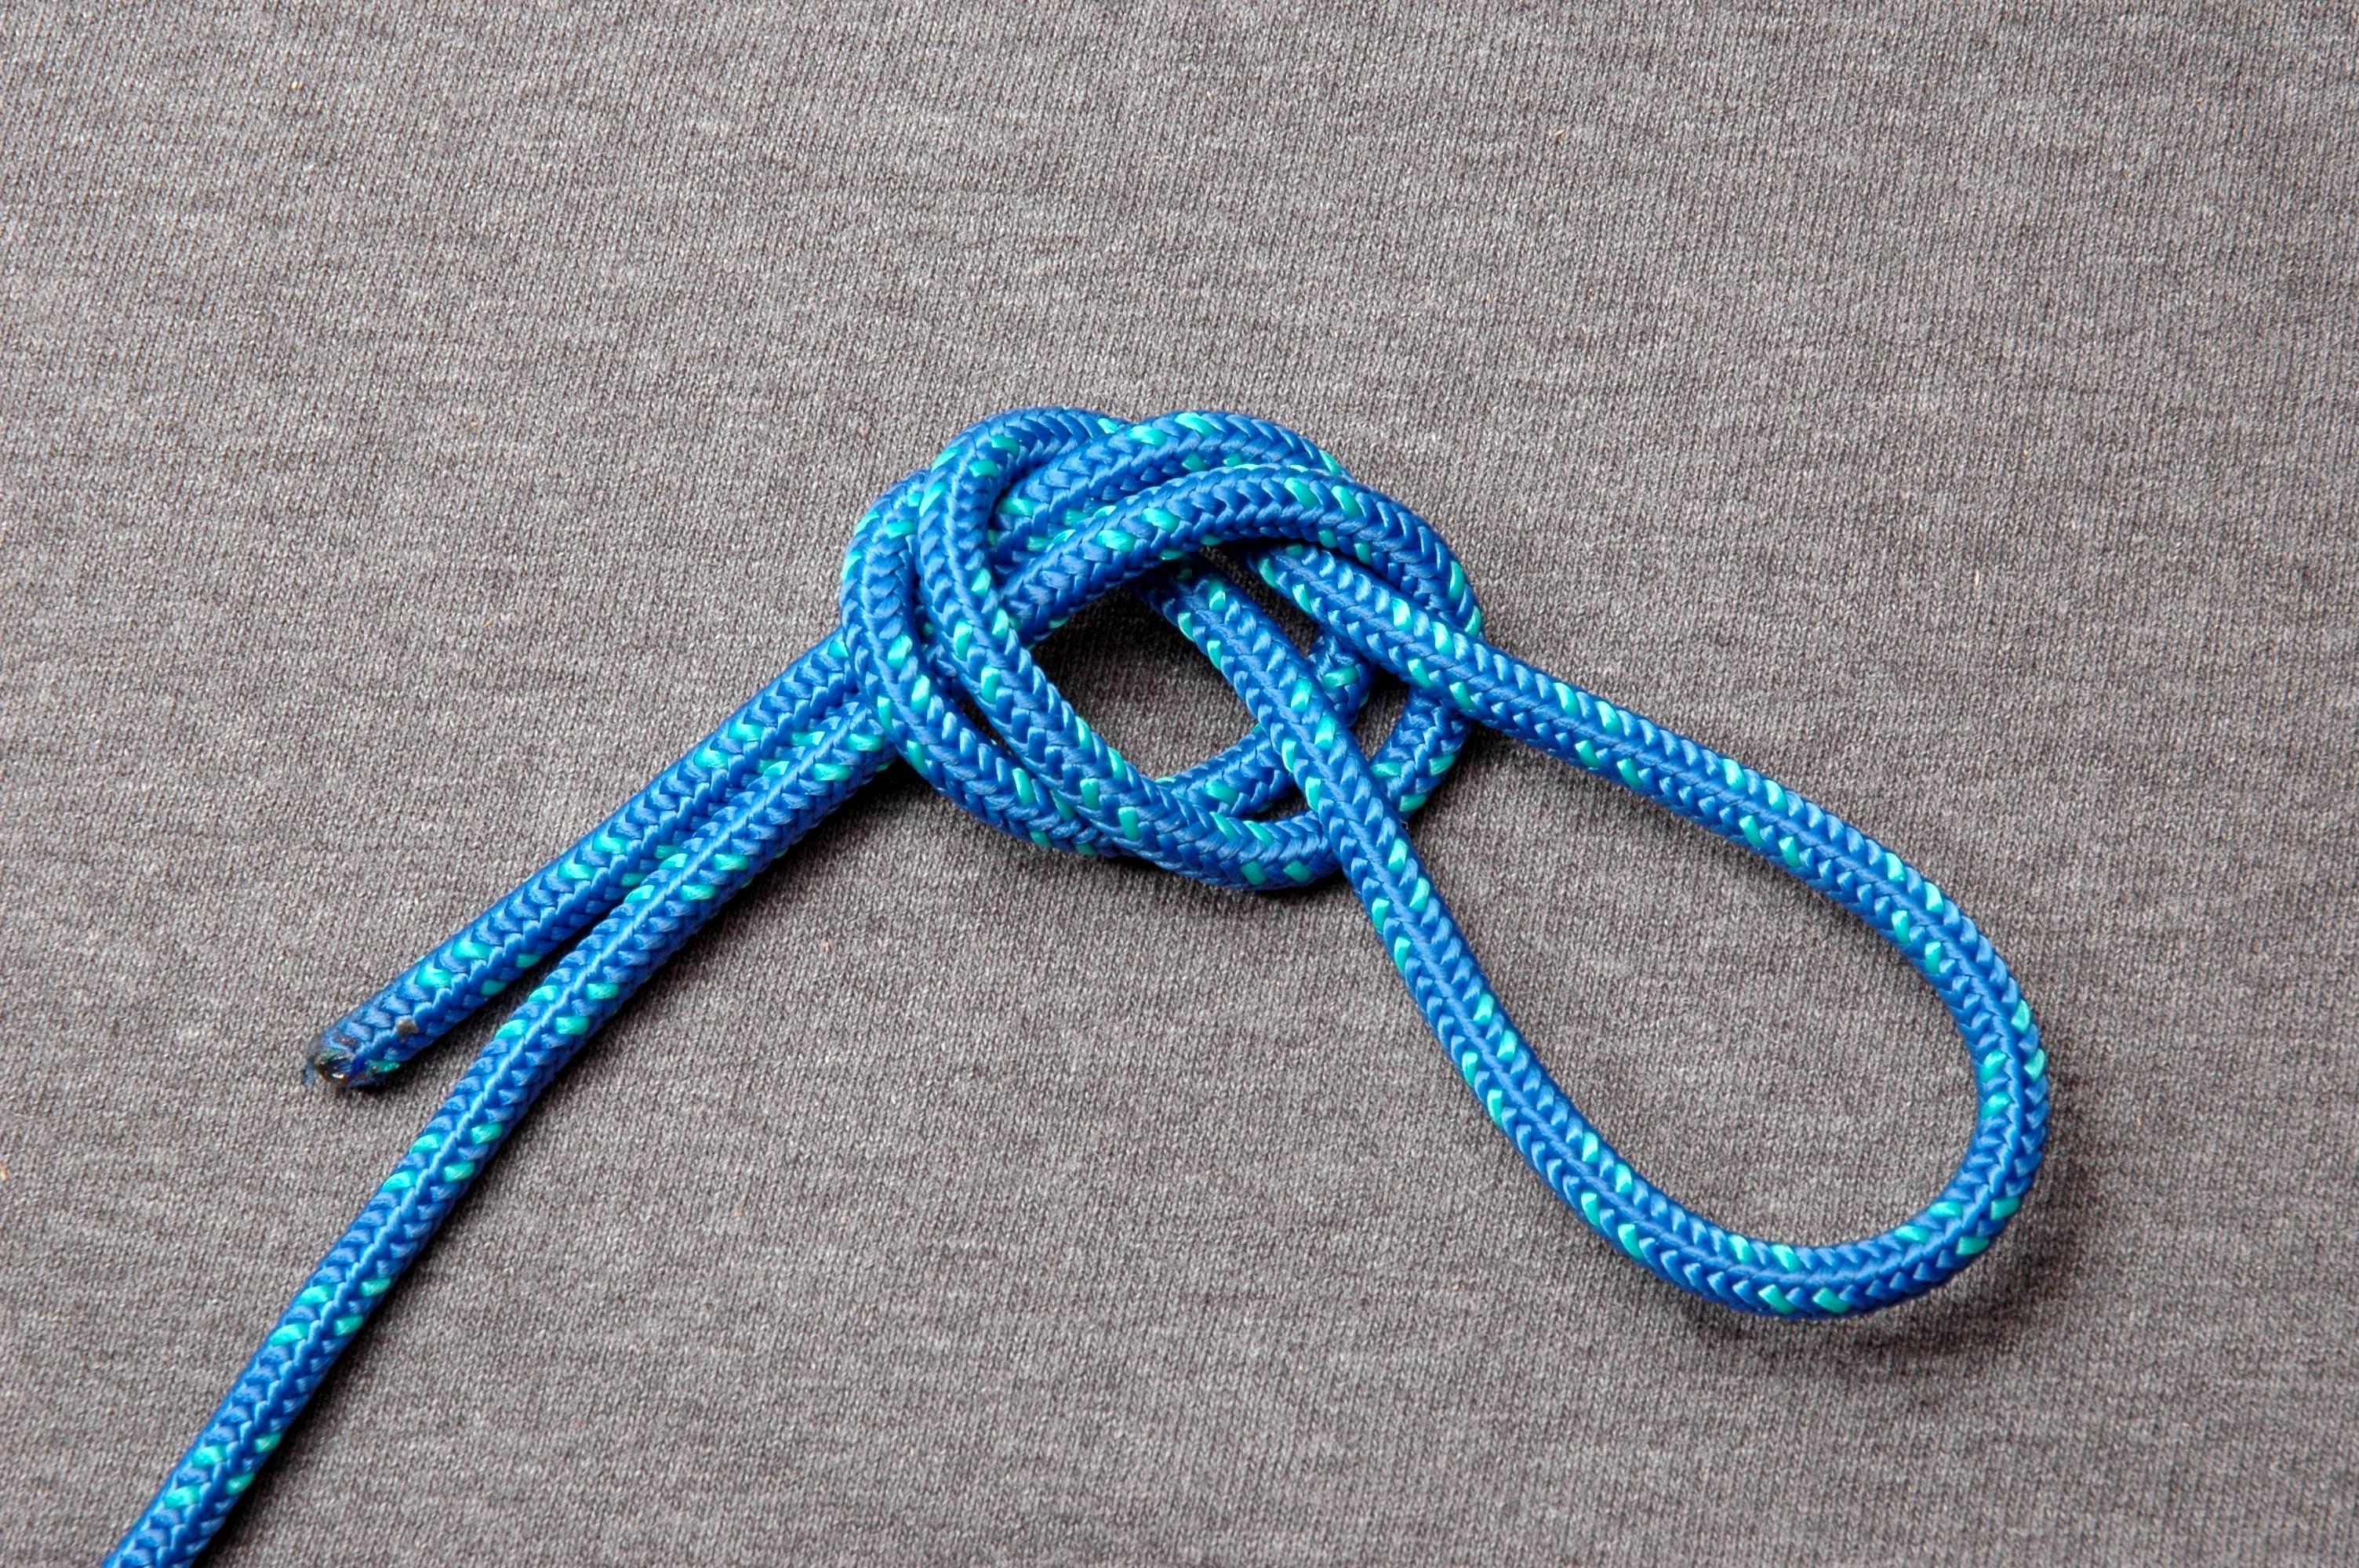 |
||
| Regressions: | Progressions: | ||
| Key Teaching Points | |||
|---|---|---|---|
|
An easy way to create a secure anchor point when using theraband and/or surgical tubing is to establish a ‘dog lead’ knot within the ends of the band. See video for details. |
|||
| Common Error(s): | |||
| Spotting: | |||
| Movement Pattern: | Target: | Synergist(s): | |
| Exercise | 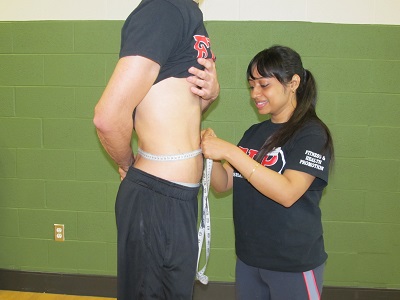 |
||
| Regressions: | Progressions: | ||
| Key Teaching Points | |||
|---|---|---|---|
|
|||
| Common Error(s): | |||
| Spotting: | |||
| Movement Pattern: | Target: | Synergist(s): | |
| Exercise |  |
||
| Regressions: | Progressions: | ||
| Key Teaching Points | |||
|---|---|---|---|
|
You will need to enter the following information in order to get a measurement:
Directions
Please note:
|
|||
| Common Error(s): | |||
| Spotting: | |||
| Movement Pattern: | Target: | Synergist(s): | |
| Exercise |  |
||
| Regressions: | Progressions: | ||
| Key Teaching Points | |||
|---|---|---|---|
|
Initial Consultation
During the Assessment or Exercise Demonstration
|
|||
| Common Error(s): | |||
| Spotting: | |||
| Movement Pattern: | Target: | Synergist(s): | |
| Exercise |  |
||
| Regressions: | Progressions: | ||
| Key Teaching Points | |||
|---|---|---|---|
|
Procedure:
Scoring: The time to complete the test in seconds is recorded. The score is the best time of two trials. |
|||
| Common Error(s): | |||
| Spotting: | |||
| Movement Pattern: | Target: | Synergist(s): | |
| Exercise | 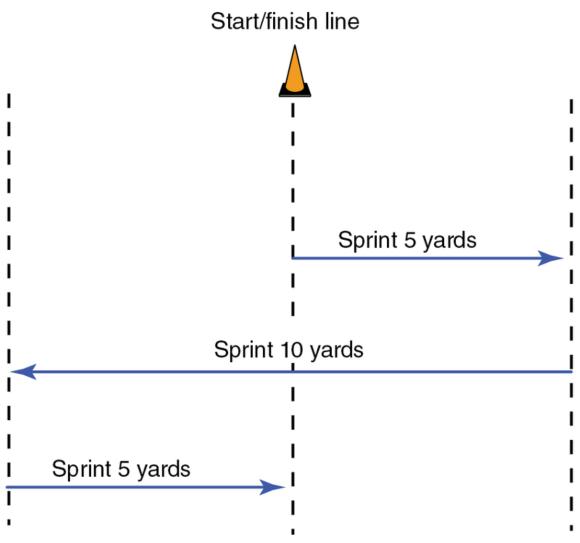 |
||
| Regressions: | Progressions: | ||
| Key Teaching Points | |||
|---|---|---|---|
|
Procedure:
Scoring: The time to complete the test in seconds to the nearest two decimals is recorded. The score is the best time of three trials. |
|||
| Common Error(s): | |||
| Spotting: | |||
| Movement Pattern: | Target: | Synergist(s): | |
| Exercise | 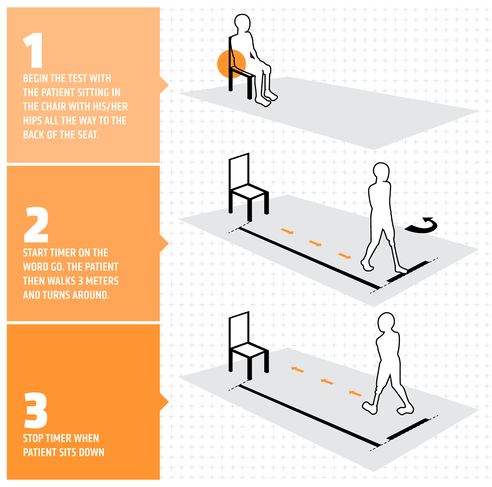 |
||
| Regressions: | Progressions: | ||
| Key Teaching Points | |||
|---|---|---|---|
|
Seated upright in chair. The total time it takes to stand fully up, walk at a regular pace to a line 3 meters away. Turn and return to the chair and sit back down. |
|||
| Common Error(s): | |||
| Spotting: | |||
| Movement Pattern: | Target: | Synergist(s): | |
| Exercise | 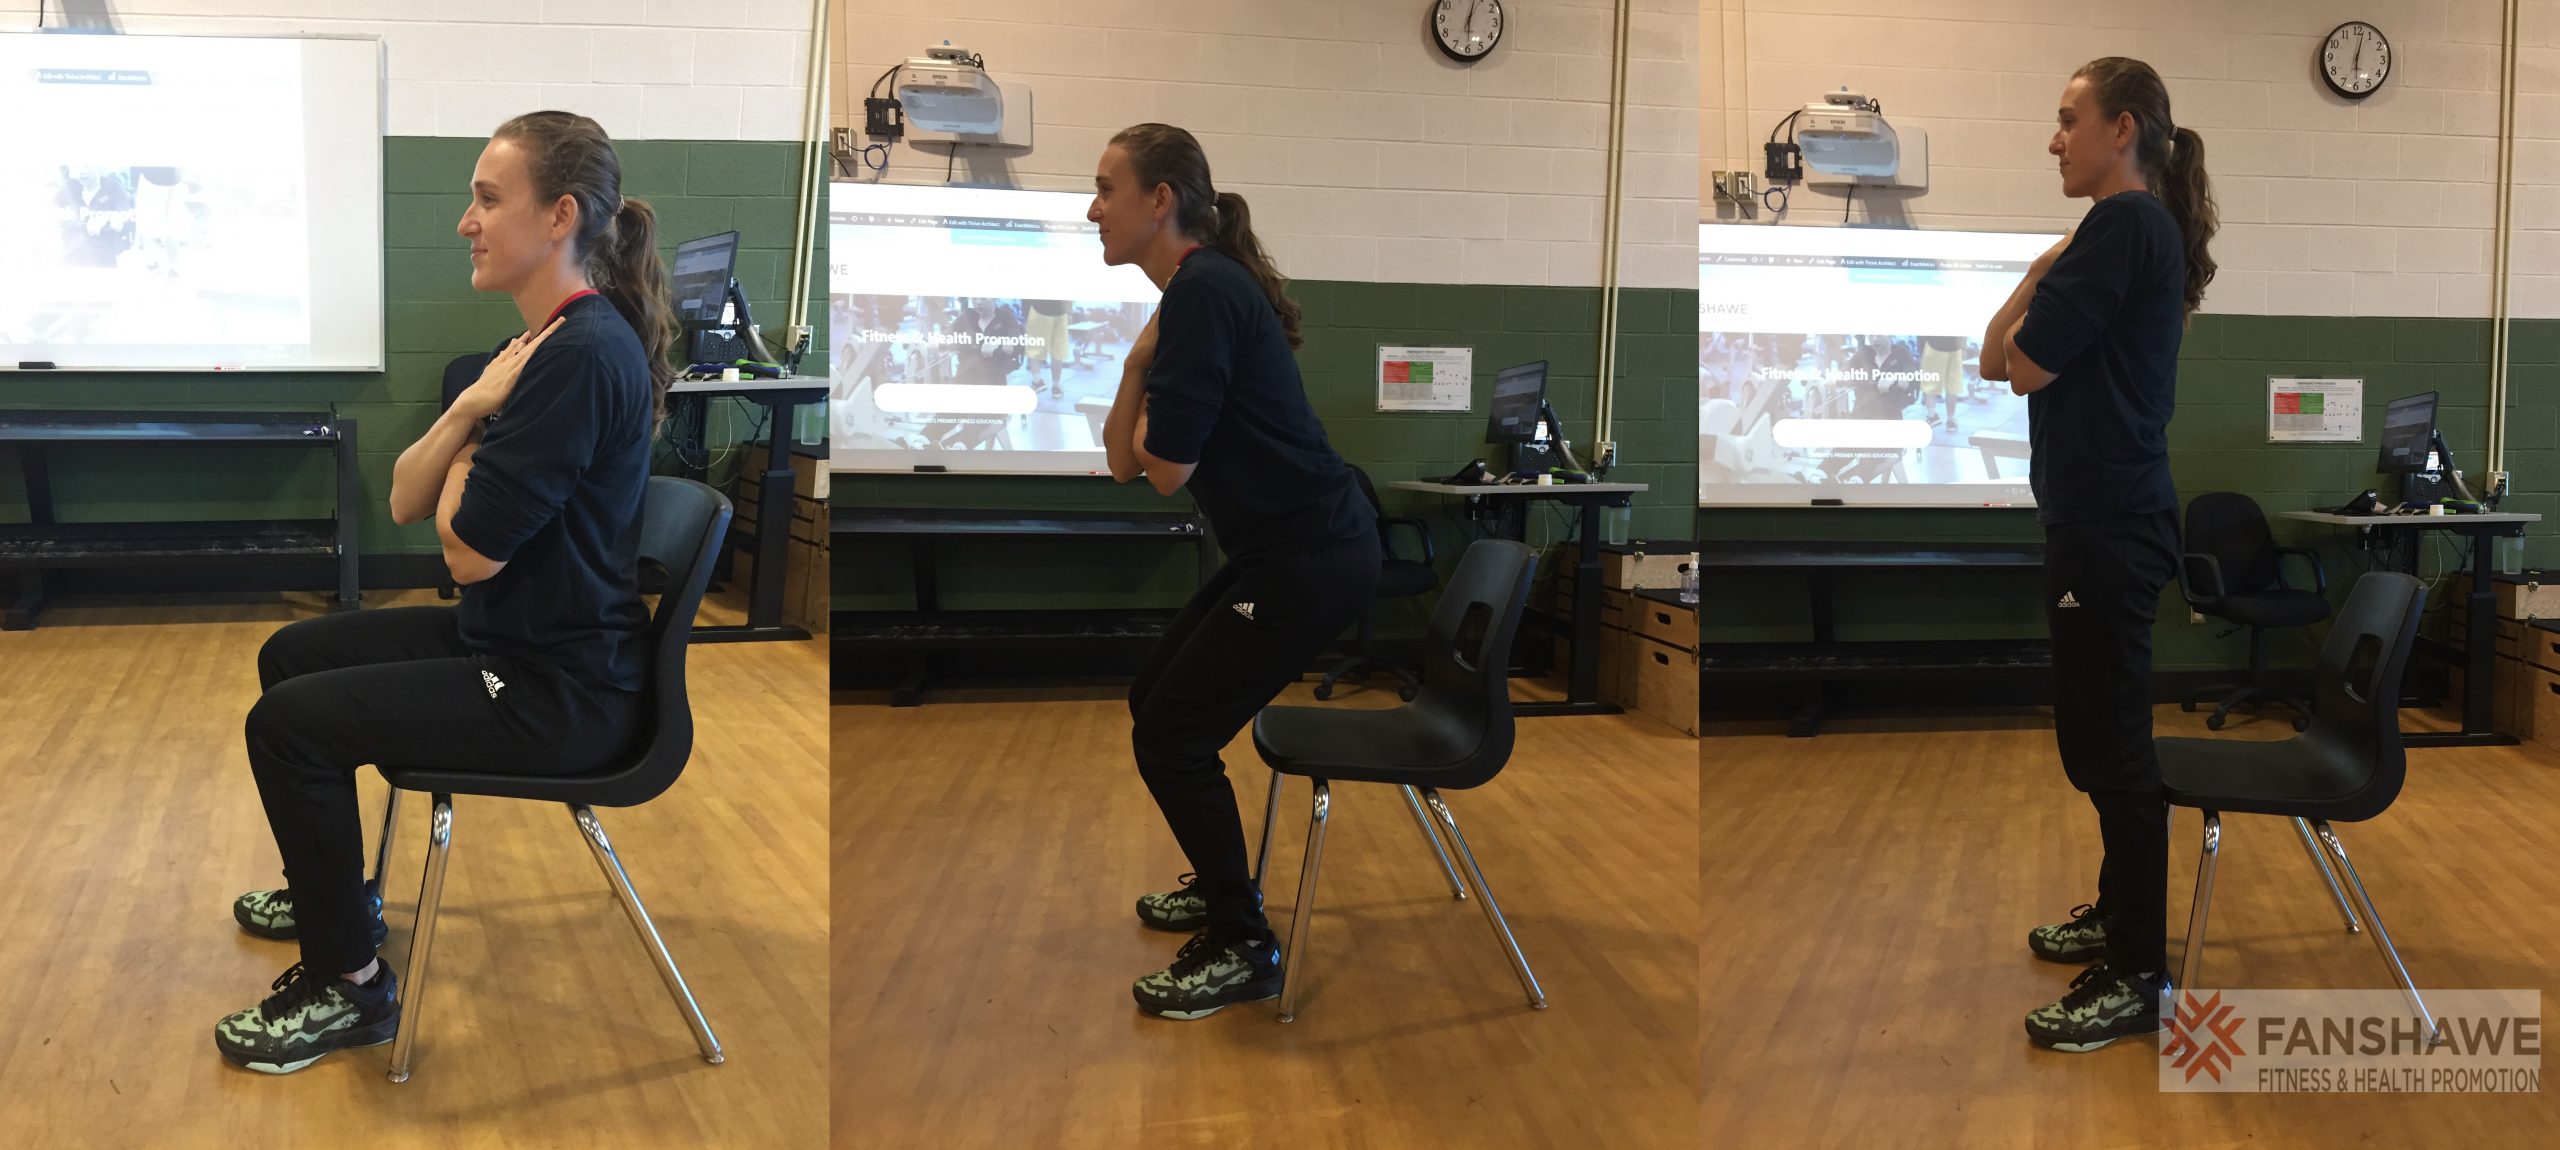 |
||
| Regressions: | Progressions: | ||
| Key Teaching Points | |||
|---|---|---|---|
|
Seated upright in chair with arms crossed in front. Record the total number of controlled complete sit-to-stand (full knee and hip extension) reps completed in 30 seconds. |
|||
| Common Error(s): | |||
| Spotting: | |||
| Movement Pattern: | Target: | Synergist(s): | |
| Exercise | |||
| Regressions: | Progressions: | ||
| Key Teaching Points | |||
|---|---|---|---|
| Common Error(s): | |||
| Spotting: | |||
| Movement Pattern: | Target: | Synergist(s): | |
| Exercise | 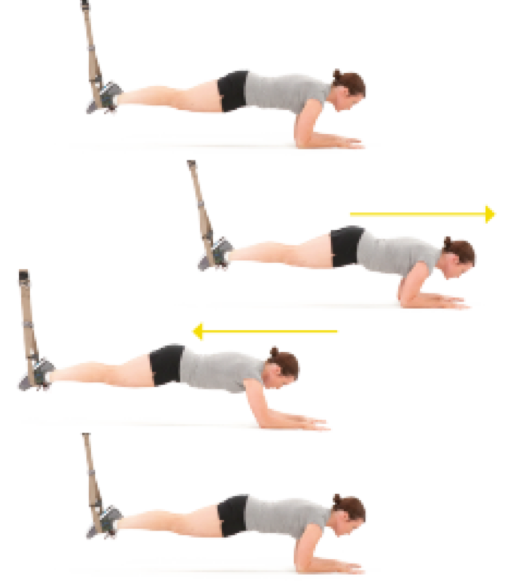 |
||
| Regressions: | Plank | Progressions: | |
| Key Teaching Points | |||
|---|---|---|---|
|
|||
| Common Error(s): | Sagging lower back | Not engaging core | Arching the upper back | ||
| Spotting: | Instability training | ||
| Movement Pattern: Core | stabilization | Target: | Synergist(s): | |
| Exercise | 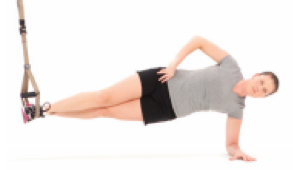 |
||
| Regressions: | Side plank | Progressions: | |
| Key Teaching Points | |||
|---|---|---|---|
|
|||
| Common Error(s): | Not engaging core | Torso collapses forward | ||
| Spotting: | |||
| Movement Pattern: | Target: Transverse Abdominus | Synergist(s): Obliques, Rectus Abdominus | |
| Exercise | 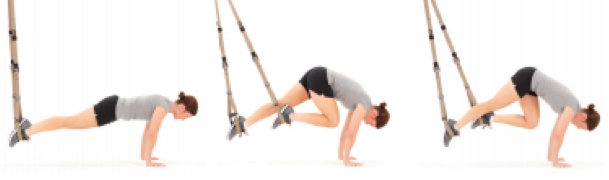 |
||
| Regressions: | BOSU Mountain Climber | TRX Plank | Progressions: | |
| Key Teaching Points | |||
|---|---|---|---|
|
|||
| Common Error(s): | Not engaging core | Sagging lower back | ||
| Spotting: | |||
| Movement Pattern: Core | stabilization | Target: | Synergist(s): | |
| Exercise | 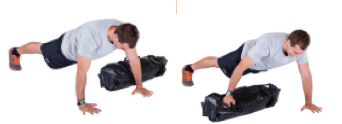 |
||
| Regressions: | Plank | Stability Ball Bird Dog | Progressions: | |
| Key Teaching Points | |||
|---|---|---|---|
|
|||
| Common Error(s): | Not engaging core | Sagging lower back | Rounded shoulders | ||
| Spotting: | |||
| Movement Pattern: Core | stabilization | Target: Transverse Abdominus | Synergist(s): | |
| Exercise | 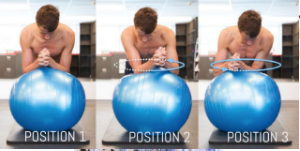 |
||
| Regressions: | Plank | Stability Ball Plank | Progressions: | Rollout | Stability Ball Pike |
| Key Teaching Points | |||
|---|---|---|---|
|
|||
| Common Error(s): | Not engaging core | Sagging lower back | ||
| Spotting: | |||
| Movement Pattern: | Target: | Synergist(s): | |
| Exercise | 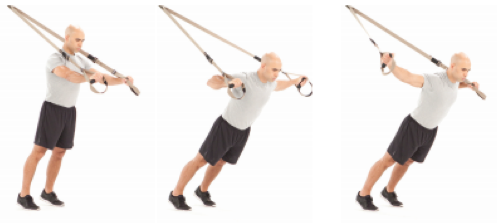 |
||
| Regressions: | Progressions: | ||
| Key Teaching Points | |||
|---|---|---|---|
|
|||
| Common Error(s): | Not engaging core | ||
| Spotting: | |||
| Movement Pattern: | Target: Triceps | Synergist(s): | |
| Exercise | 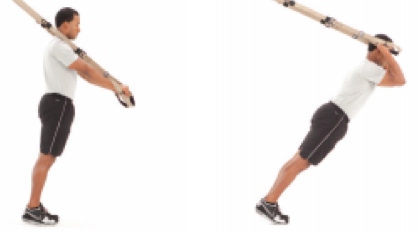 |
||
| Regressions: | Progressions: | ||
| Key Teaching Points | |||
|---|---|---|---|
|
|||
| Common Error(s): | Not engaging core | ||
| Spotting: | |||
| Movement Pattern: | Target: | Synergist(s): | |
| Exercise | 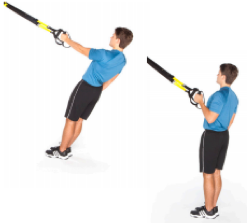 |
||
| Regressions: | TRX Row | Progressions: | |
| Key Teaching Points | |||
|---|---|---|---|
|
|||
| Common Error(s): | Not engaging core | ||
| Spotting: | |||
| Movement Pattern: Pull | horizontal | Target: | Synergist(s): | |
| Exercise | 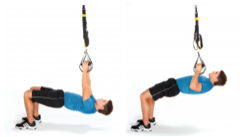 |
||
| Regressions: | Progressions: | TRX Inverted Row Single Arm | |
| Key Teaching Points | |||
|---|---|---|---|
|
|||
| Common Error(s): | Not engaging core | ||
| Spotting: | |||
| Movement Pattern: | Target: | Synergist(s): | |
| Exercise | 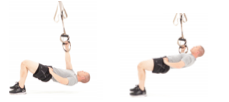 |
||
| Regressions: | TRX Inverted Row | Progressions: | |
| Key Teaching Points | |||
|---|---|---|---|
|
|||
| Common Error(s): | Not engaging core | ||
| Spotting: | |||
| Movement Pattern: | Target: | Synergist(s): | |
| Exercise | 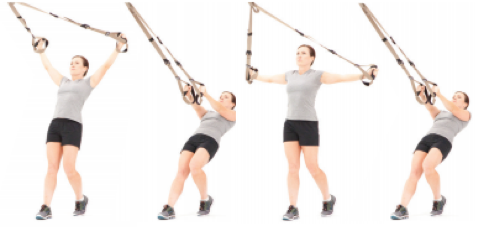 |
||
| Regressions: | Progressions: | ||
| Key Teaching Points | |||
|---|---|---|---|
|
|||
| Common Error(s): | Not engaging core | ||
| Spotting: | |||
| Movement Pattern: | Target: | Synergist(s): | |
| Exercise | 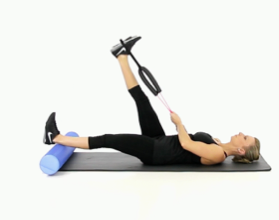 |
||
| Regressions: | Progressions: | ||
| Key Teaching Points | |||
|---|---|---|---|
|
|||
| Common Error(s): | |||
| Spotting: | |||
| Movement Pattern: | Target: | Synergist(s): | |
| Exercise | 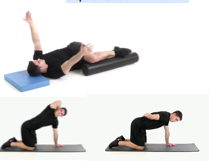 |
||
| Regressions: | Progressions: | ||
| Key Teaching Points | |||
|---|---|---|---|
|
|||
| Common Error(s): | |||
| Spotting: | |||
| Movement Pattern: Core | stabilization | Target: | Synergist(s): | |
| Exercise | 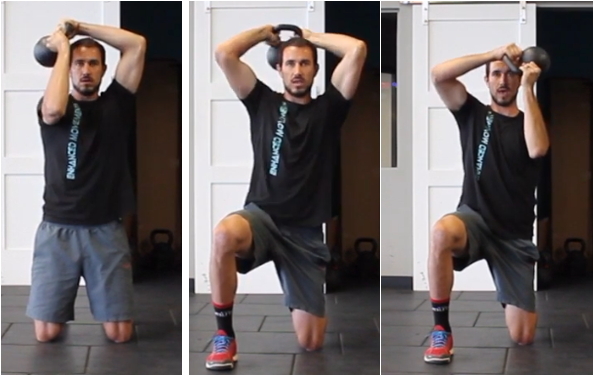 |
||
| Regressions: | Progressions: | ||
| Key Teaching Points | |||
|---|---|---|---|
|
|||
| Common Error(s): | Not engaging core | Torso collapses forward | Inappropriate momentum | ||
| Spotting: | |||
| Movement Pattern: Single-joint | isolation | Target: Soleus | Synergist(s): | |
| Exercise | 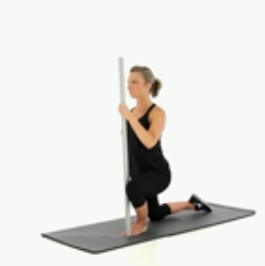 |
||
| Regressions: | Progressions: | ||
| Key Teaching Points | |||
|---|---|---|---|
|
|||
| Common Error(s): | |||
| Spotting: | |||
| Movement Pattern: | Target: | Synergist(s): | |
| Exercise | 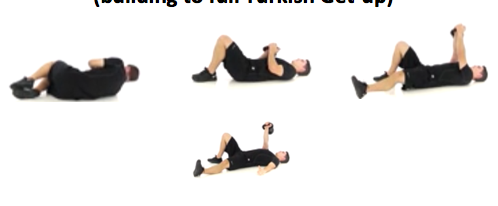 |
||
| Regressions: | Progressions: | ||
| Key Teaching Points | |||
|---|---|---|---|
|
|||
| Common Error(s): | |||
| Spotting: | |||
| Movement Pattern: | Target: | Synergist(s): | |
| Exercise | 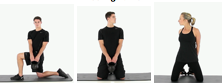 |
||
| Regressions: | Progressions: | ||
| Key Teaching Points | |||
|---|---|---|---|
|
|||
| Common Error(s): | |||
| Spotting: | |||
| Movement Pattern: | Target: | Synergist(s): | |
| Exercise | 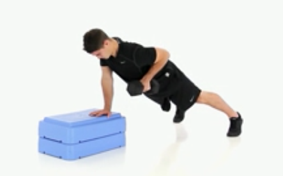 |
||
| Regressions: | Plank | Progressions: | |
| Key Teaching Points | |||
|---|---|---|---|
|
|||
| Common Error(s): | Not engaging core | Sagging lower back | ||
| Spotting: | |||
| Movement Pattern: | Target: | Synergist(s): | |
| Exercise | 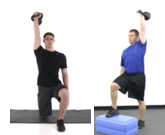 |
||
| Regressions: | Progressions: | ||
| Key Teaching Points | |||
|---|---|---|---|
|
|||
| Common Error(s): | Not engaging core | ||
| Spotting: | |||
| Movement Pattern: Hinge | Target: Hamstrings | Synergist(s): | |
| Exercise | 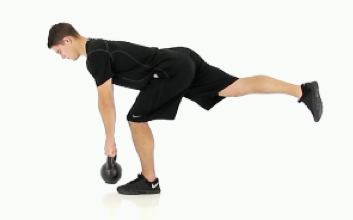 |
||
| Regressions: | Progressions: | ||
| Key Teaching Points | |||
|---|---|---|---|
|
|||
| Common Error(s): | |||
| Spotting: | |||
| Movement Pattern: | Target: | Synergist(s): | |
| Exercise | 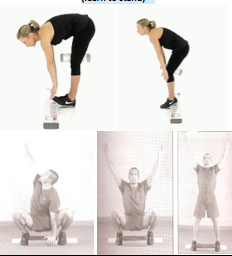 |
||
| Regressions: | Progressions: | ||
| Key Teaching Points | |||
|---|---|---|---|
|
|||
| Common Error(s): | |||
| Spotting: | |||
| Movement Pattern: Squat | Target: Quadriceps | Synergist(s): Gluteals, Hip Abductors | |
| Exercise | 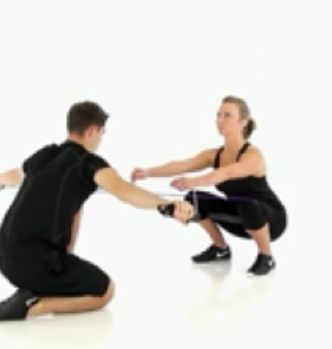 |
||
| Regressions: | Sit-to-Stand Squat | Progressions: | Goblet Squat |
| Key Teaching Points | |||
|---|---|---|---|
|
|||
| Common Error(s): | Valgus knees | Torso collapses forward | ||
| Spotting: | |||
| Movement Pattern: Core | rotation | Target: | Synergist(s): | |
| Exercise | 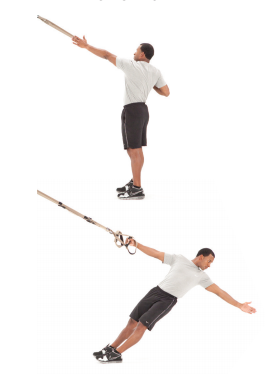 |
||
| Regressions: | Progressions: | ||
| Key Teaching Points | |||
|---|---|---|---|
|
|||
| Common Error(s): | Not engaging core | Rounded shoulders | Inappropriate momentum | ||
| Spotting: | |||
| Movement Pattern: Core | rotation | Target: | Synergist(s): | |
| Exercise | 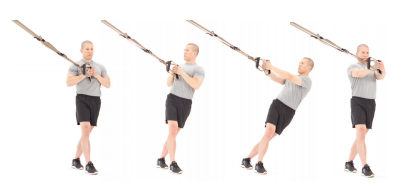 |
||
| Regressions: | Progressions: | ||
| Key Teaching Points | |||
|---|---|---|---|
|
|||
| Common Error(s): | Not engaging core | Inappropriate momentum | ||
| Spotting: | |||
| Movement Pattern: Press | horizontal, Whole Body | Target: Transverse Abdominus | Synergist(s): Deltoids (Anterior), Hip Flexors, Obliques, Pec Major, Rectus Abdominus | |
| Exercise |  |
||
| Regressions: | TRX Mountain Climber | BOSU Push Up | Progressions: | |
| Key Teaching Points | |||
|---|---|---|---|
|
|||
| Common Error(s): | Not engaging core | Sagging lower back | ||
| Spotting: | |||
| Movement Pattern: Core | rotation | Target: Obliques | Synergist(s): Rectus Abdominus | |
| Exercise | 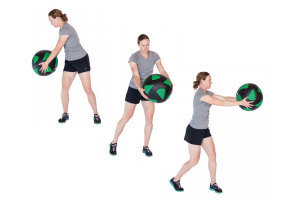 |
||
| Regressions: | Barbell Rotation | Progressions: | |
| Key Teaching Points | |||
|---|---|---|---|
|
|||
| Common Error(s): | Not engaging core | ||
| Spotting: | |||
| Movement Pattern: Lunge | Target: Quadriceps | Synergist(s): | |
| Exercise | 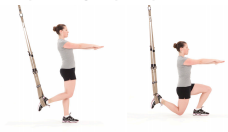 |
||
| Regressions: | Split Squat | Bulgarian Split Squat | Progressions: | |
| Key Teaching Points | |||
|---|---|---|---|
|
|||
| Common Error(s): | Torso collapses forward | Foot/ankle collapse | Trendelenburg Hip Drop | ||
| Spotting: | |||
| Movement Pattern: Lower Body | Target: Quadriceps | Synergist(s): | |
| Exercise | 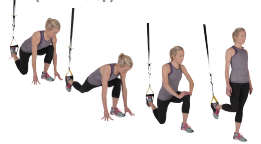 |
||
| Regressions: | Progressions: | ||
| Key Teaching Points | |||
|---|---|---|---|
|
|||
| Common Error(s): | Arching the upper back | Not engaging core | Valgus knees | ||
| Spotting: | |||
| Movement Pattern: Lunge | Target: Quadriceps | Synergist(s): | |
| Exercise | 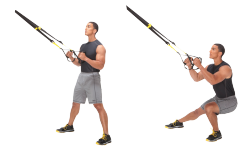 |
||
| Regressions: | Progressions: | Lateral Lunge | |
| Key Teaching Points | |||
|---|---|---|---|
|
|||
| Common Error(s): | Torso collapses forward | Trendelenburg Hip Drop | ||
| Spotting: | |||
| Movement Pattern: Lunge | Target: Quadriceps | Synergist(s): | |
| Exercise | 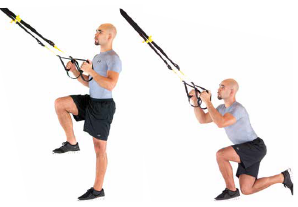 |
||
| Regressions: | Progressions: | Crossover Lunge | Single Leg Squat | |
| Key Teaching Points | |||
|---|---|---|---|
|
|||
| Common Error(s): | Torso collapses forward | Valgus knees | ||
| Spotting: | |||
| Movement Pattern: Lower Body | Target: | Synergist(s): | |
| Exercise | 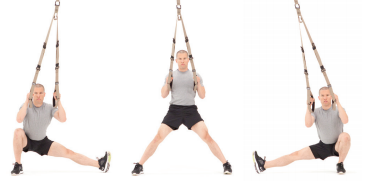 |
||
| Regressions: | Progressions: | ||
| Key Teaching Points | |||
|---|---|---|---|
|
|||
| Common Error(s): | Torso collapses forward | ||
| Spotting: | |||
| Movement Pattern: Hinge | Target: | Synergist(s): | |
| Exercise | 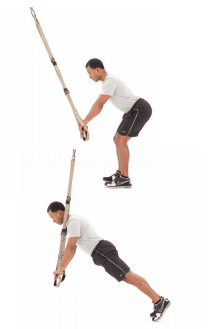 |
||
| Regressions: | Dowel Deadlift | Pull Through | Progressions: | Deadlift | Swing |
| Key Teaching Points | |||
|---|---|---|---|
|
|||
| Common Error(s): | Not engaging core | Rounded lower back | Sagging lower back | ||
| Spotting: | |||
| Movement Pattern: Lower Body | Target: Hamstrings | Synergist(s): Gluteals, Transverse Abdominus | |
| Exercise | 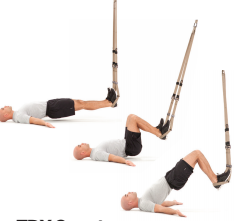 |
||
| Regressions: | TRX Hip Press (Bridge) | Single Leg Bridge | Progressions: | |
| Key Teaching Points | |||
|---|---|---|---|
|
|||
| Common Error(s): | Arching the upper back | ||
| Spotting: | |||
| Movement Pattern: Core (rotation), Hinge (hip) | Target: Obliques | Synergist(s): Deltoid (Posterior), Gluteals, Hamstrings, Quadratus Lumborum | |
| Exercise | 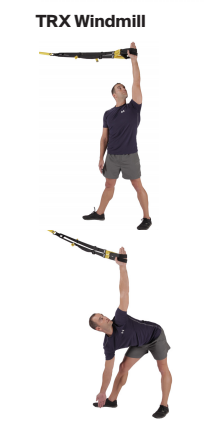 |
||
| Regressions: | Progressions: | Windmill | |
| Key Teaching Points | |||
|---|---|---|---|
|
|||
| Common Error(s): | Rounded lower back | Not engaging core | ||
| Spotting: | |||
| Movement Pattern: Core | stabilization, Hinge (hip) | Target: Transverse Abdominus | Synergist(s): Hip Flexors | |
| Exercise |  |
||
| Regressions: | TRX Hinge | Progressions: | |
| Key Teaching Points | |||
|---|---|---|---|
|
|||
| Common Error(s): | Not engaging core | Sagging lower back | ||
| Spotting: | |||
| Movement Pattern: Hinge | Target: Hamstrings | Synergist(s): Gluteals, Transverse Abdominus | |
| Exercise | 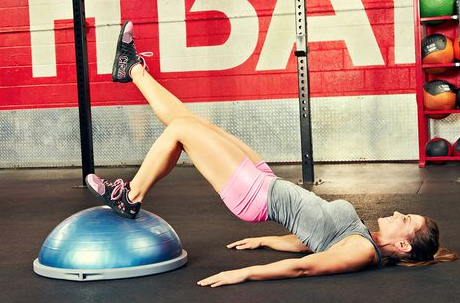 |
||
| Regressions: | Hip Bridge | Single Leg Bridge | Progressions: | TRX Hip Press (Bridge) | TRX Hamstring Curl to Hip Press (Bridge) |
| Key Teaching Points | |||
|---|---|---|---|
|
|||
| Common Error(s): | Not engaging core | Arching the upper back | ||
| Spotting: | |||
| Movement Pattern: Squat | Target: Quadriceps | Synergist(s): Gluteals | |
| Exercise | 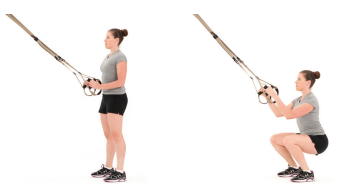 |
||
| Regressions: | Sit-to-Stand Squat | Progressions: | Goblet Squat | TRX Single Leg Squat |
| Key Teaching Points | |||
|---|---|---|---|
|
|||
| Common Error(s): | Torso collapses forward | Valgus knees | ||
| Spotting: | |||
| Movement Pattern: Squat | Target: Quadriceps | Synergist(s): Gluteals | |
| Exercise | 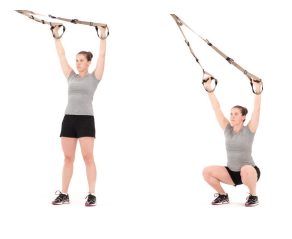 |
||
| Regressions: | TRX Squat | Progressions: | TRX Single Leg Squat | Front Squat |
| Key Teaching Points | |||
|---|---|---|---|
|
|||
| Common Error(s): | Torso collapses forward | Valgus knees | ||
| Spotting: | |||
| Movement Pattern: Squat | Target: Quadriceps | Synergist(s): Gluteals | |
| Exercise | 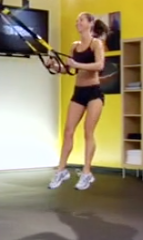 |
||
| Regressions: | TRX Squat | Progressions: | |
| Key Teaching Points | |||
|---|---|---|---|
|
|||
| Common Error(s): | Torso collapses forward | Valgus knees | ||
| Spotting: | |||
| Movement Pattern: Squat | Target: Quadriceps | Synergist(s): Gluteals | |
| Exercise | 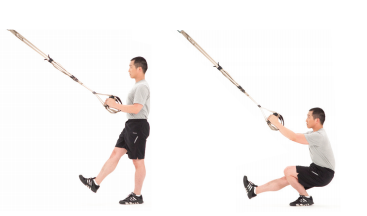 |
||
| Regressions: | Progressions: | Single Leg Squat | |
| Key Teaching Points | |||
|---|---|---|---|
|
|||
| Common Error(s): | Torso collapses forward | Valgus knees | Trendelenburg Hip Drop | ||
| Spotting: | |||
| Movement Pattern: Lower Body | Target: Quadriceps | Synergist(s): Gastrocnemius, Gluteals, Hip Flexors, Transverse Abdominus | |
| Exercise | 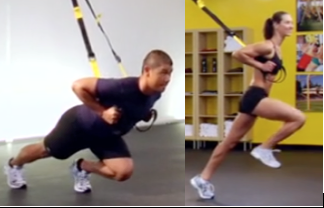 |
||
| Regressions: | Progressions: | ||
| Key Teaching Points | |||
|---|---|---|---|
|
|||
| Common Error(s): | Not engaging core | Forward Head Posture | Inappropriate momentum | ||
| Spotting: | |||
| Movement Pattern: Squat | Target: Quadriceps | Synergist(s): Gluteals, Hip Adductors | |
| Exercise | 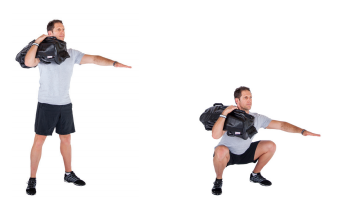 |
||
| Regressions: | Goblet Squat | TRX Overhead Squat | Progressions: | |
| Key Teaching Points | |||
|---|---|---|---|
|
|||
| Common Error(s): | Valgus knees | Torso collapses forward | Not engaging core | ||
| Spotting: | |||
| Movement Pattern: Core | stabilization | Target: Pec Major | Synergist(s): Deltoids (Anterior), Transverse Abdominus, Triceps | |
| Exercise | 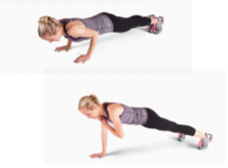 |
||
| Regressions: | Plank | Push Up | Progressions: | Plyometric Push Up |
| Key Teaching Points | |||
|---|---|---|---|
|
|||
| Common Error(s): | Not engaging core | Sagging lower back | Forward Head Posture | ||
| Spotting: | |||
| Movement Pattern: Pull | horizontal | Target: Latissimus Dorsi | Synergist(s): Rhomboids, Trapezius | |
| Exercise |  |
||
| Regressions: | Progressions: | ||
| Key Teaching Points | |||
|---|---|---|---|
|
This exercise is for clients with gripping and/or grasping challenges. Client can either lay supine on bench or stand in a bent over position (similar to a bent over row). Make sure to complete row with proper scapular retraction. Consider supporting head with towel under forehead for comfort. |
|||
| Common Error(s): | |||
| Spotting: | |||
| Movement Pattern: Press | vertical | Target: Deltoids (Anterior) | Synergist(s): Triceps | |
| Exercise | 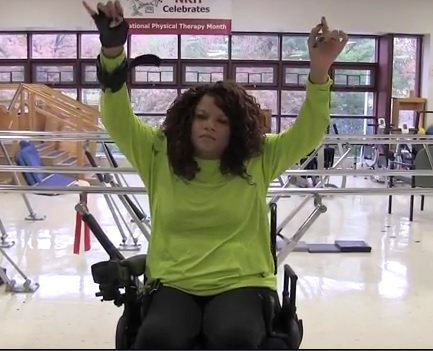 |
||
| Regressions: | Progressions: | ||
| Key Teaching Points | |||
|---|---|---|---|
|
|||
| Common Error(s): | |||
| Spotting: | |||
| Movement Pattern: | Target: | Synergist(s): | |
| Exercise | 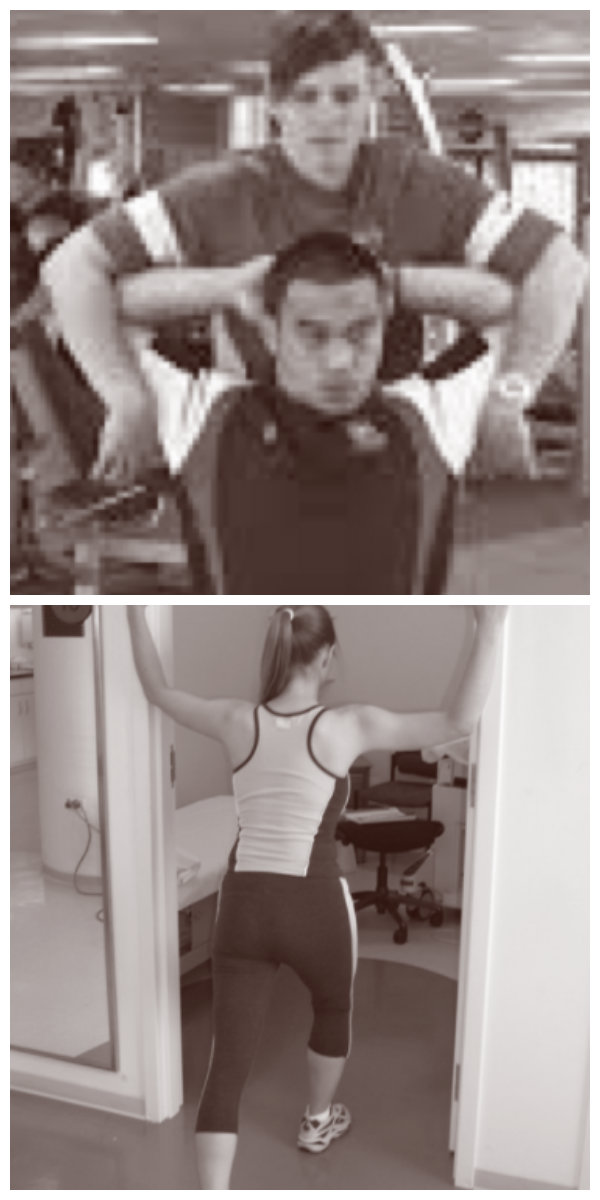 |
||
| Regressions: | Progressions: | ||
| Key Teaching Points | |||
|---|---|---|---|
|
Chest stretch, both sides, seated, with partner
Chest self-stretch, both sides, in doorway
|
|||
| Common Error(s): | |||
| Spotting: | |||
| Movement Pattern: | Target: | Synergist(s): | |
| Exercise |  |
||
| Regressions: | Progressions: | ||
| Key Teaching Points | |||
|---|---|---|---|
|
Hip Flexors stretch, supine, with partner
Hip Flexors self-stretch, lunge
|
|||
| Common Error(s): | |||
| Spotting: | |||
| Movement Pattern: | Target: | Synergist(s): | |
| Exercise |  |
||
| Regressions: | Progressions: | ||
| Key Teaching Points | |||
|---|---|---|---|
|
Quadriceps stretch, prone, with partner
Quadriceps self-stretch, standing
|
|||
| Common Error(s): | |||
| Spotting: | |||
| Movement Pattern: | Target: | Synergist(s): | |
| Exercise | 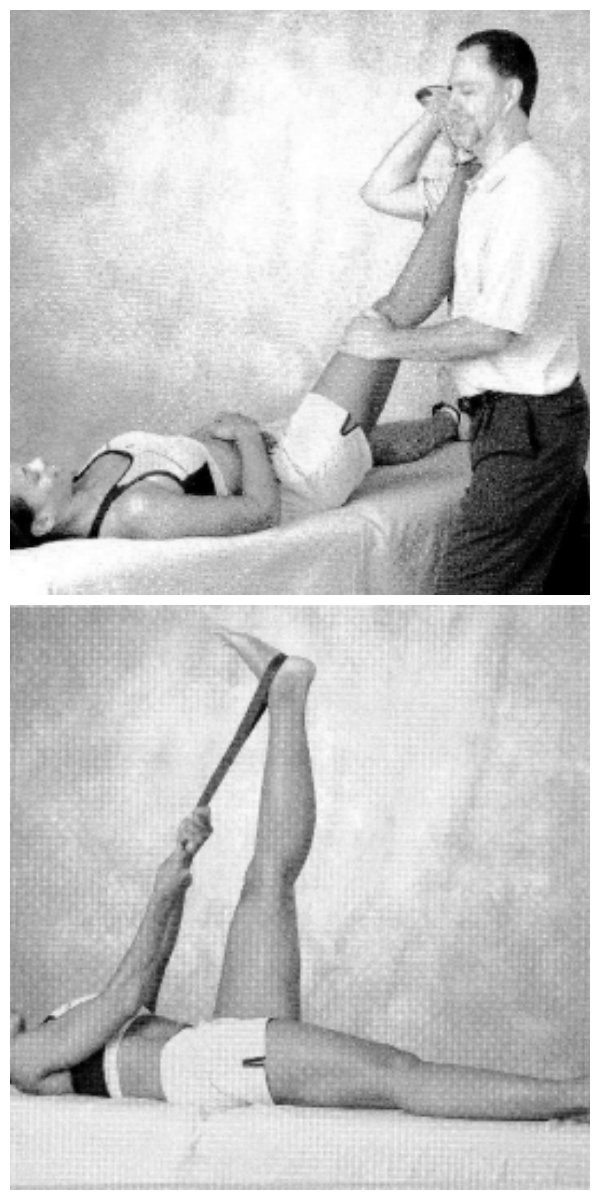 |
||
| Regressions: | Progressions: | ||
| Key Teaching Points | |||
|---|---|---|---|
|
Hamstrings stretch, straight leg, supine, with partner
Hamstring self-stretch, supine, with stretching strap
|
|||
| Common Error(s): | |||
| Spotting: | |||
| Movement Pattern: | Target: | Synergist(s): | |
| Exercise | 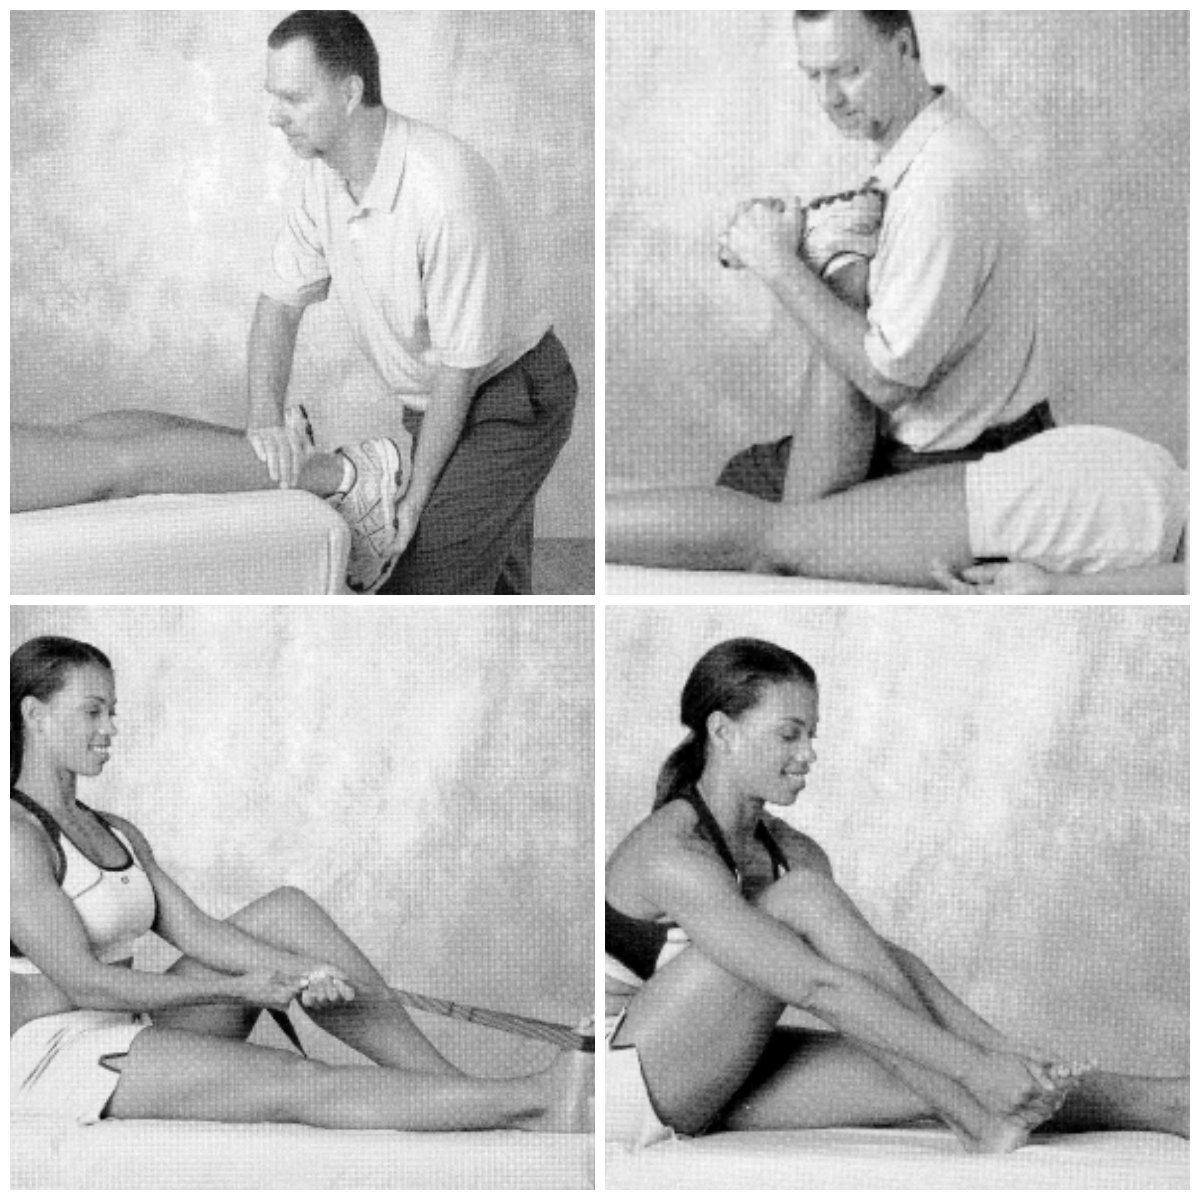 |
||
| Regressions: | Progressions: | ||
| Key Teaching Points | |||
|---|---|---|---|
|
Gastrocnemius and soleus stretches, prone, with partner
Gastrocnemius and soleus stretches, seated, with stretching strap
|
|||
| Common Error(s): | |||
| Spotting: | |||
| Movement Pattern: | Target: | Synergist(s): | |
| Exercise | 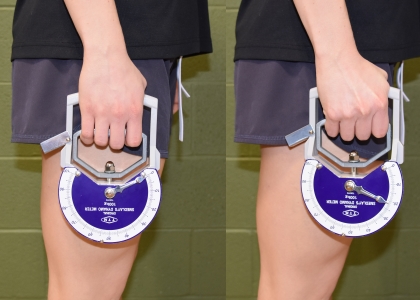 |
||
| Regressions: | Progressions: | ||
| Key Teaching Points | |||||||||||||||||||||||||||||||||||||||||||||||||||||||||||||||||||||||||||||||||||||||||||||||||||||||||
|---|---|---|---|---|---|---|---|---|---|---|---|---|---|---|---|---|---|---|---|---|---|---|---|---|---|---|---|---|---|---|---|---|---|---|---|---|---|---|---|---|---|---|---|---|---|---|---|---|---|---|---|---|---|---|---|---|---|---|---|---|---|---|---|---|---|---|---|---|---|---|---|---|---|---|---|---|---|---|---|---|---|---|---|---|---|---|---|---|---|---|---|---|---|---|---|---|---|---|---|---|---|---|---|---|---|
|
Instructions
Scoring and Recording Combine the maximum scores from each of the left and right hands. Record the result and associated Health Benefit (from the table) on the Client Information Sheet.
*Grip scores are for left- and right-hand combined. |
|||||||||||||||||||||||||||||||||||||||||||||||||||||||||||||||||||||||||||||||||||||||||||||||||||||||||
| Common Error(s): | |||||||||||||||||||||||||||||||||||||||||||||||||||||||||||||||||||||||||||||||||||||||||||||||||||||||||
| Spotting: | |||||||||||||||||||||||||||||||||||||||||||||||||||||||||||||||||||||||||||||||||||||||||||||||||||||||||
| Movement Pattern: | Target: | Synergist(s): | |
| Exercise | 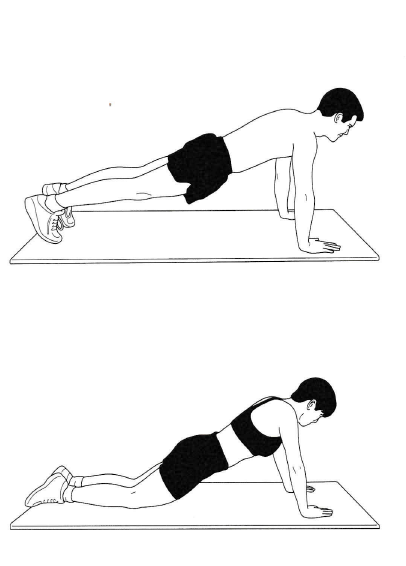 |
||
| Regressions: | Progressions: | ||
| Key Teaching Points | |||||||||||||||||||||||||||||||||||||||||||||||||||||||||||||||||||||||||||||||||||||||||||||||||||||||||
|---|---|---|---|---|---|---|---|---|---|---|---|---|---|---|---|---|---|---|---|---|---|---|---|---|---|---|---|---|---|---|---|---|---|---|---|---|---|---|---|---|---|---|---|---|---|---|---|---|---|---|---|---|---|---|---|---|---|---|---|---|---|---|---|---|---|---|---|---|---|---|---|---|---|---|---|---|---|---|---|---|---|---|---|---|---|---|---|---|---|---|---|---|---|---|---|---|---|---|---|---|---|---|---|---|---|
|
Instructions
Stop the test if a client feels any pain or discomfort, appears to strain forcibly or is unable to maintain the proper push-up technique over two consecutive repetitions. Do not count repetitions with improper technique. Advise the client to exhale during upward phase of the push-up and to avoid holding his/her breath. Scoring and Recording Record the client’s total number of push-ups and associated Health Benefit Rating in the Client Information Sheet.
|
|||||||||||||||||||||||||||||||||||||||||||||||||||||||||||||||||||||||||||||||||||||||||||||||||||||||||
| Common Error(s): | |||||||||||||||||||||||||||||||||||||||||||||||||||||||||||||||||||||||||||||||||||||||||||||||||||||||||
| Spotting: | |||||||||||||||||||||||||||||||||||||||||||||||||||||||||||||||||||||||||||||||||||||||||||||||||||||||||
| Movement Pattern: | Target: | Synergist(s): | |
| Exercise | 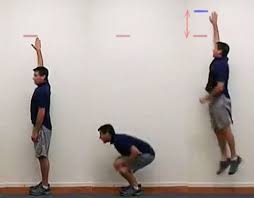 |
||
| Regressions: | Progressions: | ||
| Key Teaching Points | |||||||||||||||||||||||||||||||||||||||||||||||||||||||||||||||||||||||||||||||||||||||||||||||||||||||||
|---|---|---|---|---|---|---|---|---|---|---|---|---|---|---|---|---|---|---|---|---|---|---|---|---|---|---|---|---|---|---|---|---|---|---|---|---|---|---|---|---|---|---|---|---|---|---|---|---|---|---|---|---|---|---|---|---|---|---|---|---|---|---|---|---|---|---|---|---|---|---|---|---|---|---|---|---|---|---|---|---|---|---|---|---|---|---|---|---|---|---|---|---|---|---|---|---|---|---|---|---|---|---|---|---|---|
|
Instructions
Allow the client three trials, with a rest period of 10-15 seconds between each. No run up, step up or pre-jump is permitted (feet flat on the floor to start). Scoring and Recording Subtract the stand and reach measurement from the best of the three jump and reach trials to get the maximum difference. Calculate Peak Leg Power in watts (W) using the formula: Peak Leg Power (W) = [60.7 x jump height (cm)] + [45.3 x body mass (kg)] – 2055Record the Peak Leg Power and the associated Health Benefit Rating on the Client Information Sheet.
|
|||||||||||||||||||||||||||||||||||||||||||||||||||||||||||||||||||||||||||||||||||||||||||||||||||||||||
| Common Error(s): | |||||||||||||||||||||||||||||||||||||||||||||||||||||||||||||||||||||||||||||||||||||||||||||||||||||||||
| Spotting: | |||||||||||||||||||||||||||||||||||||||||||||||||||||||||||||||||||||||||||||||||||||||||||||||||||||||||
| Movement Pattern: Upper Body | Target: Latissimus Dorsi | Synergist(s): Obliques | |
| Exercise | 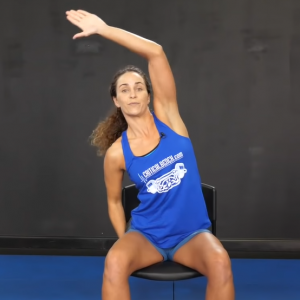 |
||
| Regressions: | Progressions: | ||
| Key Teaching Points | |||
|---|---|---|---|
|
Make sure wheelchair/chair is secure. Extend a fully extended arm overhead and then lean to the opposite side. Make sure not to tip the chair. Stretch should be felt in the lat and upper trunk. Don’t twist. Remaining in frontal plane. Alternate sides, each time improving range of motion. Pain free. |
|||
| Common Error(s): | Inappropriate momentum | ||
| Spotting: | |||
| Movement Pattern: Core | stabilization, Gait | Target: Transverse Abdominus | Synergist(s): Quadratus Lumborum, Rectus Abdominus, Rhomboids, Trapezius | |
| Exercise |  |
||
| Regressions: | Progressions: | ||
| Key Teaching Points | |||
|---|---|---|---|
|
|||
| Common Error(s): | Not engaging core | ||
| Spotting: | |||
| Movement Pattern: | Target: | Synergist(s): | |
| Exercise | 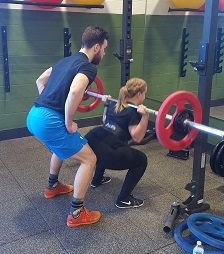 |
||
| Regressions: | Goblet Squat | TRX Squat | Progressions: | |
| Key Teaching Points | |||
|---|---|---|---|
|
Submaximal strength testing can be used to estimate 1 RM performance for exercisers who have inadequate experience handling heavy free weights. Generally when using a submaximal load, it is customary to use a weight that causes a client to reach momentary muscle failure within 6-10 repetitions. For the purpose of our predictors, we will be using the Baechle (2000) equation: weight (lbs) x (1 + (o.o33 x # of reps))
Remember, that before performing any more strenuous exercise to complete a proper warm-up. |
|||
| Common Error(s): | Valgus knees | ||
| Spotting: | |||
| Movement Pattern: Lower Body | Target: Hip Adductors | Synergist(s): Gluteals, Hamstrings | |
| Exercise | 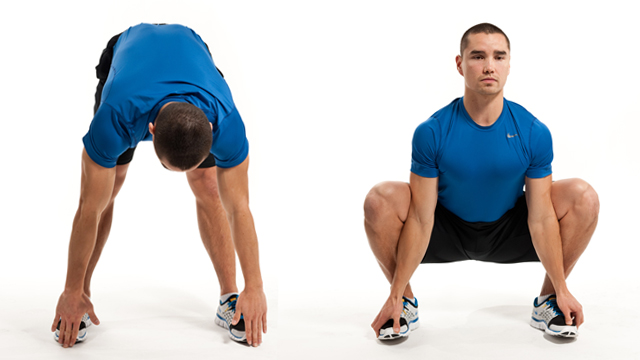 |
||
| Regressions: | Progressions: | ||
| Key Teaching Points | |||
|---|---|---|---|
|
|||
| Common Error(s): | |||
| Spotting: | |||
| Movement Pattern: Whole Body | Target: Gluteals | Synergist(s): Hip Flexors, Quadriceps, Rectus Abdominus | |
| Exercise | 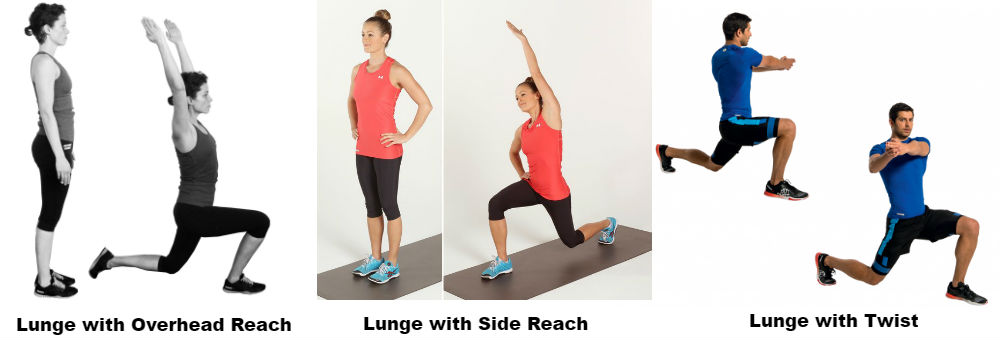 |
||
| Regressions: | TRX Lunge | Progressions: | |
| Key Teaching Points | |||
|---|---|---|---|
|
Lunge with Overhead Reach
Lunge with Side Reach. Complete the same steps as above, only in bottom of lunge reach up and across your body with the opposite arm (from the knee that is leading). Lunge and Twist In bottom of lunge, extend arms and rotate to both sides in a slow and controlled fashion. |
|||
| Common Error(s): | Not engaging core | ||
| Spotting: | |||
| Movement Pattern: Whole Body | Target: | Synergist(s): | |
| Exercise | 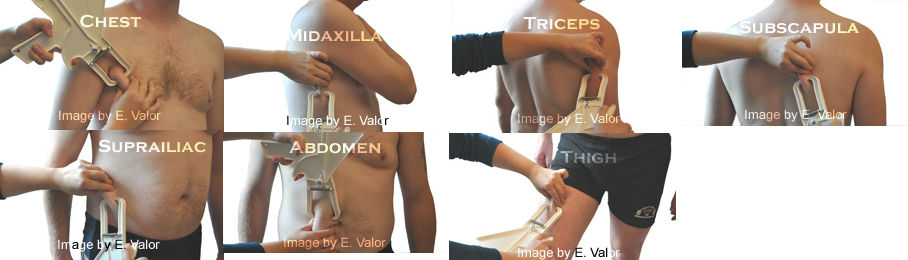 |
||
| Regressions: | Progressions: | ||
| Key Teaching Points | |||||||||
|---|---|---|---|---|---|---|---|---|---|
|
General instructions for skinfold calipers
Jackson-Pollock 7 Site With this procedure, you will take all measurements on the right side of the body, while your subject is standing.
Jackson/Pollock 7-Site Caliper Method formula
1. Jackson, A.S. & Pollock, M.L. (1978) Generalized equations for predicting body density of men. British J of Nutrition, 40: p497-504. 2. Jackson, et al. (1980) Generalized equations for predicting body density of women. Medicine and Science in Sports and Exercise, 12: p175-182. |
|||||||||
| Common Error(s): | |||||||||
| Spotting: | |||||||||
| Movement Pattern: Core | stabilization | Target: Transverse Abdominus | Synergist(s): Gluteals, Trapezius | |
| Exercise | 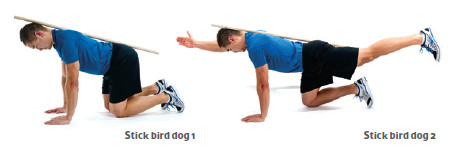 |
||
| Regressions: | Progressions: | ||
| Key Teaching Points | |||
|---|---|---|---|
|
Follow same instructions as 4 point bird dog but now include a dowel with three points of contact (gluts, t spine and back of head). This will allow the trainer to ensure the client is maintaining a neutral spine and avoiding excessive extension of the back. |
|||
| Common Error(s): | Not engaging core | Arching the upper back | ||
| Spotting: | Mirror Client Level | ||
| Movement Pattern: Whole Body | Target: | Synergist(s): | |
| Exercise |  |
||
| Regressions: | Progressions: | ||
| Key Teaching Points | |||
|---|---|---|---|
|
Any kind of sports specific activity for a period of time. |
|||
| Common Error(s): | |||
| Spotting: | |||
| Movement Pattern: | Target: | Synergist(s): | |
| Exercise | 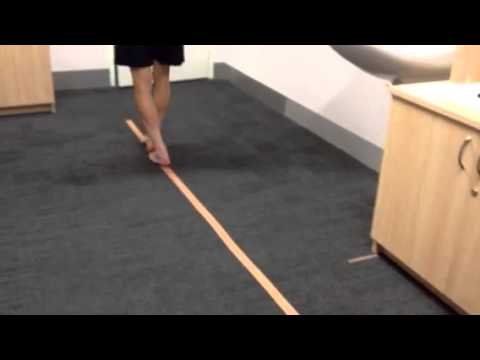 |
||
| Regressions: | Progressions: | ||
| Key Teaching Points | |||
|---|---|---|---|
|
Tandem Gait 1. Schneiders, A.G., Sullivan, S.J., Gray, A., Hammond-Tooke, G. & M cCrory, P. Normative values for 16-37 year old subjects for three clinical measures of motor |
|||
| Common Error(s): | |||
| Spotting: | |||
| Movement Pattern: | Target: | Synergist(s): | |
| Exercise | 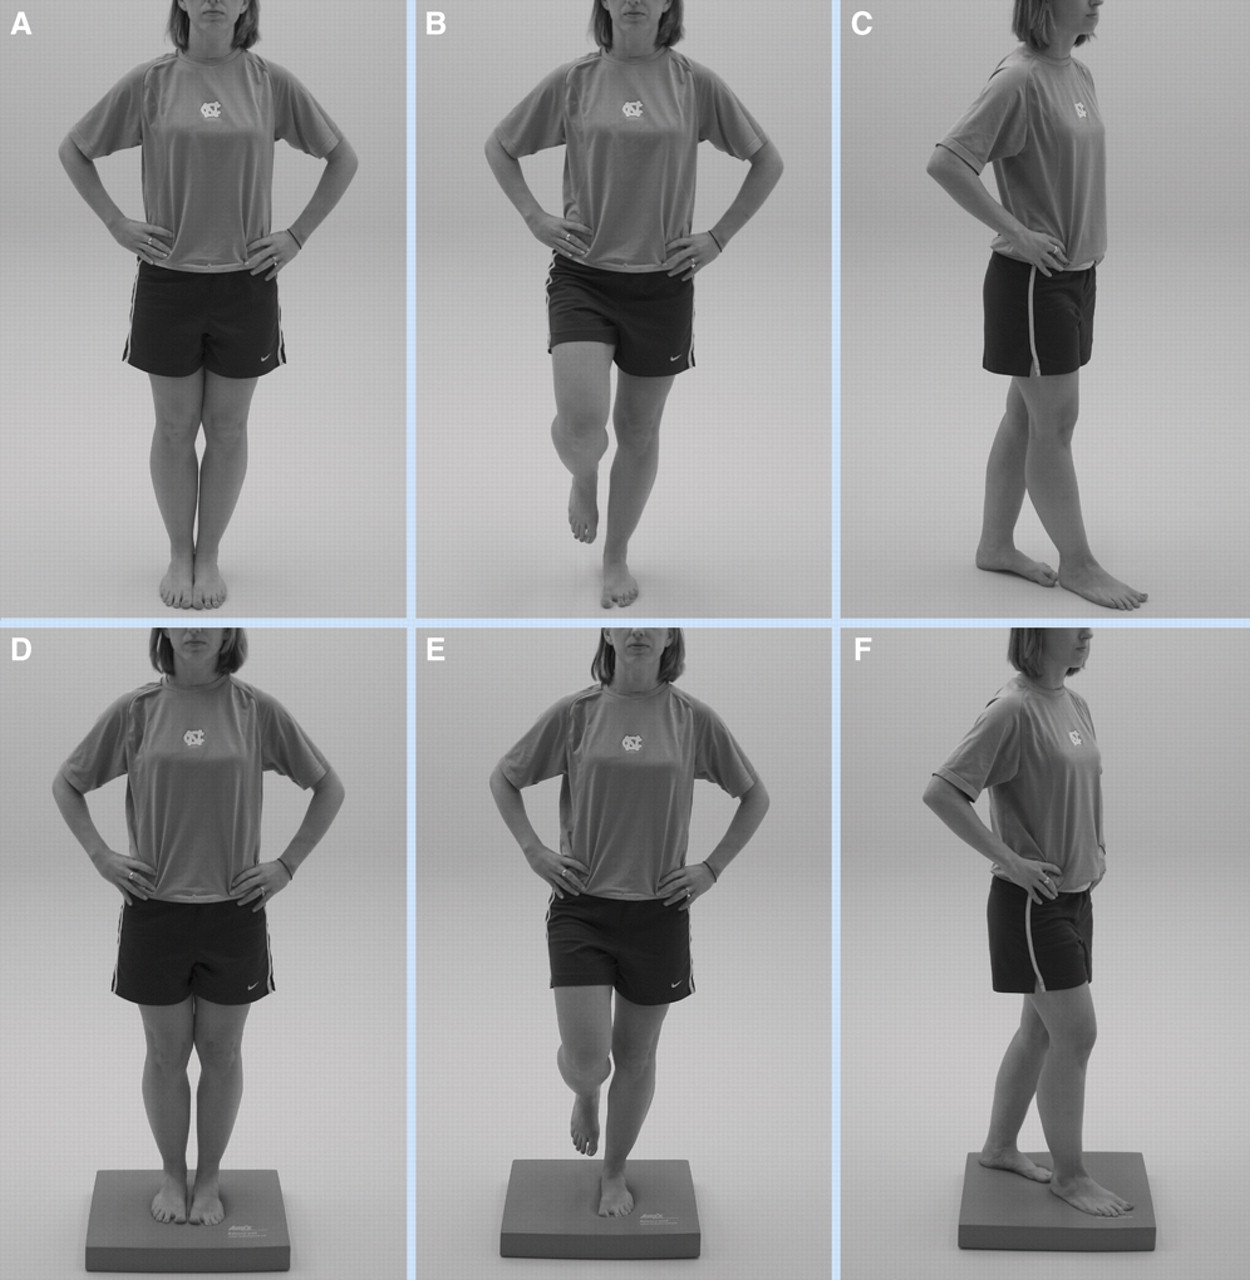 |
||
| Regressions: | Progressions: | ||
| Key Teaching Points | |||
|---|---|---|---|
|
This balance testing is based on a modified version of the Balance Error Scoring System (BESS)5. A stopwatch or watch with a second hand is required for this testing. Balance testing – types of errors 1. Guskiewicz KM. Assessment of postural stability following sport-related concussion. Current Sports Medicine Reports. 2003; 2: 24 – 30. |
|||
| Common Error(s): | |||
| Spotting: | |||
| Movement Pattern: | Target: | Synergist(s): | |
| Exercise |  |
||
| Regressions: | Progressions: | ||
| Key Teaching Points | |||
|---|---|---|---|
|
Upper limb coordination Scoring: 5 correct repetitions in < 4 seconds = 1 |
|||
| Common Error(s): | |||
| Spotting: | |||
| Movement Pattern: | Target: | Synergist(s): | |
| Exercise |  |
||
| Regressions: | Progressions: | ||
| Key Teaching Points | |||
|---|---|---|---|
|
This original Cunningham Faulkner test requires the athlete to run on a treadmill set at a speed of 8 miles/hour and an incline of 20% (11.3°) until unable to continue
In the modified Anaerobic Speed Test (mAST, Murao 2018), athletes will use the values of 15% grade and 9 mph (8 mph females), allowing this test to be completed on most commercial treadmills. |
|||
| Common Error(s): | |||
| Spotting: | |||
| Movement Pattern: Gait | Target: Quadriceps | Synergist(s): Gluteals, Hamstrings | |
| Exercise | 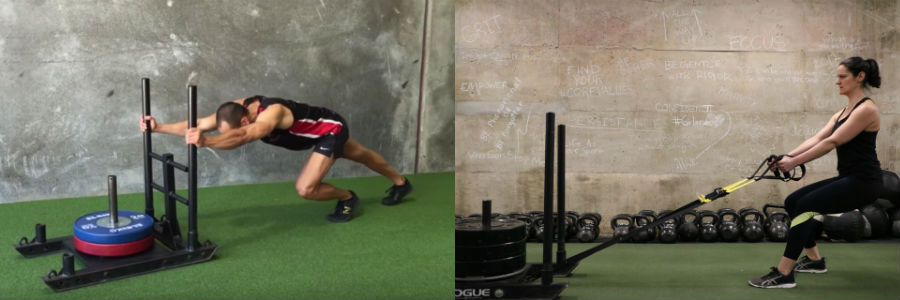 |
||
| Regressions: | Progressions: | ||
| Key Teaching Points | |||
|---|---|---|---|
|
Sled Push
Sled Pull
Both of these movements can be completed with a Prowler type sled, or a weight bench. |
|||
| Common Error(s): | |||
| Spotting: | |||
| Movement Pattern: | Target: Quadriceps | Synergist(s): | |
| Exercise | |||
| Regressions: | Progressions: | ||
| Key Teaching Points | |||
|---|---|---|---|
|
Pre-Exercise
During Exercise
Post-Exercise
Two equations, which for young adults tend to yield similar results, have been developed to predict aerobic fitness using this assessment:
|
|||
| Common Error(s): | |||
| Spotting: | |||
| Movement Pattern: Squat | Target: | Synergist(s): | |
| Exercise | 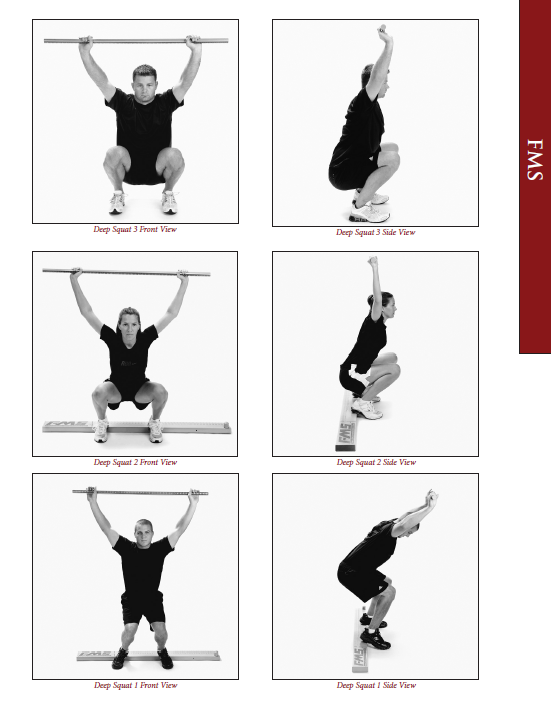 |
||
| Regressions: | Progressions: | ||
| Key Teaching Points | |||
|---|---|---|---|
|
Set-up Verbal Instructions:
Tips for testing:
Scoring: 3:
2:
1:
0:
|
|||
| Common Error(s): | |||
| Spotting: | |||
| Movement Pattern: Gait, Lower Body | Target: | Synergist(s): | |
| Exercise | 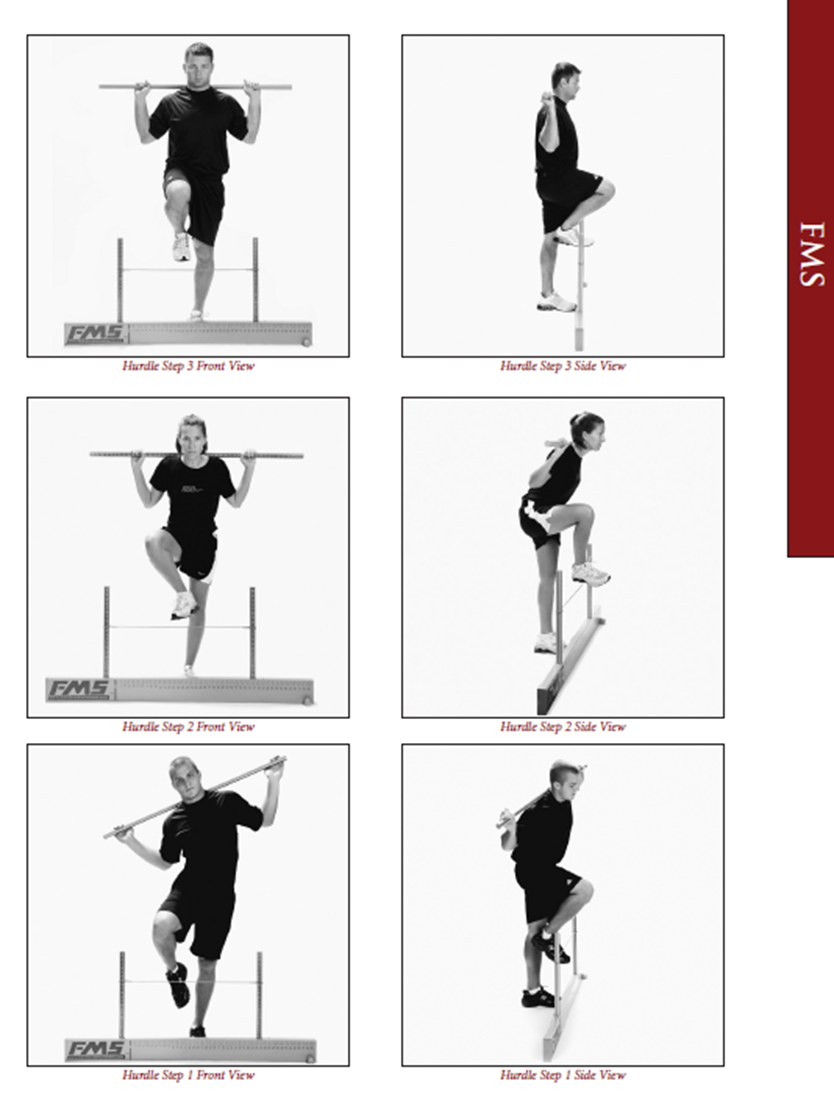 |
||
| Regressions: | Progressions: | ||
| Key Teaching Points | |||
|---|---|---|---|
|
Set-up Verbal Instructions:
Tips for testing:
Scoring: 3:
2:
1:
0:
|
|||
| Common Error(s): | |||
| Spotting: | |||
| Movement Pattern: | Target: | Synergist(s): | |
| Exercise | 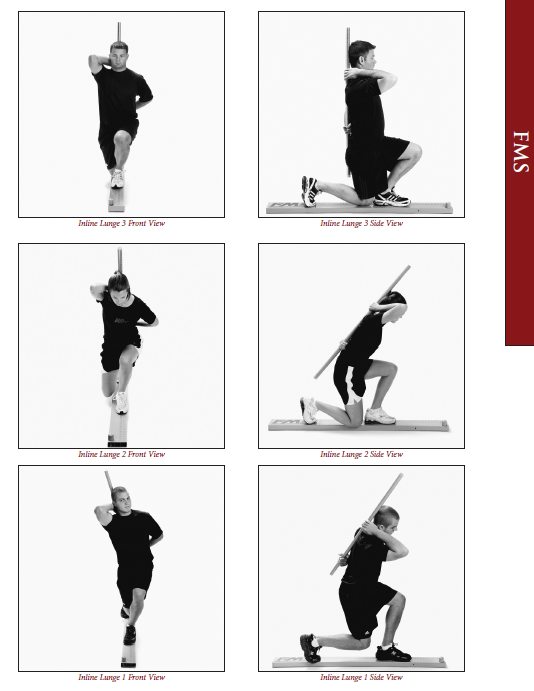 |
||
| Regressions: | Progressions: | ||
| Key Teaching Points | |||
|---|---|---|---|
|
Set-up Verbal Instructions:
Tips for testing:
Scoring: 3:
2:
1:
0:
|
|||
| Common Error(s): | |||
| Spotting: | |||
| Movement Pattern: Hinge | Target: Gluteals | Synergist(s): Hamstrings | |
| Exercise |  |
||
| Regressions: | Progressions: | ||
| Key Teaching Points | |||
|---|---|---|---|
|
Set-Up:
Scoring: 3 – Client is able to achieve >60° hip flexion with dowel remaining in contact at all points. 2 – Client able to achieve 45-60° hip flexion before dowel loses contact. 1 – Back rounds or dowel loses contact before client achieves 45° hip flexion. 0 – Client unable to hinge OR pain occurs |
|||
| Common Error(s): | |||
| Spotting: | |||
| Movement Pattern: Press | vertical, Upper Body | Target: | Synergist(s): | |
| Exercise | 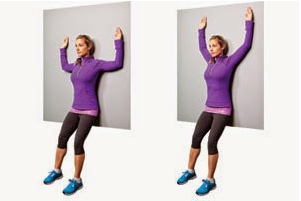 |
||
| Regressions: | Progressions: | ||
| Key Teaching Points | |||
|---|---|---|---|
|
Set-Up:
|
|||
| Common Error(s): | |||
| Spotting: | |||
| Movement Pattern: Core | stabilization | Target: | Synergist(s): | |
| Exercise | 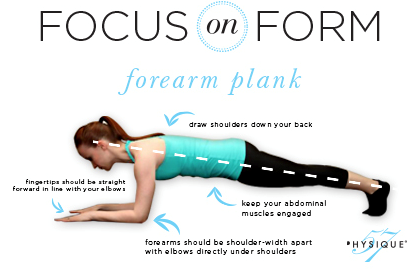 |
||
| Regressions: | Progressions: | ||
| Key Teaching Points | |||
|---|---|---|---|
|
Set-Up:
Scoring: Excellent: > 60 sec Good: 30 – 60 sec Needs Improvement: 15 – 30 sec Poor: 0 – 15 sec |
|||
| Common Error(s): | |||
| Spotting: | |||
| Movement Pattern: Upper Body | Target: | Synergist(s): | |
| Exercise | 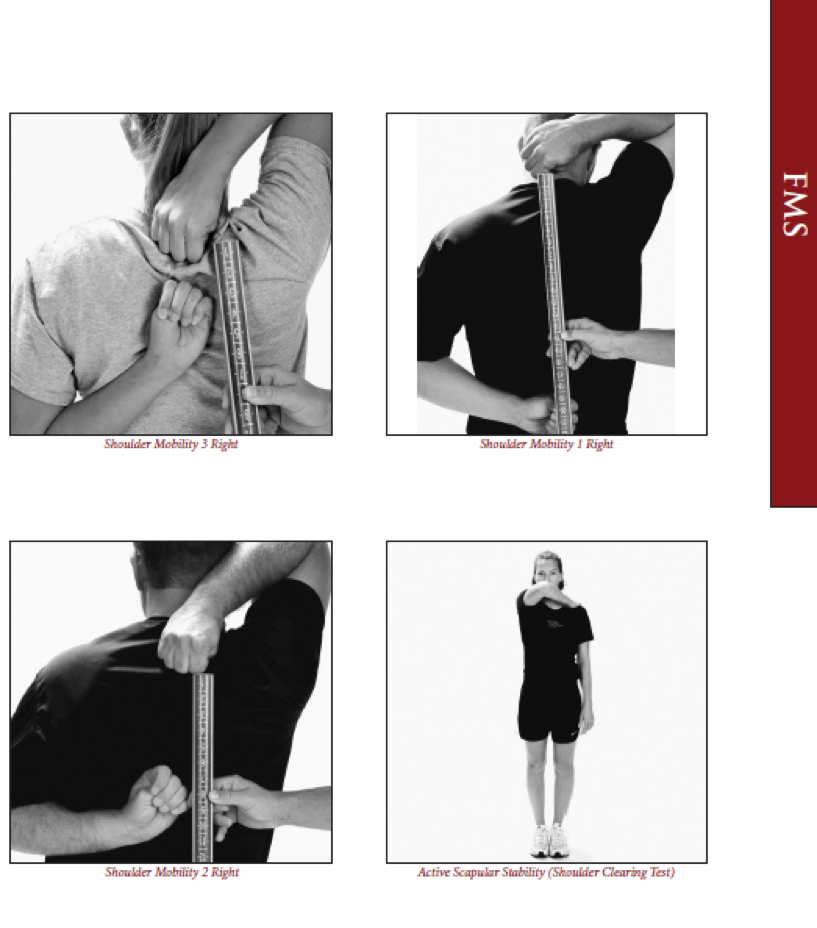 |
||
| Regressions: | Progressions: | ||
| Key Teaching Points | |||
|---|---|---|---|
|
Set up verbal instructions:
Tips for teaching
Scoring: 3:
2:
1:
0:
Clearing test:
|
|||
| Common Error(s): | |||
| Spotting: | |||
| Movement Pattern: Lower Body | Target: | Synergist(s): | |
| Exercise | 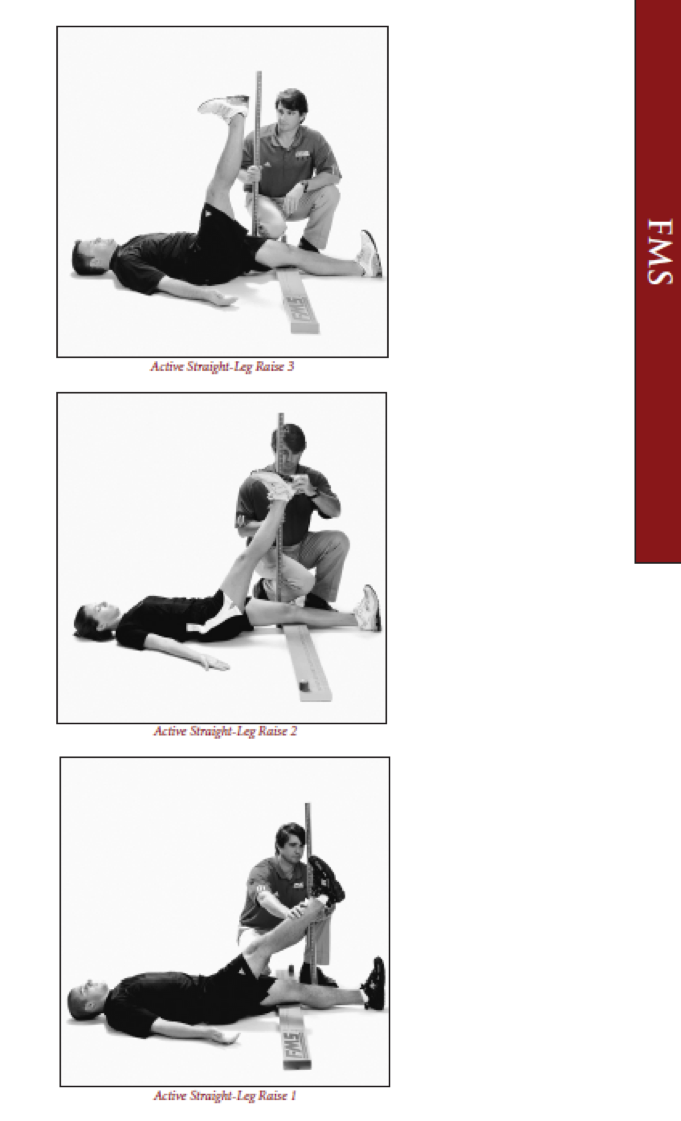 |
||
| Regressions: | Progressions: | ||
| Key Teaching Points | |||
|---|---|---|---|
|
Set up verbal instructions:
Tips for teaching:
Scoring: 3:
2:
1:
0:
|
|||
| Common Error(s): | |||
| Spotting: | |||
| Movement Pattern: Press | horizontal, Whole Body | Target: | Synergist(s): | |
| Exercise | 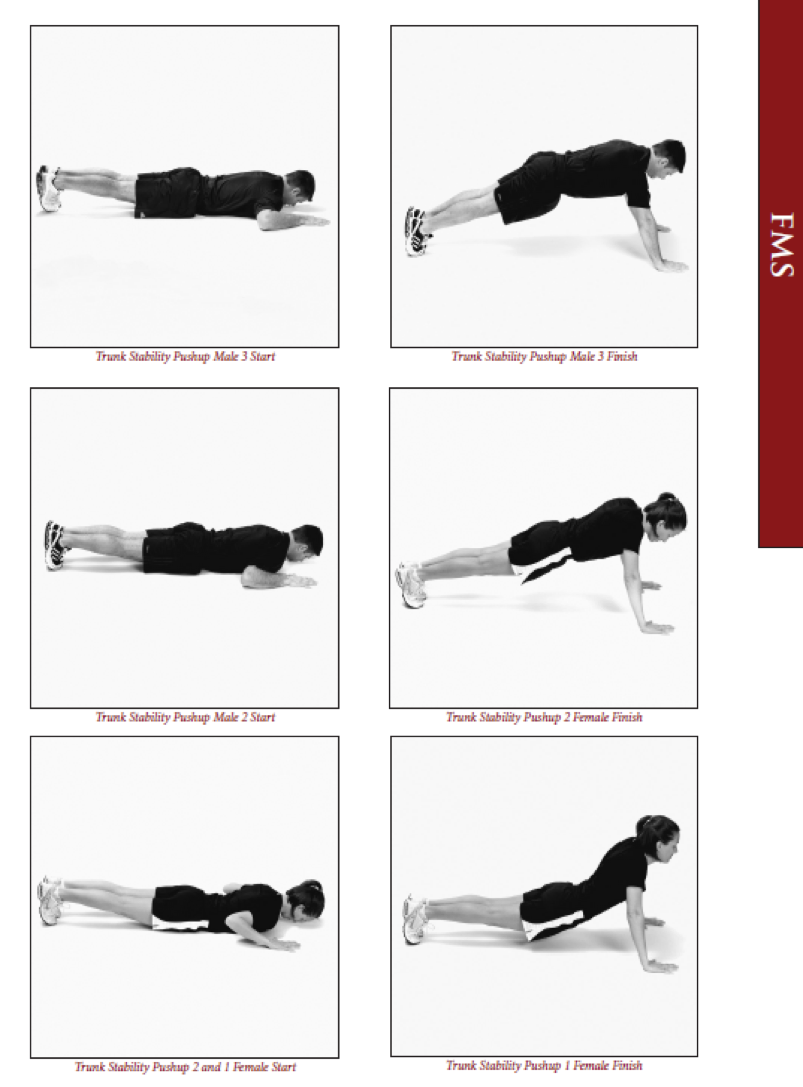 |
||
| Regressions: | Progressions: | ||
| Key Teaching Points | |||
|---|---|---|---|
|
Set up verbal instructions:
Tips for teaching:
Scoring: 3:
2:
1:
0:
Clearing Test:
|
|||
| Common Error(s): | |||
| Spotting: | |||
| Movement Pattern: Core | stabilization, Whole Body | Target: | Synergist(s): | |
| Exercise | 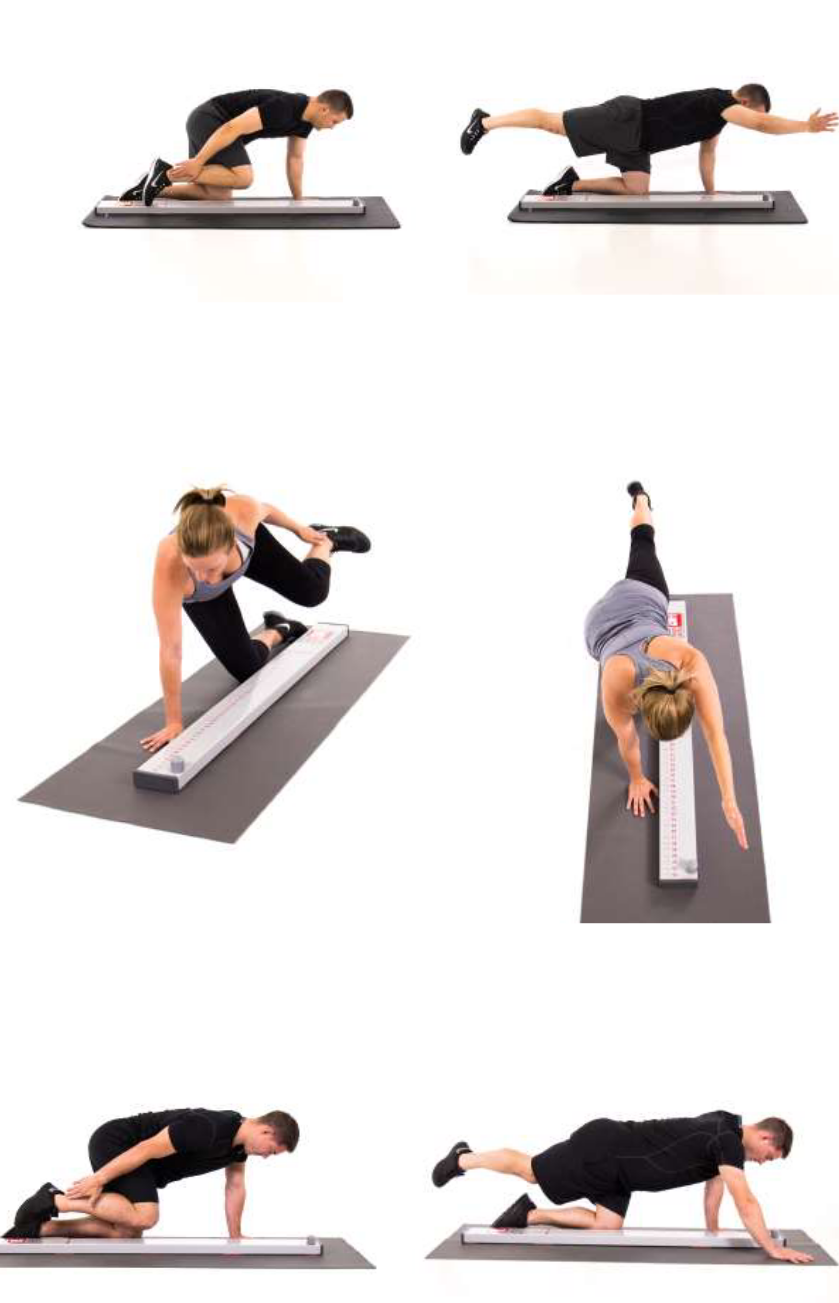 |
||
| Regressions: | Progressions: | ||
| Key Teaching Points | |||
|---|---|---|---|
|
Set up verbal instructions:
Tips for teaching:
Scoring: 3:
2:
1:
0:
Clearing Test:
|
|||
| Common Error(s): | |||
| Spotting: | |||
| Movement Pattern: Core | rotation | Target: Obliques | Synergist(s): Rectus Abdominus | |
| Exercise | 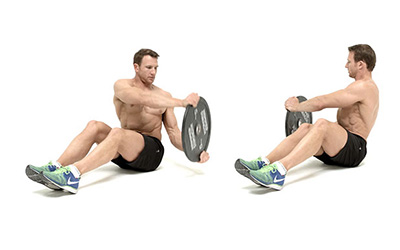 |
||
| Regressions: | Progressions: | ||
| Key Teaching Points | |||
|---|---|---|---|
|
|||
| Common Error(s): | Not engaging core | Inappropriate momentum | ||
| Spotting: | |||
| Movement Pattern: Core | rotation | Target: Obliques | Synergist(s): Transverse Abdominus | |
| Exercise | 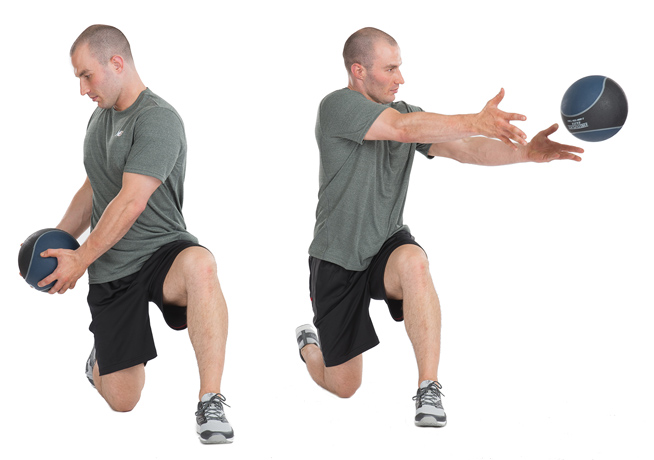 |
||
| Regressions: | Progressions: | ||
| Key Teaching Points | |||
|---|---|---|---|
|
This drill can be done with a partner or up against a wall. With a wall
With a partner
|
|||
| Common Error(s): | |||
| Spotting: | |||
| Movement Pattern: Pull | horizontal | Target: Latissimus Dorsi | Synergist(s): Deltoid (Posterior), Rhomboids | |
| Exercise | 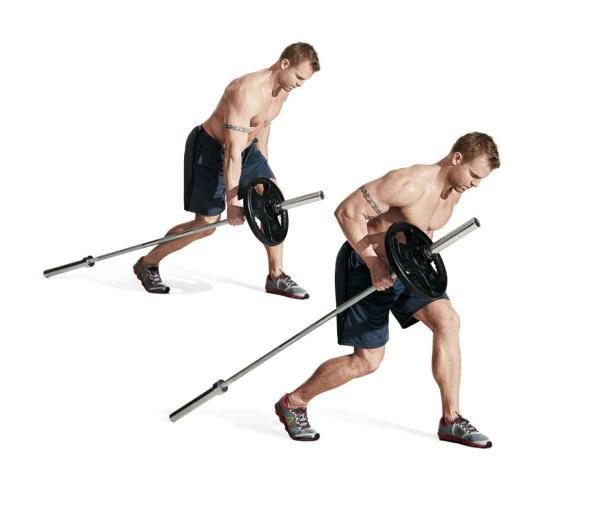 |
||
| Regressions: | Progressions: | ||
| Key Teaching Points | |||
|---|---|---|---|
|
Instructions
Variations (1-arm Meadows Row)
|
|||
| Common Error(s): | |||
| Spotting: | |||
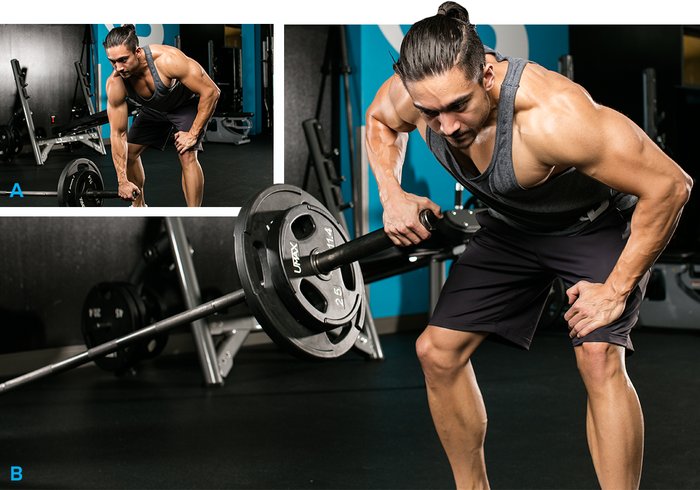
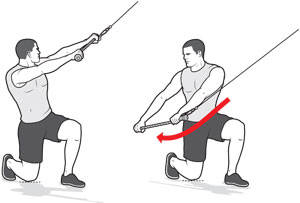
| Movement Pattern: Single-joint | isolation, Upper Body | Target: Suboccipitals | Synergist(s): | |
| Exercise | 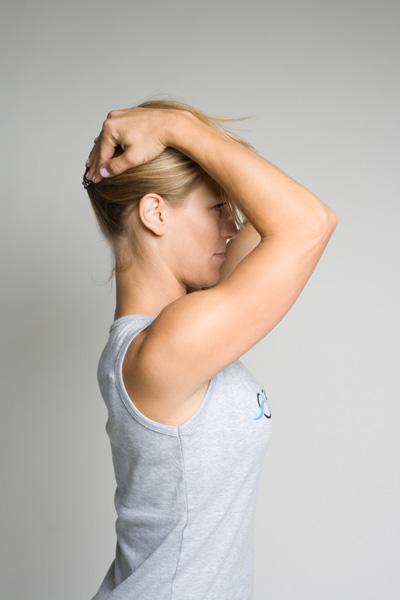 |
||
| Regressions: | Progressions: | ||
| Key Teaching Points | |||
|---|---|---|---|
|
Do not flex head forward. Stretch with the horizontal plane. |
|||
| Common Error(s): | |||
| Spotting: | |||
| Movement Pattern: Whole Body | Target: Quadriceps | Synergist(s): Latissimus Dorsi | |
| Exercise | 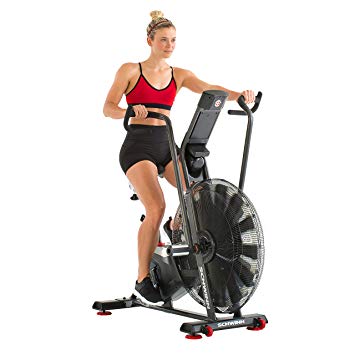 |
||
| Regressions: | Progressions: | ||
| Key Teaching Points | |||
|---|---|---|---|
| Common Error(s): | |||
| Spotting: | |||
| Movement Pattern: Press | horizontal | Target: Pec Major | Synergist(s): Deltoids (Anterior) | |
| Exercise | |||
| Regressions: | Progressions: | ||
| Key Teaching Points | |||
|---|---|---|---|
|
|||
| Common Error(s): | Using Excessive Momentum | ||
| Spotting: | |||
| Movement Pattern: Upper Body | Target: Latissimus Dorsi | Synergist(s): Obliques | |
| Exercise | 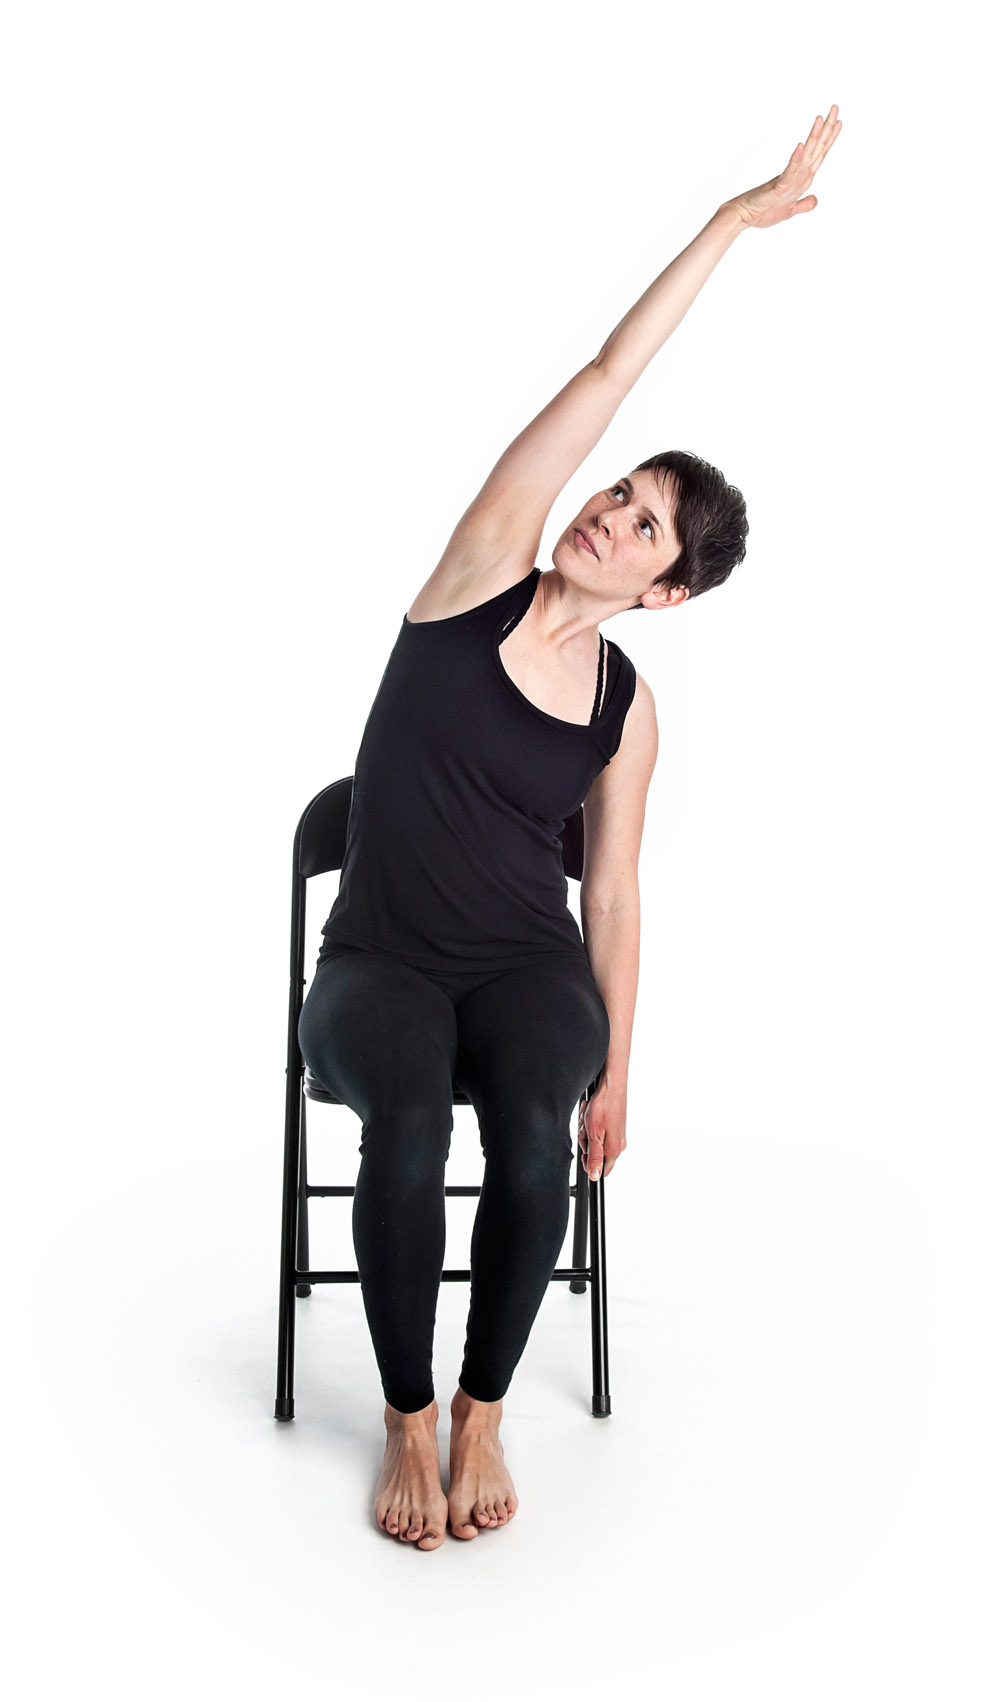 |
||
| Regressions: | Progressions: | ||
| Key Teaching Points | |||
|---|---|---|---|
|
While seated in a secure wheelchair/chair reach a fully extended arm overhead and then lean to the opposite side. Intensify the stretch by reaching further away from the body and/or grabbing an anchor (e.g. rig/rack) and leaning away. Be careful not to tip the chair. |
|||
| Common Error(s): | |||
| Spotting: | |||
| Movement Pattern: Whole Body | Target: Quadriceps | Synergist(s): Gluteals, Hamstrings, Trapezius | |
| Exercise | 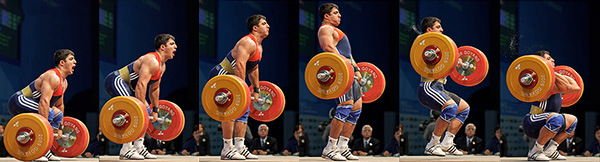 |
||
| Regressions: | 1-Arm Clean and Press | Progressions: | Power Snatch |
| Key Teaching Points | |||
|---|---|---|---|
|
|||
| Common Error(s): | |||
| Spotting: | |||
| Movement Pattern: Squat | Target: Gluteals | Synergist(s): Quadriceps, Spinal Erectors, Transverse Abdominus | |
| Exercise | 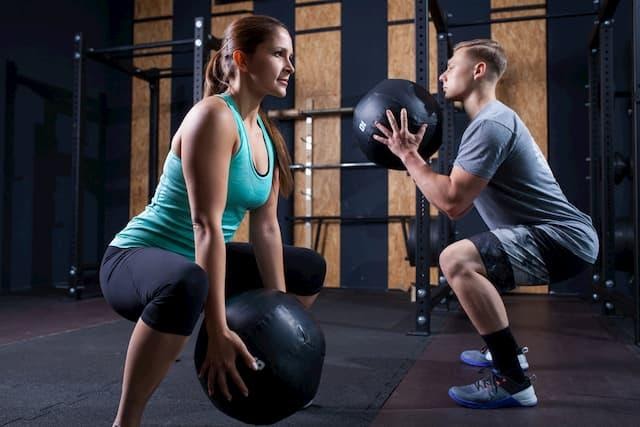 |
||
| Regressions: | FMS Deep Squat | Progressions: | Trap Bar Deadlift | Deadlift |
| Key Teaching Points | |||
|---|---|---|---|
|
Using ideal lifting mechanics (i.e. neutral spine, load close to body, lift with legs) pick the medicine ball up and down from the ground. Your goal is to reinforce proper lifting mechanics. |
|||
| Common Error(s): | Rounded lower back | Not engaging core | ||
| Spotting: | Mirror Client Level | ||
| Movement Pattern: Whole Body | Target: Quadriceps | Synergist(s): Deltoids (Anterior), Transverse Abdominus, Triceps | |
| Exercise | 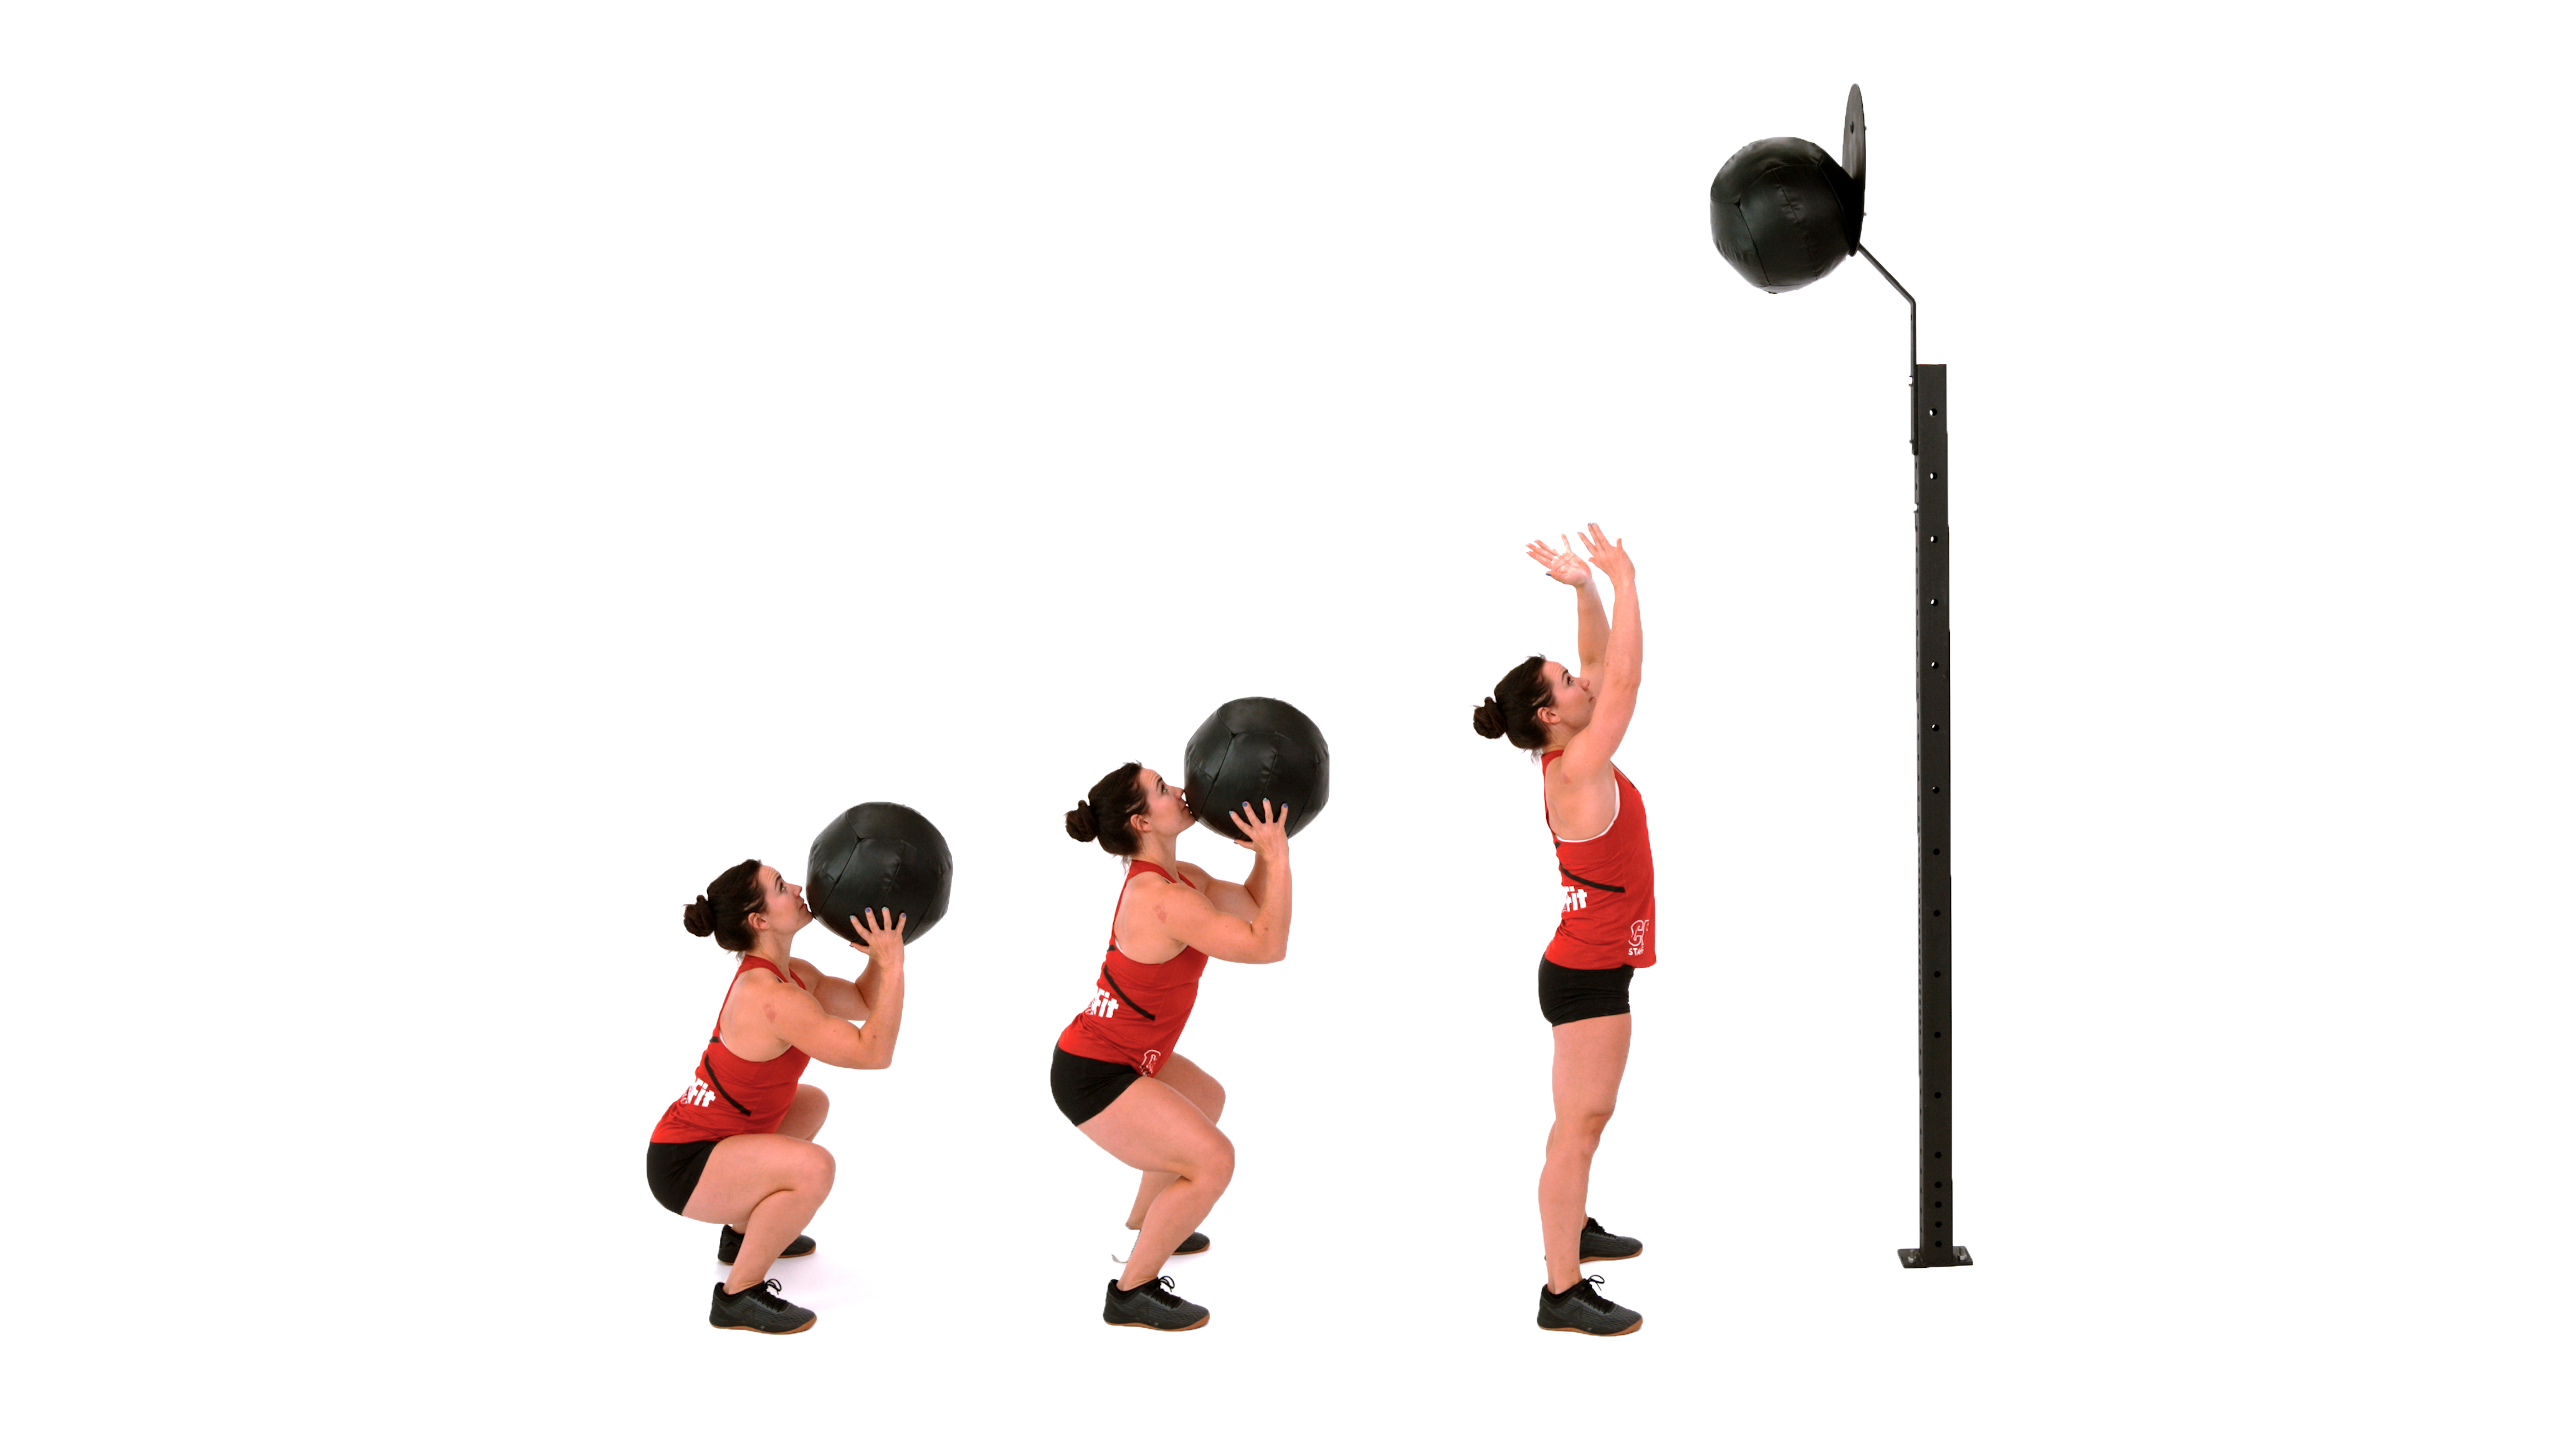 |
||
| Regressions: | Progressions: | ||
| Key Teaching Points | |||
|---|---|---|---|
|
|||
| Common Error(s): | |||
| Spotting: | |||
| Movement Pattern: Hinge | Target: Gluteals | Synergist(s): Hamstrings, Hip Abductors | |
| Exercise | 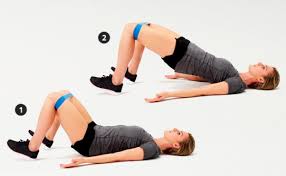 |
||
| Regressions: | Clam Shell | Progressions: | Hip Abduction Squats |
| Key Teaching Points | |||
|---|---|---|---|
|
Secure band just above the knee. Follow best practice for bridge exercise form. At the top of the bridge abduct at the hips. Increase intensity by tightening band and/or using a stronger band. |
|||
| Common Error(s): | |||
| Spotting: | |||
| Movement Pattern: Whole Body | Target: Quadriceps | Synergist(s): Gluteals, Hamstrings, Spinal Erectors, Trapezius | |
| Exercise | 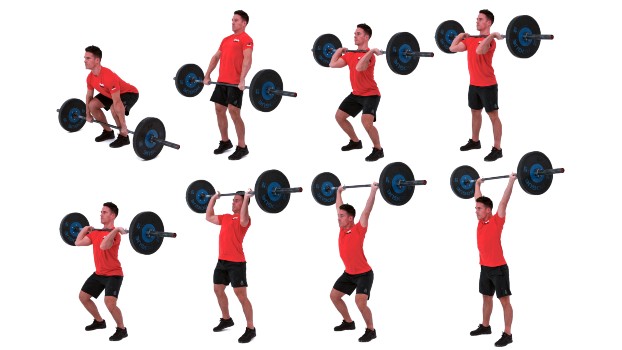 |
||
| Regressions: | Progressions: | ||
| Key Teaching Points | |||
|---|---|---|---|
| Common Error(s): | |||
| Spotting: | |||
| Movement Pattern: Upper Body | Target: | Synergist(s): Wrist Flexor, Wrist Extensor, Wrist Pronator, Wrist Supinator | |
| Exercise | 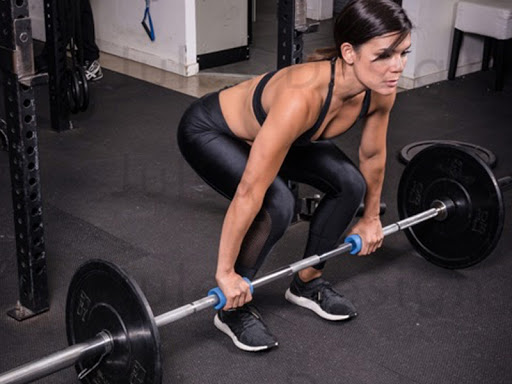 |
||
| Regressions: | Progressions: | ||
| Key Teaching Points | |||
|---|---|---|---|
|
Develop your grip by progressively lifting heavier loads while using a wider diameter bar. Never develop grip during maximal lift attempts. Deadlift grips and or neutral carry grips are both appropriate. Make sure you are in an environment where you can safely drop the bar. |
|||
| Common Error(s): | |||
| Spotting: | |||
| Movement Pattern: Single-joint | isolation | Target: Biceps | Synergist(s): Brachialis | |
| Exercise | 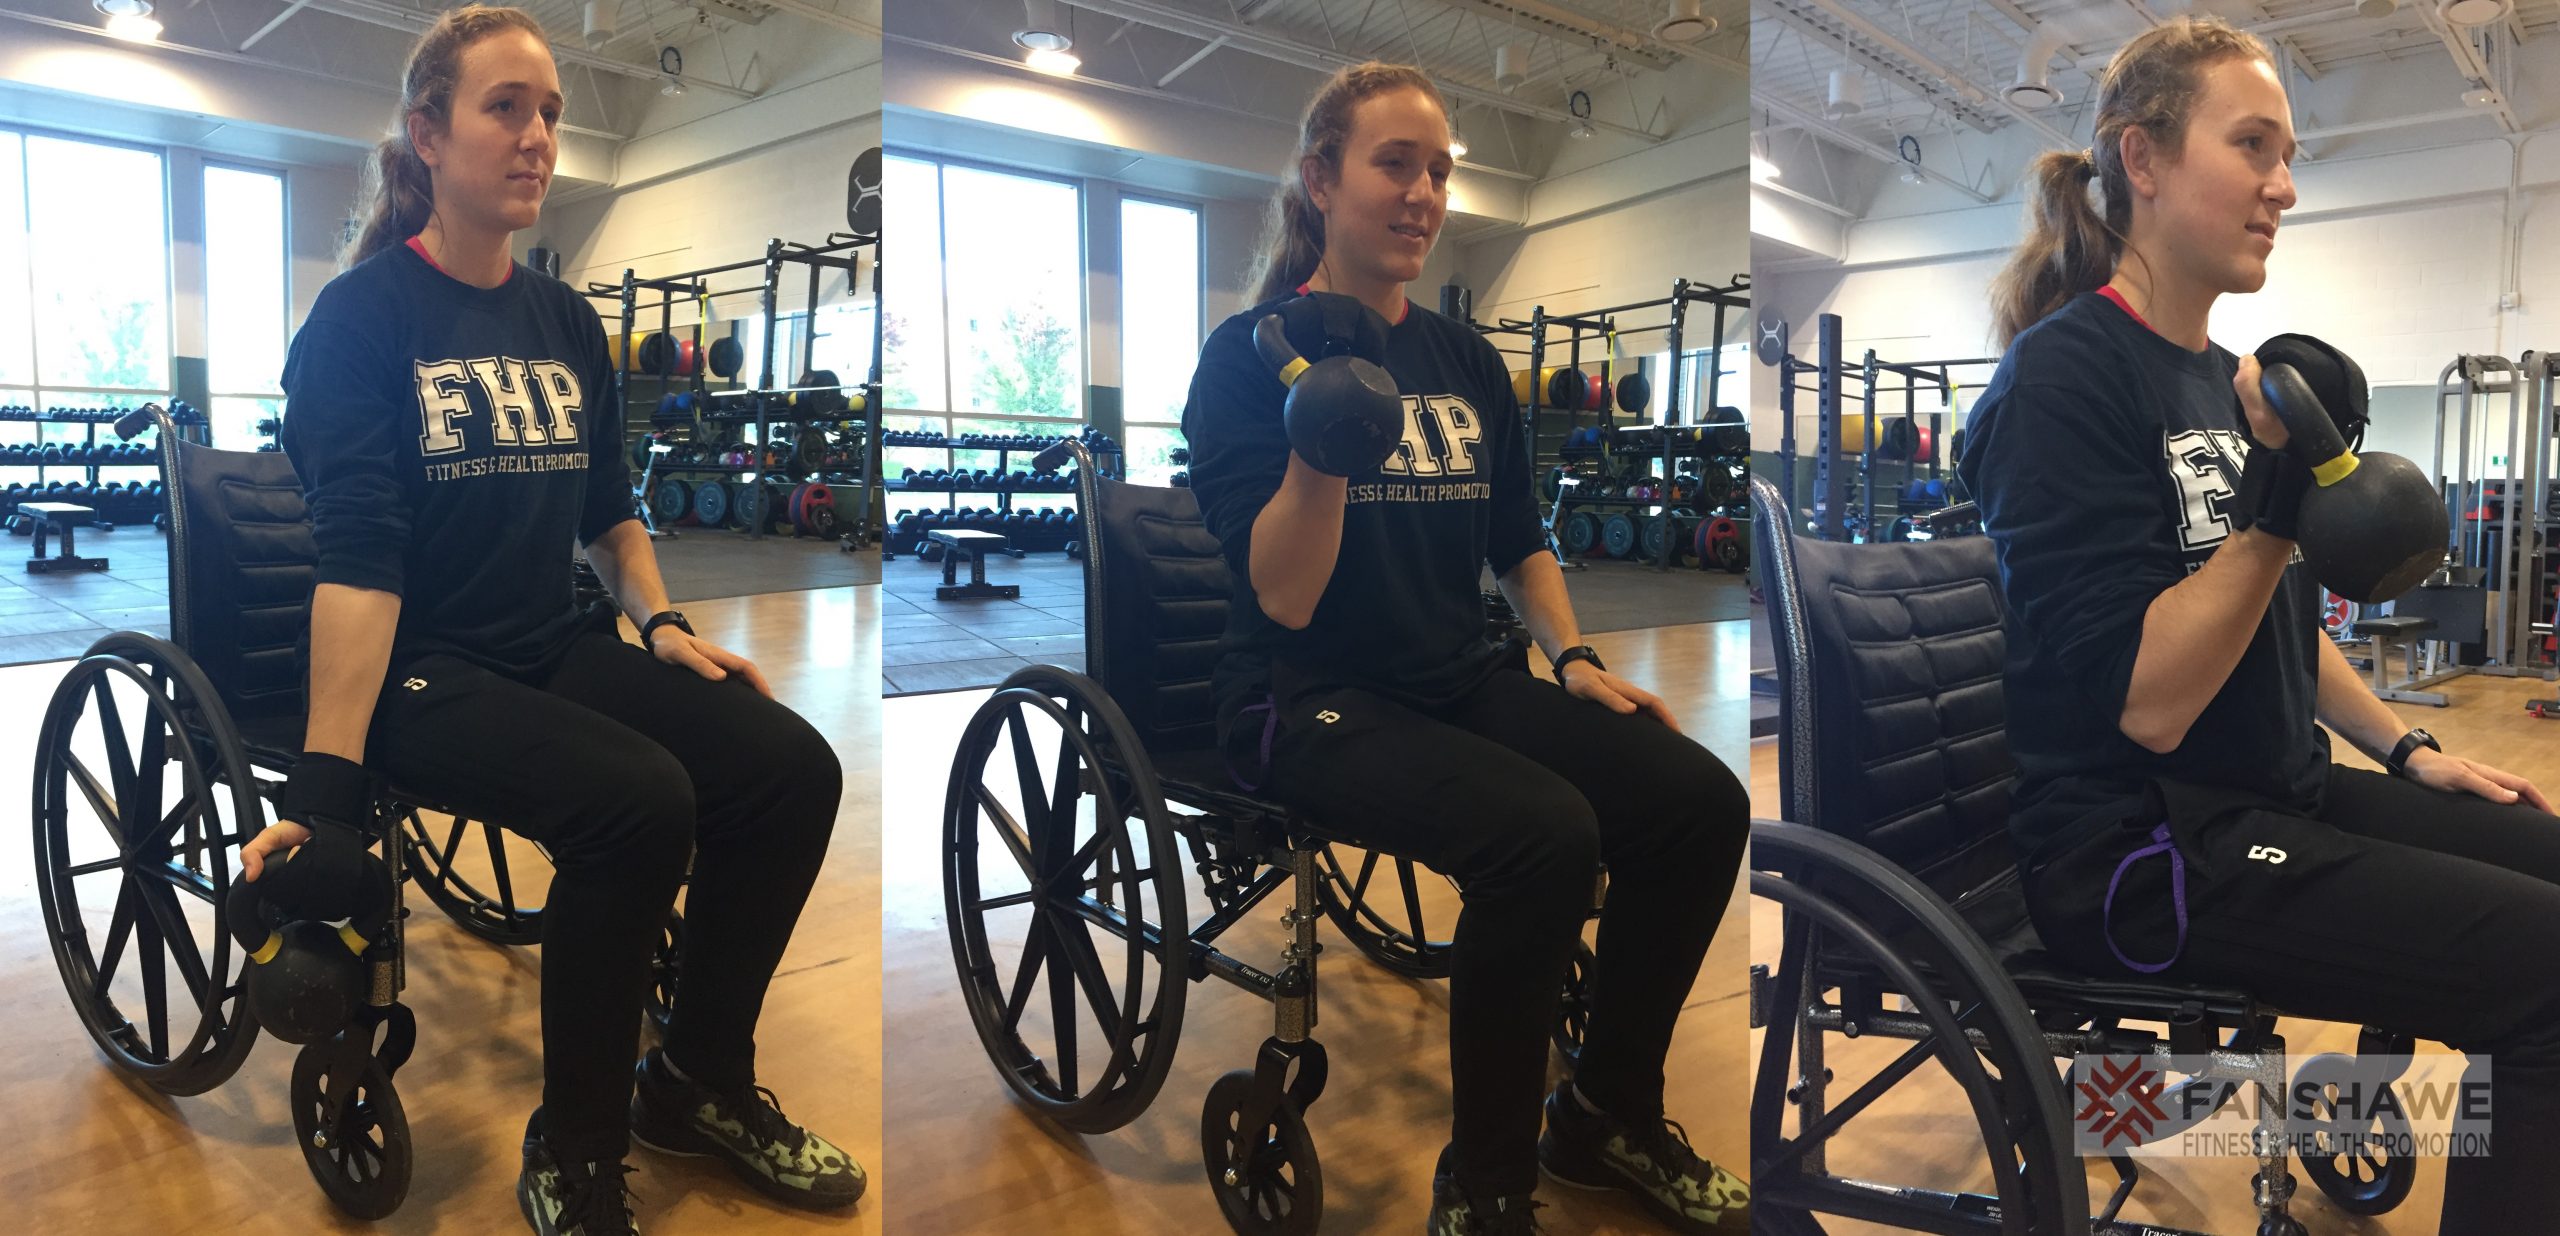 |
||
| Regressions: | Progressions: | ||
| Key Teaching Points | |||
|---|---|---|---|
|
Following Active Hands guidelines (see video) secure the KB to hand with gripping limitations. If good trunk control remove arm rest on wheelchair. Seated upright complete a full elbow flexion range of motion biceps curl. Slowly (under control) lower the weight back down to near but not full elbow extension. Engage core throughout. Repeat. |
|||
| Common Error(s): | Inappropriate momentum | Rounded shoulders | ||
| Spotting: | |||
| Movement Pattern: | Target: | Synergist(s): | |
| Exercise | 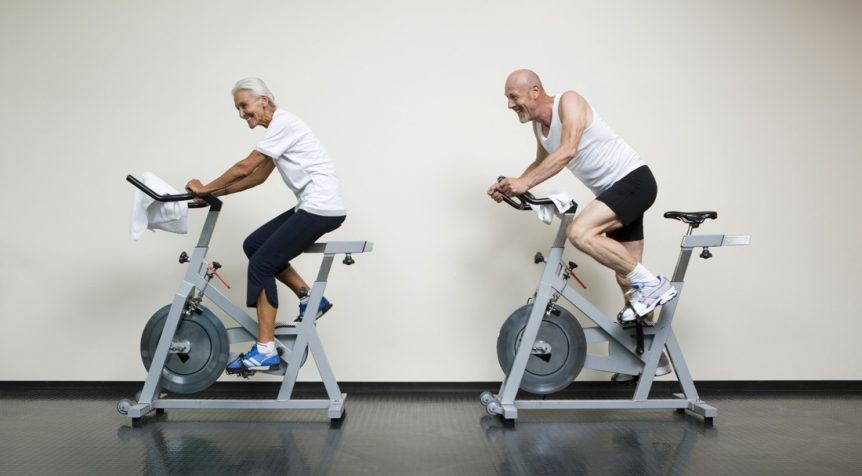 |
||
| Regressions: | Progressions: | ||
| Key Teaching Points | |||
|---|---|---|---|
|
The stationary bike is a great low impact aerobic option. It promotes hip and knee range of motion. It can also improve muscular endurance of the lower limbs. Make sure the seat and handlebar heights are properly adjusted to minimize knee, hip, low back and shoulder/neck discomfort. |
|||
| Common Error(s): | |||
| Spotting: | |||
| Movement Pattern: | Target: | Synergist(s): | |
| Exercise | 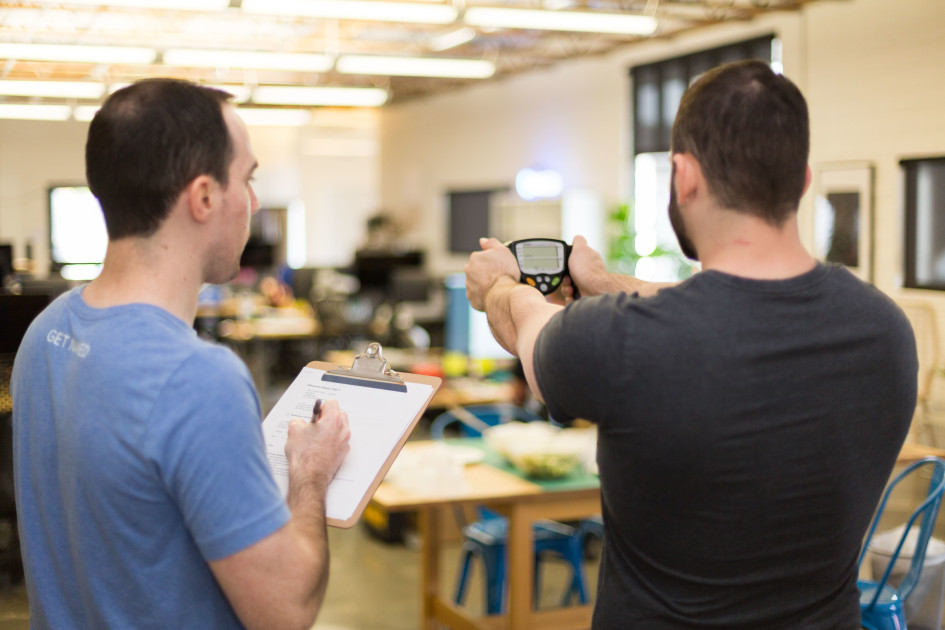 |
||
| Regressions: | Progressions: | ||
| Key Teaching Points | |||
|---|---|---|---|
N.B. If a measurement is made under the following physical conditions, the measured body fat percentage may differ significantly from the actual one because the water content in the body is changing:
|
|||
| Common Error(s): | |||
| Spotting: | |||
| Movement Pattern: Upper Body | Target: Latissimus Dorsi | Synergist(s): Brachialis, Deltoid (Posterior) | |
| Exercise | 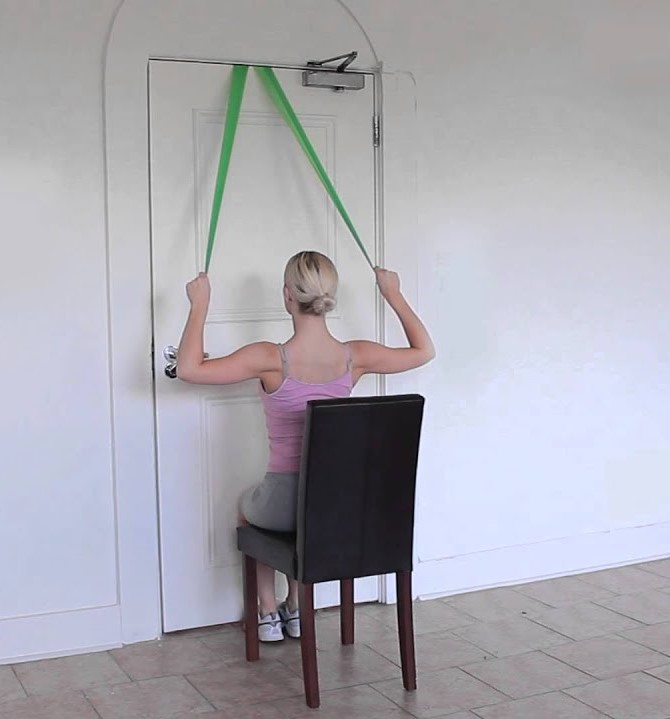 |
||
| Regressions: | Progressions: | ||
| Key Teaching Points | |||
|---|---|---|---|
|
|||
| Common Error(s): | Arching the upper back | Rounded shoulders | Not engaging core | ||
| Spotting: | |||
| Movement Pattern: Lower Body | Target: Gluteals | Synergist(s): Hamstrings | |
| Exercise | 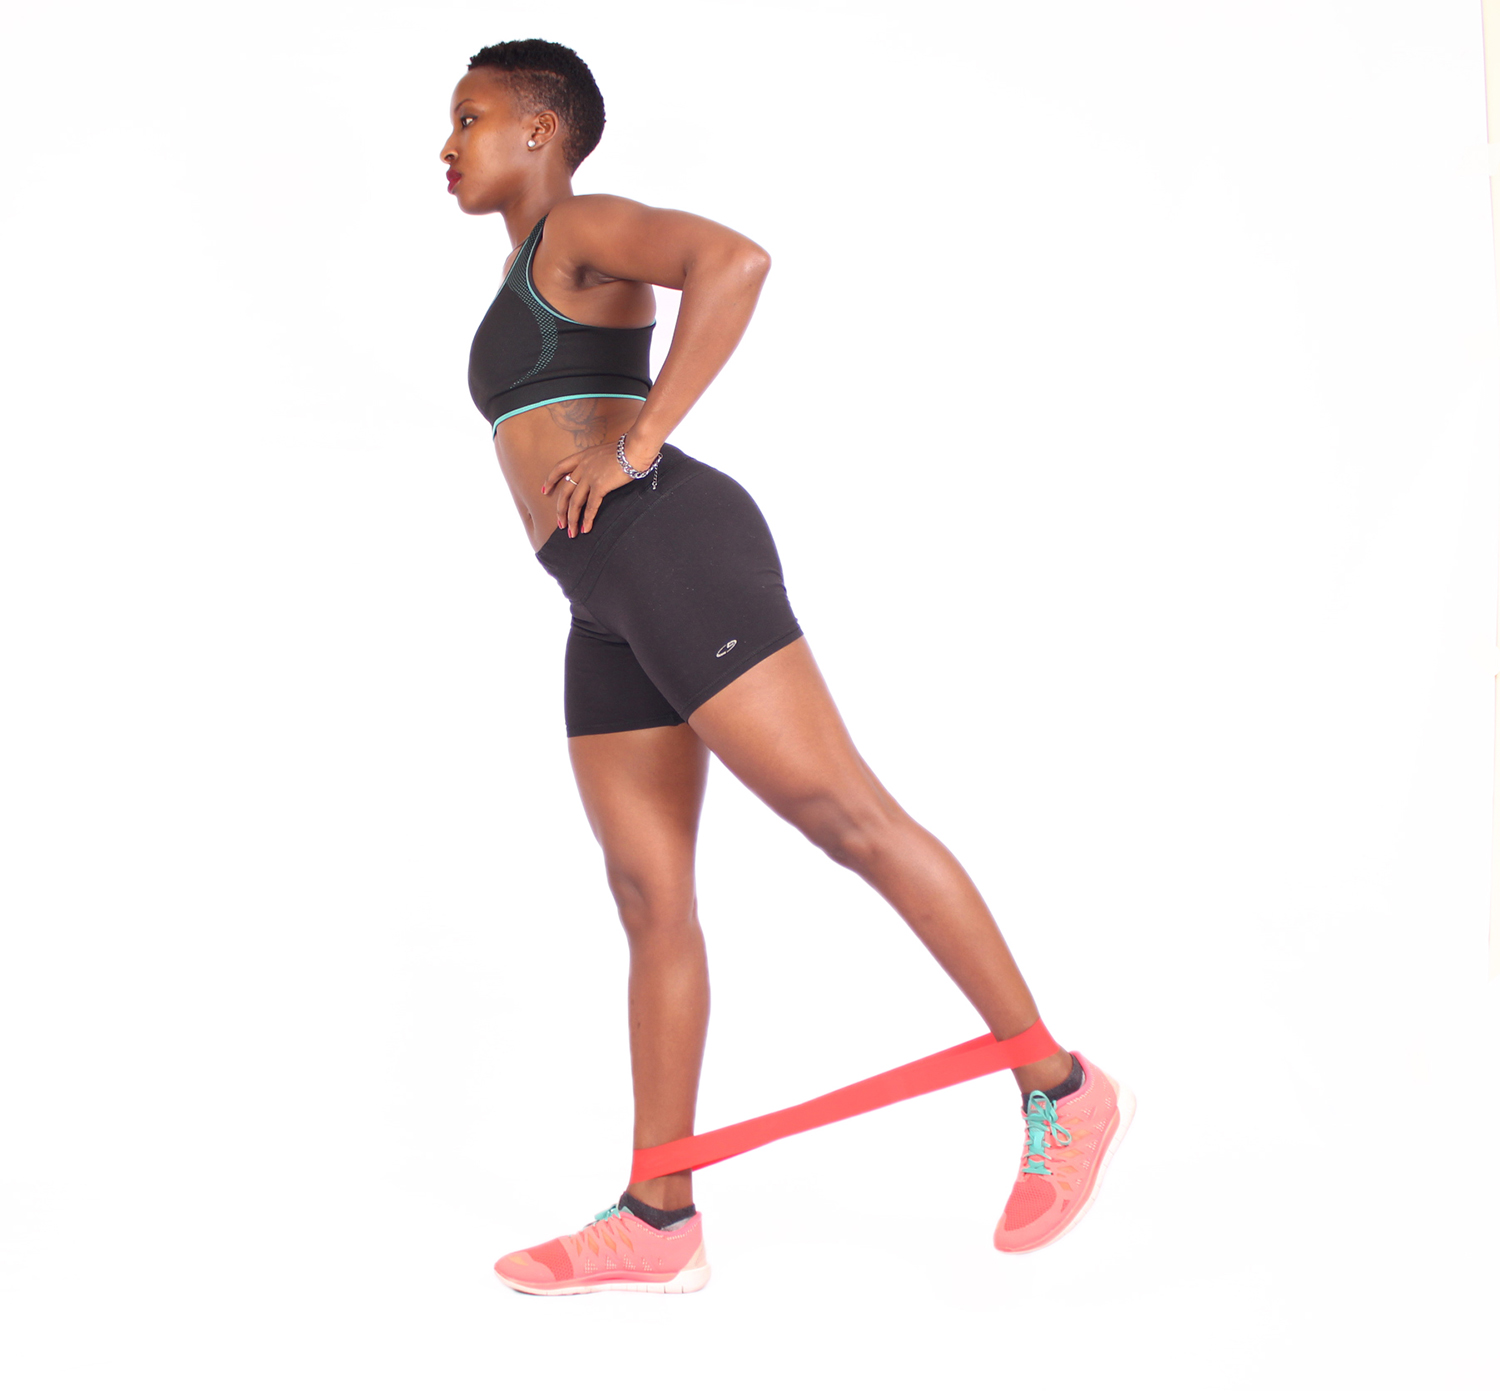 |
||
| Regressions: | Progressions: | ||
| Key Teaching Points | |||
|---|---|---|---|
| Common Error(s): | |||
| Spotting: | |||
| Movement Pattern: Lower Body | Target: | Synergist(s): | |
| Exercise | 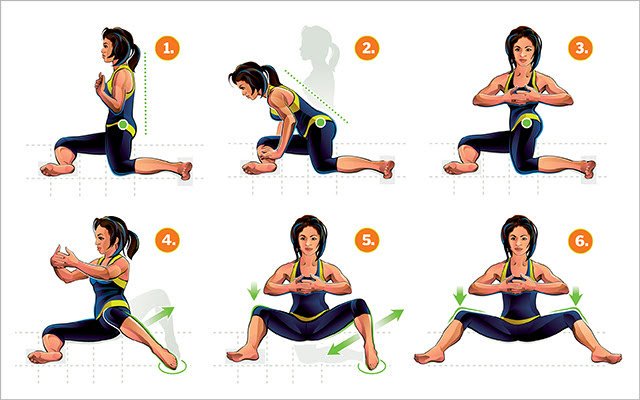 |
||
| Regressions: | Progressions: | ||
| Key Teaching Points | |||
|---|---|---|---|
| Common Error(s): | |||
| Spotting: | |||
| Movement Pattern: Upper Body | Target: Wrist Flexor | Synergist(s): Wrist Extensor | |
| Exercise | 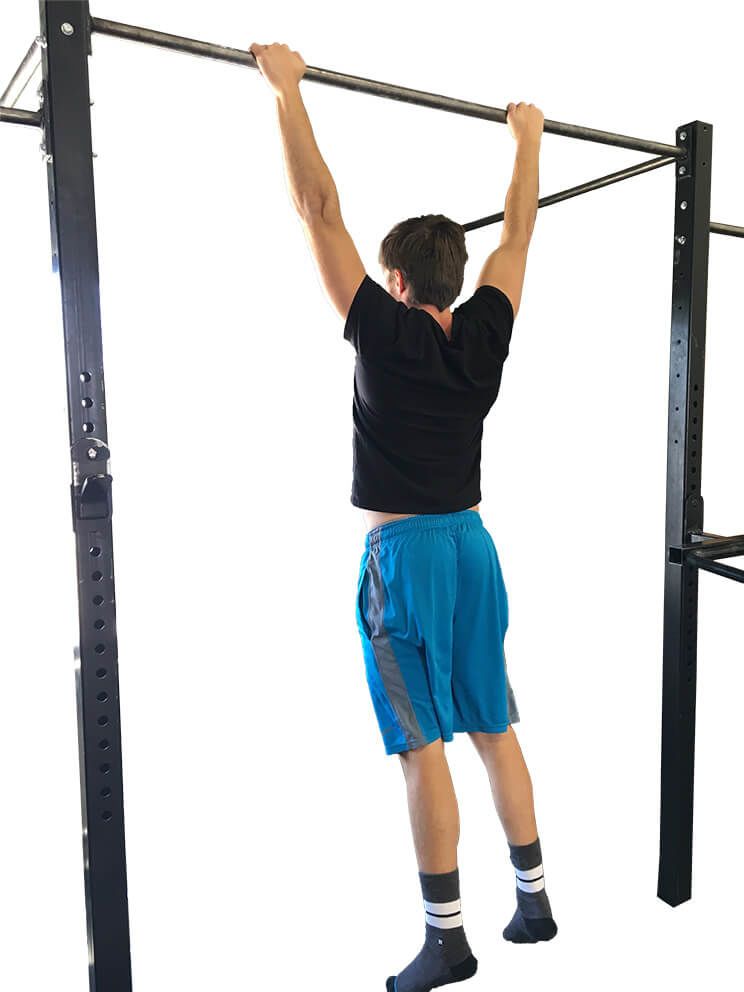 |
||
| Regressions: | Fat Bar Grip Training | Progressions: | Pull Ups |
| Key Teaching Points | |||
|---|---|---|---|
|
Build general upper body strength. Train grip strength. Biceps, lats, chest stretching and spine traction. Initial training for a pull-up. |
|||
| Common Error(s): | |||
| Spotting: | |||