Lab 2: FORCE Evaluation

Lab Overview

Learning Objectives

  1. Experience and coach the FORCE evaluation.
  2. Recall the purpose and scoring procedure for the FORCE evaluation.
  3. Reflect on the FORCE evaluation.

Lab Tasks

In this week’s lab, you will be required to:

  1. Design a workout program – using yourself as a client- to help prepare for the FORCE Evaluation

Recommended

If you have access to some pylons, a measuring tape, and a sandbag or even a medicine ball you can attempt some of the tasks to get an idea of the specific tasks used as part of the force evaluation.

Preamble:

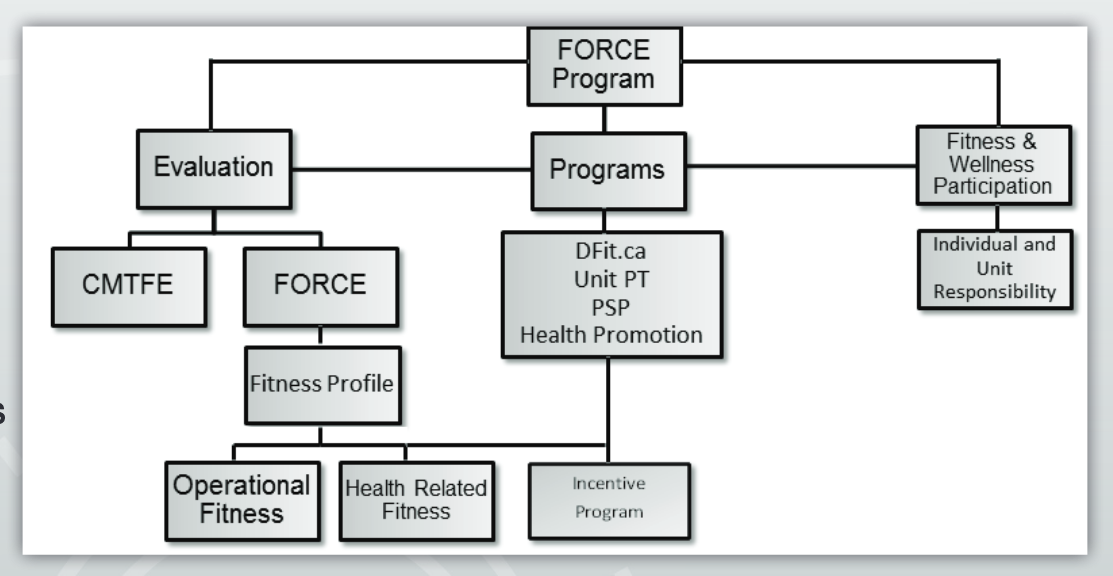
            The “Fitness for Operational Requirements of Canadian Armed Forces Employment” or FORCE evaluation is a measure of operational fitness – the minimal physical employment standard related to common defense and security duties known as the “Universality of Service Principle”. It represents a basic standard that everyone must meet. The FORCE evaluation was designed to capture the movement patterns, energy systems, and muscle groups recruited in their performance of common military duties.

FORCE Operations Manual, Second Edition. (n.d.). Retrieved from https://www.cfmws.com/en/AboutUs/PSP/DFIT/Fitness/FORCEprogram/Pages/FORCE-Operations-Manual-2nd-Edition.aspx

In the Canadian Armed Forces common duties are asses using an evaluation called the Common Military Task Fitness Evaluation (CMTFE) (https://www.youtube.com/watch?v=9T4QX84wAKQ). There are six common military demands:

  1. Escape to cover
  2. Vehicle extrication
  3. Picking and digging
  4. Stretcher carry
  5. Sandbag fortification
  6. Pickets and wire carry

However, this evaluation is complex and very time consuming, therefore it is not practical to do with all personal on a yearly basis. Instead the FORCE evaluation was created to simulate the physical demands and movement patterns of the six common military tasks listed above. Today the CMTFE is only used if personal fail to meet the FORCE evaluation or do to other medical employment limitations.

The FORCE evaluation is comprised of four tasks: (https://www.youtube.com/watch?v=QxoVsBFTqJ8)

  1. 20m Rushes
  2. Sandbag lift
  3. Intermittent loaded shuttle
  4. Sandbag drag

The results from the four tasks and waist circumference are then used to predict cardio-respiratory fitness and to assess “general fitness”.  There is an online calculator that is used to show the results of both the operational fitness results and health related results – https://formefitcalculator.cfmws.com/.

The procedures of the FORCE evaluation include preliminary instructions, pre-screening (health questionnaire and BP), warm-up (light aerobic activity, dynamic movements, and a reduced version of each task), the four tasks, and a cool-down.

Lab 9 Instability/Suspension Training Part 3 – Lunge and Squat

Lab Overview
Learning Objectives

  1. Be able to set-up the TRX training system and understand the basic principles for regression and progression of exercises
  2. Experience lunge, and squat exercises with and without instability (on and off of the TRX)
  3. Be able to coach lunge and squat exercises with and without instability (on and off of the TRX). Know how to make these exercises harder and easier for clients.

Lab Tasks

  1. Review, Experience, and Coach the TRX Hinge, and Power Pull exercises (from last week)
  2. Experience and Coach the Lunge and Squat exercises
  3. Complete one (Lunge or Squat) competency as an examiner and the other as a trainer


Lab 8: Instability/Suspension Training Part 2 – Hinge and Rotate

Lab Overview
Learning Objectives

  1. Be able to set-up the TRX training system and understand the basic principles for regression and progression of exercises
  2. Experience hinge, and rotate exercises with and without instability (on and off of the TRX)
  3. Be able to coach hinge and rotate exercises with and without instability (on and off of the TRX). Know how to make these exercises harder and easier for clients.

Lab Tasks

  1. Review, Experience, and coach the TRX Plank, TRX Chest Press, and TRX Row exercises (from last week)
  2. Experience and coach the Hinge and Rotate exercises


Lab 7: Instability/Suspension Training Part 1 – Plank, Push, Pull

Lab Overview
Learning Objectives

  1. Be able to set-up the TRX training system and understand the basic principles for regression and progression of exercises
  2. Experience plank, push, and pull exercises with instability (on and off of the TRX)
  3. Be able to coach plank, push, and pull exercises with instability (on and off of the TRX). Know how to make these exercises harder and easier for clients.

Lab Tasks

  1. Review and practice the general set-up of TRX
  2. Review and practice the Plank, Push, and Pull exercises
  3. Complete Lab Quiz 3 on FOL based on the information in the lab


Instability training has both benefits and challenges.  Some of the benefits include: increased intrinsic core muscle activation (Behm et al., 2010) for similar basic exercises (e.g. plank vs. plank on stability ball).  Instability training has also been used successfully to help aide in proprioceptive training and rehabilitation from injury as well as playing an important role in balance training (Klamroth et al, 2016). It should be noted, that unilateral training also provides instability to the body, providing an additional means of increasing the activation of the core musculature.

Instability training does provide some challenges as well.  The first issue is that the exercises often pose an increased risk of falls or injury.  Furthermore, the additional core muscle activation that is seen when comparing a similar standard exercise becomes less evident with functional movements like squats, lunges, deadlifts, and/or Olympic lifts.  In fact, during these multi-joint movements core activation often matches and at times exceeds other instability exercises (Behm et al., 2010).  In addition, it has been shown that instability training is not the best approach to achieve maximal strength and power. Although the use of instability equipment is an effective means of training core stabilizer muscles, for the average person, it should make-up a smaller portion of the stabilizer muscle training program compared to using multi-joint functional movement patterns (i.e., deadlift, squat, lunge, pull-up, ground-based multi-joint pull/push movement).

Overall, research suggests that instability training plays an important role for proprioceptive training, for injury rehabilitation, for movement corrective work, and for core stabilizer training in conjunction with multi-joint functional movement patterns.  However, it should not replace the inclusion of functional multi-joint movement patterns, nor should it be used when power and high strength is your main training purpose.

Lab 4 (Week 5): Introduction to Corrective Exercises

Lab Overview
Learning Objectives

  1. Effectively and safely demonstrate several corrective exercises.
  2. Recognize how these exercises could be used in a corrective environment with various clients.
  3. Be able to relate corrective exercises back to an FMS movement.

Lab Tasks

  1. Familiarize yourself with corrective exercises, experience the exercises, and recognize why certain exercises relate to certain FMS movement patterns.
  2. Complete Lab Report


FMS General Scoring Rules:

  1. A score of zero must be referred to the appropriate medical professional.
    1. You want the zero scores to be assessed further and then information sent back to you as to what types of exercise are suitable for this client.
  2. Mobility patterns are addressed first because stability cannot be present with reduced mobility.
  3. A score of 21 is not necessarily the goal. The goal is to set a baseline to see improvements from.

The FMS training cycle involves:

  • Identifying the pattern that requires correcting (weak link)
  • Working on mobility competency
  • Working on static motor control competency
  • Working on dynamic motor control competency
  • Movement pattern retraining
  • Performance training

The light system

  • GREEN – score of 3 (optimal) or combination of 2R, 2L (acceptable) = Proceed with fitness training
  • YELLOW – score of 3R,2L or 2L,3R = Proceed with caution à asymmetry present à must focus on symmetry while training
  • RED – score of 1 in the pattern = Do not proceed with fitness training in this pattern à instead work on corrective exercises (i.e., this is why you did the screen, you found a weak link)
  • PAIN – score of 0 = Must be referred to Physical Therapist

The correction order is as follows – Look for 0 scores, 1 scores, then asymmetries in this order:

  1. Active straight leg raise (mobility)
  2. Shoulder mobility (mobility)
  3. Rotary stability (motor control)
  4. Trunk stability pushup (motor control)
  5. Inline lunge (functional patterning)
  6. Hurdle step (functional patterning)
  7. Deep squat (functional patterning)

Are you doing corrective or conditioning exercises?

If you are performing an exercise to improve movement or reduce movement related risk, then it is a corrective exercise. If you are performing an exercise to improve performance or physical capacity, it is a conditioning exercise.
What are ‘corrective exercises’?

Essentially, these exercises are preparing the client for an effective strength training program (followed by power development). They involve fundamental core development. Remember, in training, stability is developed first, then strength, then power. These exercises will increase range of motion, posture control, movement sequencing, and stability (static and dynamic).

NOTE: depending on your client’s ability, experience, and when the exercises are programmed in a training prescription, an exercise that is corrective for one client may be conditioning for another client, and a dynamic warm-up for another client.

General thoughts to consider for corrective exercises and FMS:

  • All exercises should be performed free of pain.
  • Fix Little four movement patterns (ASLR, SM, RS, TSPU) then the Big three movement patterns (IL, HS, DS)
  • Don’t load any movement until you have 2 or higher on FMS (e.g. no loaded shoulder press without a 2 or 3 on shoulder mobility or no running until 2 or 3 on active straight leg)
  • Address asymmetry by training split patters (e.g. bird dog or single leg work)
  • Train mobility, then static motor control, then dynamic motor control
  • The stance of the corrective exercise matches the movement stance you are training (i.e., split or straight)
  • Client should concentrate on posture, core engagement, and breathing; if focus on posture, core engagement, and breathing is lost stop exercise and either lighten load or re-focus before continuing.

Lab 3 (Week 4): FMS

What is functional movement?

Whole body, multi-joint movements that mimic both the way we were made to move and the way we presently need to move in order to operate at a high functioning level (and with a high quality of life) in our daily lives.

  • For some that involves getting in and out of a chair
  • For others that involves performing their sport at the highest level

What are a few reasons to train using functional movement?

  1. Improved performance: Functional movement patterns make up the backbone of most sport or performance activities. If there is a restriction in free movement and/or a lack in practice or skill development an athlete will not be able to either perform or enhance their performance through sport or other conditioning techniques. This would be true for both cardiorespiratory (e.g. running free of restriction improves mechanical efficiency) and strength/power (e.g. proper hip and shoulder mobility and trunk stability produces a more powerful hockey shot) dominated activities.
  1. Injury prevention: Many injuries are a function of poor movement which can lead to an acute ACL tear because of muscle misfiring or chronic low back injury because of poor stabilization musculature, or supraspinatus tendonitis because of improper mobility and stability within the muscles around the shoulder. In addition, painful patterns are often identified during multi-joint movement patterns (versus isolated exercises) for which you can refer to clinical professional to address before full blown injury occurs.
  2. ‘Real world’ improvement in function and quality of life: Clients will lift boxes, navigate stairs, run to catch a bus, etc. more efficiently and effectively.

Why should we assess the quality of movement?

  1. Assessing movement quality can help you to identify an injury risk. Many people cannot perform common movement patterns correctly or free of pain. Assessing movement quality will allow you to know which movement patterns should not be loaded, which should be avoided, and when a client needs to be referred on to a more qualified health professional (i.e., Physical Therapist).
  2. Assessing movement quality can help you select proper exercises to improve movement quality.
  3. Assessing movement quality can help you demonstrate an improvement in movement quality after implementing a training program.

When should you assess the quality of movement?

  1. After pre-screening / medical screening and before performance testing (both cardiovascular, strength and power) because the quality of movement can impact performance.
  2. Prior to loading movement, you will want to see how a client moves through a pattern unloaded.

 How to assess the quality of movement?

  1. The easiest way is to watch someone move! Have your client engage in the desired pattern unloaded – watch for mobility, stability (static, dynamic), and alignment. Then have your client engage in the desired pattern weighted to see if the movement quality changes.
  2. You can use an established movement screen, created with scoring systems to see change over time (e.g., FMS: www.functionalmovement.com).

The Seven FMS Movement Pattern Screens include:

  1. Deep Squat
  2. Hurdle Step
  3. Inline Lunge
  4. Shoulder Mobility*
  5. Active Straight-Leg Raise
  6. Trunk Stability Push-up*
  7. Rotary Stability*

* Four of the FMS movement patterns involve clearance tests that should be done after the movement pattern (i.e., ankle clearing, shoulder clearing test, extension clearing test, flexion clearing test). A positive (+) on the clearing test would indicate that pain is present. A negative (-) on the clearing test would indicate no pain.

FMS Scoring reminders: 0 – pain (referral), 1 – can’t complete either movement pattern correctly, 2- completed a less demanding variation or part of the movement pattern, 3 – perfect completion of movement pattern.

A split pattern is where the movement involves on one side at a time (e.g. on 1 Leg hurdle step). A straight pattern where the movement involves both sides (e.g. 2 Leg squat). The split pattern will demonstrate asymmetry that may not be noticed during a straight pattern movement.

In split pattern movements, record right and left sides separately. Look for asymmetry (i.e. differences on right and left side).

Raw Score: This score is used to indicate right and left scoring. Clients are given three attempts at the movement pattern (in each level of difficulty). The raw score would be the highest score in those attempts.

Final Score: This score is used to denote the overall score for the movement pattern. The lowest raw score in split patterns is used as the final score for the movement pattern. If pain is experienced in a clearance test, the final score for the movement pattern becomes zero despite whatever the raw score may be.

Total Screen Score: This score is the sum of all the final scores; this score will range between 0 and 21.

Note: The seven FMS movement patterns require familiarity with the following bony structures or superficial landmarks: Tibial tuberosity, ASIS, Lateral and Medial Malleoli, Distal wrist crease, Joint line of knee.

General Scoring Rules:

  1. A score of zero must be referred to the appropriate medical professional.
    1. You want the zero scores to be assessed further and then information sent back to you as to what types of exercise are suitable for this client.
  2. Mobility patterns are addressed first because stability cannot be present with reduced mobility.
  3. A score of 21 is not necessarily the goal. The goal is to set a baseline to see improvements from.

Are you doing corrective or conditioning exercises?

If you are performing an exercise to improve movement or reduce movement related risk, then it is a corrective exercise. If you are performing an exercise to improve performance or physical capacity, it is a conditioning exercise.

Lab 5 (Week 7): Practice

Lab Overview
Learning Objectives

  1. Practice and prepare for midterm practical assessment (worth 15% of your final grade)

Lab Tasks

By the end of the lab today, you should:

  1. Practice and review coaching the corrective exercises covered last week
  2. Review the steps, coaching cues, and scoring for the FMS screen
  3. Complete a midterm assessment competency (full rubric)

Note:

Your practical assessment will be use the full rubric and require you to:

  • meet a client
  • coach and score one FMS movement screen (chosen at random)
  • coach two appropriate corrective exercises for the FMS screen completed with the client
  • close the session with the client
  • submit the FMS score sheet with screen score and comments to the examiner

Practical assessment rubrics are posted on FOL and can be found on the lab website. The practical assessment schedule is posted on FOL and can also be found here

Lab 1 (Week 2): Police Fitness Award (PIN test)

Lab Overview
Learning Objectives

  1. Experience and coach the Police PIN assessment
  2. Recall the purpose and scoring procedure for the PIN assessment
  3. Reflect on PIN assessment and the run

Lab Tasks

By the end of the lab this week, you should complete your:

  1. FOL Quiz
  2. Lab worksheet – SUBMIT TO FOL

It is also recommended that you try/complete the following (will not be graded)

  1. PIN assessment data
  2. 1.5 Mile run additional data
  3. Reflection answers

The Ontario Police Fitness Award is a provincial incentive program developed to motivate Ontario police officers and police service employees to remain physically fit throughout their entire careers. Many Police Services offer incentives for passing the assessment annually: http://pfpo.org/index.php/2013-01-12-19-00-53/ontario-police-fitness-pin-award-program. When an officer passes (75 pts out of 100 pts) the fitness assessment, he/she is given a PIN (hence, fitness PIN) in addition to other incentives (i.e., money, time off).

This award can be administered at the police station by certified fitness professionals. It is also administered by Applicant Testing Services (ATS: http://www.applicanttesting.com/index.php) for potential applicants of various civil service positions (i.e., special constables, parking enforcement officers).

The award consists of 3 CSEP-PATH assessments (push-ups, sit and reach, back extension) plus a 1.5 mile run. If the weather is not good, the 1.5 mile run can be exchanged for the 20M shuttle run or VO2max score from the Single Stage Treadmill or YMCA bike test.

The assessment is scored out of 100 points and the client must earn 75 points to pass the assessment:

  • Push-ups are scored out of 20
  • Sit and reach is scored out of 10 (best of 2 attempts)
  • Back extension is scored out of 20
  • 1.5 mile run is scored out of 50

Official scoring tables can be found here: http://pfpo.org/index.php/2013-01-12-19-00-53/ontario-police-fitness-pin-award-program

The fitness award is usually assessed in mass testing style. The assessor must understand the importance of standardization as to not give any applicant an advantage over another. Prior to the assessment the assessor should determine a client’s physical activity readiness, explain the assessment, and obtain consent. Prior to each component the assessor should explain the component, demonstrate, and ensure applicant understanding/consent.

Although not required for this assessment, the 1.5 mile run test can be a predictor of aerobic fitness based on the assumption that the more fit an individual is, the faster he/she can run the distance. It is not a great measure of VO2max because of other factors potentially involved (i.e., pacing, running efficiency, motivation, terrain, climate). If you do want to predict VO2max using this test you need the following data: exercise HR at the end of a test, gender, body mass (kg), and time.