This course focuses on learning the various assessments required for the CSEP exam: blood pressure, heart rate, handgrip, & mCAFT.
Target population: Adults (18-65), healthy
- Course Instructor: Lyndsay Fitzgeorge
- Lab Instructors: Lyndsay Fitzgeorge
- Lab Technician:
- Semester: Two
Lab Sections:
- Section 1:
- Section 2:
- Section 3:
- Section 4:
Practical Assessment Schedule
N.B. During the weeks involving practical assessments, students will continue to have lab class as scheduled and are expected to attend.
| Week |
Skills Assessed |
| Week 8 |
Blood pressure, heart rate, height, weight & waist circumference |
| Week 9 – 12 |
mCAFT, YMCA cycle test, single-stage treadmill |
| Week 13 – 14 |
Grip strength, sit and reach, push up, single-leg balance, vertical jump & back extension |
Lab Competencies
[su_table responsive="yes"]
| Competency |
Teaching points (The value of each point can be found at the end of each line.) |
| RHR and RBP |
- Smooth and assured consent during the session | 1
- Client feet flat on floor, ear pieces forward in stethoscope | 1
- Stethoscope over sternum or second intercostal space on left OR index and middle finger on wrist at base of thumb | 1
- Use 15s count to obtain correct reading (+/- 1 of examiner) | 1
- Multiply reading to obtain correct HR in bpm | 1
- Correctly identify ceiling value for postponing exercise (after second reading) | 1
- Cuff on bare left upper arm, 2-3 cm above elbow crease | 1
- Cuff tight enough so that two fingertips can be slipped under edge but it isn't falling down | 1
- Arrow/line at brachial artery | 1
- Index and middle finger on radial pulse, inflate cuff 20-30 mmHg above the point where pulse is gone | 1
- Place stethoscope over brachial artery, completely in contact with skin, not tucked into cuff | 1
- Fully release pressure at appropriate pace (2mmHg/second) | 1
- Record blood pressure to the nearest 2 mmHg (+/- 4 of examiner) | 1
- Correctly identify ceiling values for hypertension >140/90 | 1
- Correctly identify ceiling values for postponing exercise (after second reading) >160/90 OR <80/50 | 1
|
| Movement Screen: Overhead Squat, Wall Slide, Plank |
- Have the client stand tall with feet shoulder-width apart and toes pointed forward | 1
- Have the client grasp the dowel in both hands and place it on top of head so shoulders and elbows are at 90 degrees | 1
- Have the client press the dowel so that it is directly above head | 1
- Instruct the client to maintain an upright torso, keep heels and dowel in position, and descend into a squat as deeply as possible | 1
- Instruct the client to hold the bottom position for a count of one, and then return to the starting position | 1
- Make appropriate corrections to set-up between movement reps. Eventually may need to regress to elevating client's heels | 1
- Screen for pain (score of zero) and provide an appropriate score for movement | 1
- Stand with head, upper back, and tailbone pressed firmly against a wall | 1
- With shoulders depressed and scapula retracted, place forearms against the wall at 90 degrees | 1
- Have client press arms overhead until they reach full extension or forearms come off wall | 1
- Screen for pain (score of zero) and provide an appropriate score for second movement | 1
- Assisst client into pushup position with forearms on ground | 1
- Have client squeeze glutes, tighten abdominals, keep a neutral neck and spine | 1
- Instruct client to keep that strong line from head to toe for as long as possible | 1
- Screen for pain and provide an appropriate score for movement | 1
|
| Movement Screening: Inline Lunge, Hinge, Plank |
- Have client step onto the center of the board with the right foot toe on the zero mark and left foot placed according to tibial measurement | 1
- Help client get both toes facing forward and balanced in position | 1
- After client's feet are in place, assist them in holding dowel with contralateral elbow (to forward leg) high | 1
- Instruct the client to have the dowel along the spine so it touches the back of head, upper back and tailbone | 1
- Instruct client to maintain an upright posture so the dowel stays straight and in contact on head, back, and tailbone, descend into a lunge position so knee touches the center of the board then return to starting position | 1
- Make appropriate corrections to set-up between movement reps | 1
- Screen for pain (score of zero) and provide an appropriate score for movement | 1
- Assist client in grasping the dowel with hand in lower back and hand behind neck. Dowel in tight contact with tailbone, upper back, and head | 1
- Instruct client to perform hip hinge with dowel remaining in contact (at locations) as far as possible | 1
- Record loss of contact, readjust between trials, coach hinge if necessary | 1
- Screen for pain (score of zero) and provide an appropriate score for second movement | 1
- Assisst client into pushup position with forearms on ground | 1
- Have client squeeze glutes, tighten abdominals, keep a neutral neck and spine | 1
- Instruct client to keep that strong line from head to toe for as long as possible | 1
- Screen for pain and provide an appropriate score for movement | 1
|
[/su_table]
View Lab Exam Feedback
No completed lab exam rubrics currently available
No completed lab exam rubrics currently available
No completed lab exam rubrics currently available
| Course: PHRE 5003 - High Performance Training | Movement Pattern: | Target: | Synergist(s): |
| Exercise | 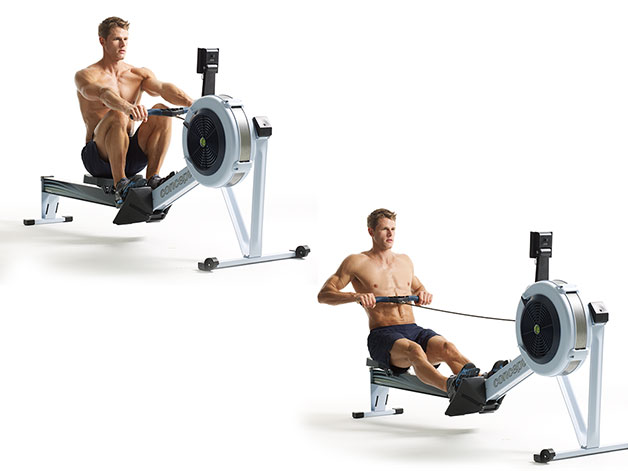 |
| Regressions: | | Progressions: | |
| Key Teaching Points | Expectation: [if 456 equals="Supervised Practice"]Supervised Practice [/if 456][if 456 not_equal="Supervised Practice"]Independent Learning[/if 456] | [579] |
|
| Description: | 10 Sec Peak Power Test
Peak Power is measured with a 10s erg test.
Warm up by rowing easy for 5-10 minutes. At the end of your warm up come to a full stop and let the fly wheel stop. On a Concept II set the drag factor to 190. The high drag factor is necessary to provide adequate resistance so that you can hit a true peak power.
Set your monitor so that you can see the watts for each stroke. From a stop row as hard and as fast as possible for 10 seconds, recording the highest power you see on any stroke. Rest for 3-5 minutes and repeat again. There is a slight learning effect when you first do this test so you might want to do it 2-3 times to get a true peak power score.
1-Min Test
Warm up by rowing easy for 5-10 minutes. At the end of your warm up come to a full stop and let the fly wheel stop.
For this test, you will want the drag factor set as follow: males - 130, females: - 110.
Set your monitor so that you can see the watts for each stroke. From a stop row as hard and as fast as possible for a full minute, recording your distance covered and the average watts you output for the test.
Performance Standards
Because body weight will have a significant impact on rowing performance power to weight ratios have been developed for men and women at different performance levels (table 1).
|
High School
|
College
|
Senior College and Masters
|
National
|
Elite International
|
| Men |
6.0-8.5
|
7.0-9.0
|
8.5-10.0
|
9.0-11.0
|
10.0-12.5
|
| Women |
4.5-7.5
|
6.1-8.25
|
7.3-9.0
|
8.27-9.9
|
9.65-10.1
|
These ranges have been developed based on the scores of top performers in each category.
|
| Common Error(s): | |
| Spotting: | |
>>
Return to My Course Home |
https://vimeo.com/9711375
Tools
mCAFT Stepping Audio - Females
mCAFT Stepping Audio - Males