PHRE 1033 – Fitness Evaluation

This course focuses on learning the various assessments required for the CSEP exam: blood pressure, heart rate, handgrip, & mCAFT.

Target population: Adults (18-65), healthy

  • Course Instructor: Lyndsay Fitzgeorge
  • Lab Instructors: Lyndsay Fitzgeorge
  • Lab Technician:
  • Semester: Two

Lab Sections:

  • Section 1:
  • Section 2:
  • Section 3:
  • Section 4:

Practical Assessment Schedule

N.B. During the weeks involving practical assessments, students will continue to have lab class as scheduled and are expected to attend.

Week Skills Assessed
Week 8 Blood pressure, heart rate, height, weight & waist circumference
Week 9 – 12 mCAFT, YMCA cycle test, single-stage treadmill
Week 13 – 14 Grip strength, sit and reach, push up, single-leg balance, vertical jump & back extension
Lab Competencies
[su_table responsive="yes"]
Competency Teaching points (The value of each point can be found at the end of each line.)
RHR and RBP
  1. Smooth and assured consent during the session | 1
  2. Client feet flat on floor, ear pieces forward in stethoscope | 1
  3. Stethoscope over sternum or second intercostal space on left OR index and middle finger on wrist at base of thumb | 1
  4. Use 15s count to obtain correct reading (+/- 1 of examiner) | 1
  5. Multiply reading to obtain correct HR in bpm | 1
  6. Correctly identify ceiling value for postponing exercise (after second reading) | 1
  7. Cuff on bare left upper arm, 2-3 cm above elbow crease | 1
  8. Cuff tight enough so that two fingertips can be slipped under edge but it isn't falling down | 1
  9. Arrow/line at brachial artery | 1
  10. Index and middle finger on radial pulse, inflate cuff 20-30 mmHg above the point where pulse is gone | 1
  11. Place stethoscope over brachial artery, completely in contact with skin, not tucked into cuff | 1
  12. Fully release pressure at appropriate pace (2mmHg/second) | 1
  13. Record blood pressure to the nearest 2 mmHg (+/- 4 of examiner) | 1
  14. Correctly identify ceiling values for hypertension >140/90 | 1
  15. Correctly identify ceiling values for postponing exercise (after second reading) >160/90 OR <80/50 | 1
Movement Screen: Overhead Squat, Wall Slide, Plank
  1. Have the client stand tall with feet shoulder-width apart and toes pointed forward | 1
  2. Have the client grasp the dowel in both hands and place it on top of head so shoulders and elbows are at 90 degrees | 1
  3. Have the client press the dowel so that it is directly above head | 1
  4. Instruct the client to maintain an upright torso, keep heels and dowel in position, and descend into a squat as deeply as possible | 1
  5. Instruct the client to hold the bottom position for a count of one, and then return to the starting position | 1
  6. Make appropriate corrections to set-up between movement reps. Eventually may need to regress to elevating client's heels | 1
  7. Screen for pain (score of zero) and provide an appropriate score for movement | 1
  8. Stand with head, upper back, and tailbone pressed firmly against a wall | 1
  9. With shoulders depressed and scapula retracted, place forearms against the wall at 90 degrees | 1
  10. Have client press arms overhead until they reach full extension or forearms come off wall | 1
  11. Screen for pain (score of zero) and provide an appropriate score for second movement | 1
  12. Assisst client into pushup position with forearms on ground | 1
  13. Have client squeeze glutes, tighten abdominals, keep a neutral neck and spine | 1
  14. Instruct client to keep that strong line from head to toe for as long as possible | 1
  15. Screen for pain and provide an appropriate score for movement | 1
Movement Screening: Inline Lunge, Hinge, Plank
  1. Have client step onto the center of the board with the right foot toe on the zero mark and left foot placed according to tibial measurement | 1
  2. Help client get both toes facing forward and balanced in position | 1
  3. After client's feet are in place, assist them in holding dowel with contralateral elbow (to forward leg) high | 1
  4. Instruct the client to have the dowel along the spine so it touches the back of head, upper back and tailbone | 1
  5. Instruct client to maintain an upright posture so the dowel stays straight and in contact on head, back, and tailbone, descend into a lunge position so knee touches the center of the board then return to starting position | 1
  6. Make appropriate corrections to set-up between movement reps | 1
  7. Screen for pain (score of zero) and provide an appropriate score for movement | 1
  8. Assist client in grasping the dowel with hand in lower back and hand behind neck. Dowel in tight contact with tailbone, upper back, and head | 1
  9. Instruct client to perform hip hinge with dowel remaining in contact (at locations) as far as possible | 1
  10. Record loss of contact, readjust between trials, coach hinge if necessary | 1
  11. Screen for pain (score of zero) and provide an appropriate score for second movement | 1
  12. Assisst client into pushup position with forearms on ground | 1
  13. Have client squeeze glutes, tighten abdominals, keep a neutral neck and spine | 1
  14. Instruct client to keep that strong line from head to toe for as long as possible | 1
  15. Screen for pain and provide an appropriate score for movement | 1
[/su_table]
View Lab Exam Feedback
No completed lab exam rubrics currently available
Lab Schedule
Course: PHRE 3045 - Sports InjuriesMovement Pattern: Target: Synergist(s):
Exercise
Regressions:Progressions:

Key Teaching PointsExpectation: [if 456 equals="Supervised Practice"]Supervised Practice [/if 456][if 456 not_equal="Supervised Practice"]Independent Learning[/if 456][579]
Description:

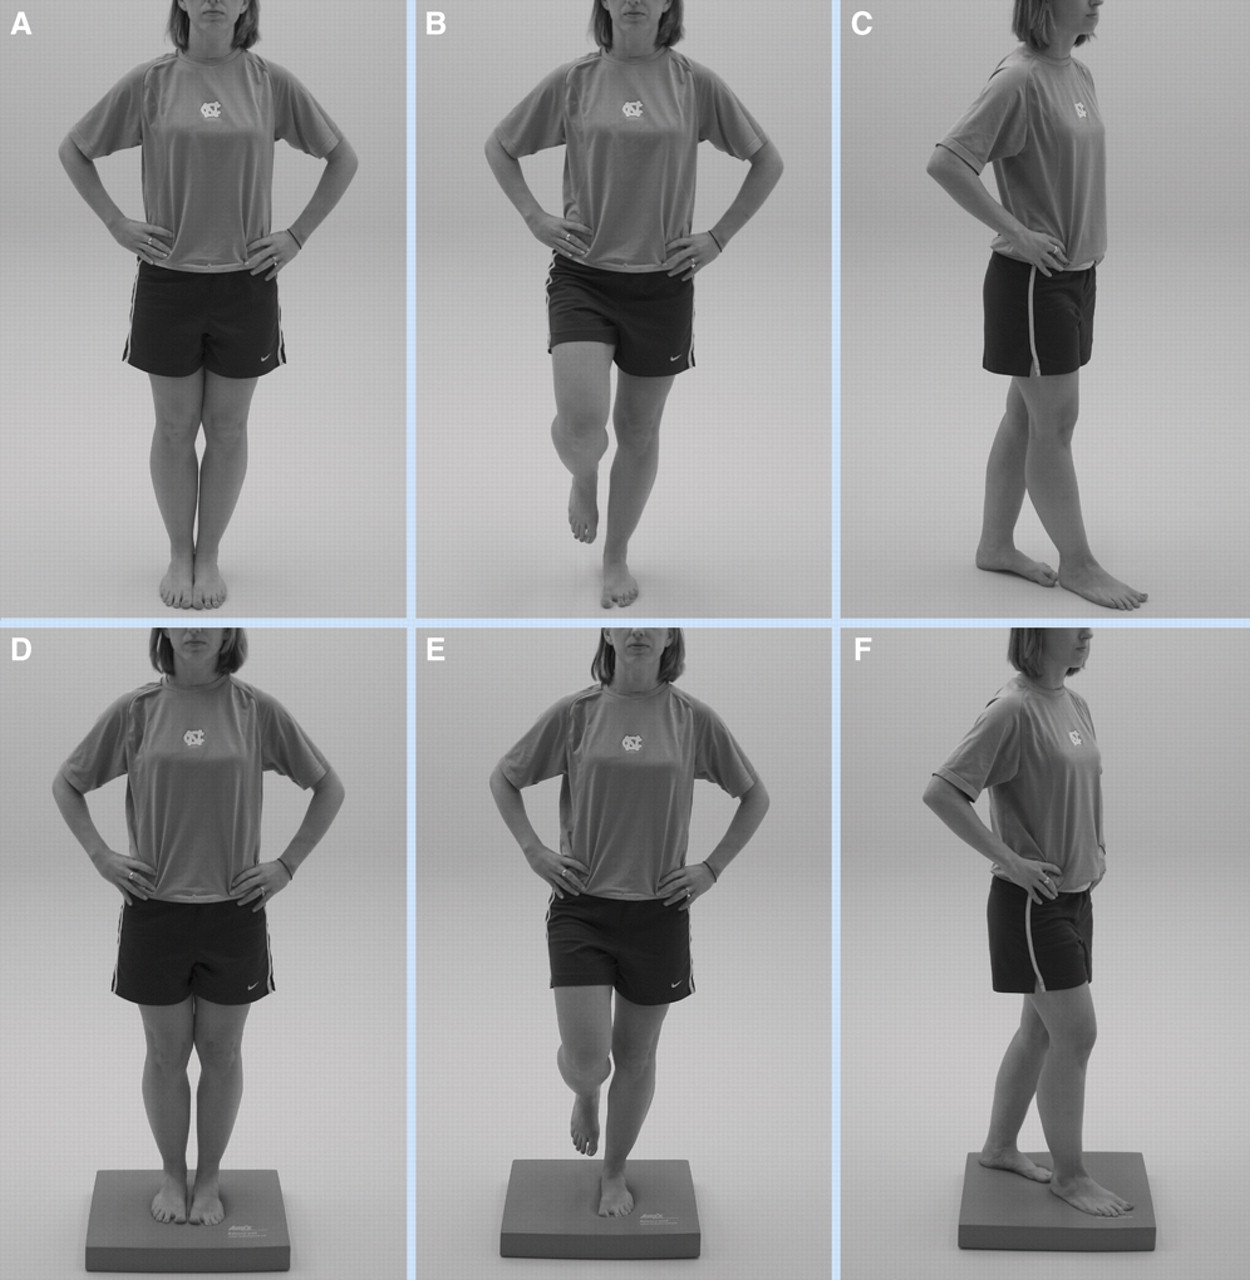
This balance testing is based on a modified version of the Balance Error Scoring System (BESS)5. A stopwatch or watch with a second hand is required for this testing.
“I am now going to test your balance. Please take your shoes off, roll up your pant legs above ankle (if applicable), and remove any ankle taping (if applicable). This test will consist of three twenty second tests with different stances.“
(a) Double leg stance:
“The first stance is standing with your feet together with your hands on your hips and with your eyes closed. You should try to maintain stability in that position for 20 seconds. I will be counting the number of times you move out of this position. I will start timing when you are
set and have closed your eyes.“
(b) Single leg stance:
“If you were to kick a ball, which foot would you use? [This will be the dominant foot] Now stand on your non-dominant foot. The dominant leg should be held in approximately 30 degrees of hip flexion and 45 degrees of knee flexion. Again, you should try to maintain stability for 20 seconds with your hands on your hips and your eyes closed. I will be counting the number of times you move out of this position. If you stumble out of this position, open your eyes and return to the start position and continue balancing. I will start timing when you are set and have closed your eyes.“
(c) Tandem stance:
“Now stand heel-to-toe with your non-dominant foot in back. Your weight should be evenly distributed across both feet. Again, you should try to maintain stability for 20 seconds with your hands on your hips and your eyes closed. I will be counting the number of times you move out of this position. If you stumble out of this position, open your eyes and return to the start position and continue balancing. I will start timing when you are set and have closed your eyes.”

Balance testing – types of errors
1. Hands lifted off iliac crest
2. Opening eyes
3. Step, stumble, or fall
4. Moving hip into > 30 degrees abduction
5. Lifting forefoot or heel
6. Remaining out of test position > 5 sec
Each of the 20-second trials is scored by counting the errors, or deviations from the proper stance, accumulated by the athlete. The examiner will begin counting
errors only after the individual has assumed the proper start position. The modified BESS is calculated by adding one error point for each error during the three
20-second tests. The maximum total number of errors for any single condition is 10. If a athlete commits multiple errors simultaneously, only one error is recorded but the athlete should quickly return to the testing position, and counting should resume once subject is set. Subjects that are unable to maintain the testing procedure for a minimum of five seconds at the start are assigned the highest possible score, ten, for that testing condition.  OPTION : For further assessment, the same 3 stances can be performed on a surface of medium density foam (e.g., approximately 50 cm x 40 cm x 6 cm).

1. Guskiewicz KM. Assessment of postural stability following sport-related concussion. Current Sports Medicine Reports. 2003; 2: 24 – 30.

Common Error(s):
Spotting:
>> Return to My Course Home |


Tools