This course focuses on learning body weight exercises that target the fundamental human movements:
- Pushing
- Pulling
- Squatting
- Lunging
- Hinging
- Gait
As well, various exercises to target functions of the core (stabilization, rotation, flexion, extension) will be covered.
Lab Competencies
[su_table responsive="yes"]
| Competency |
Teaching points (The value of each point can be found at the end of each line.) |
| Goblet Squat + Bird Dog |
- Instruct client to stand with feet approximately shoulder width apart, toes pointed slightly out. | 1
- Discuss the importance of maintaining as erect a torso as possible (neutral spine) throughout the movement. | 1
- Instruct client to keep knees aligned with toes (knees don't collapse in) | 1
- Discuss target ROM (squat until knees are bent below 90 degrees) | 1
- Cue client to keep weight back (e.g.: weight over ankles or more towards heels than toes) | 1
- Client completes at least 10 reps. | 1
- Screen pain/discomfort during squat. | 1
- Offer client the option to use a mat | 1
- Explain and cue engaging the core, keeping pelvis stable | 1
- Instruct and verify client can fully extend a single leg (while maintaining neutral spine) | 1
- Instruct and verify client can fully extend a single arm (while maintaining neutral spine) | 1
- Instruct and verify client can fully extend the opposing arm-leg, hold for ~2 seconds | 1
- Perform 6-8 reps per side | 1
- Screen pain/discomfort during bird-dog | 1
- Explain a stretch appropriate for a novice client that targets the muscles trained in the squat. | 1
|
| Split Squat + Push-Up |
- Determine a stance length/width that should allow the client to be balanced. | 1
- Mention the importance of maintaining as erect a torso as possible (neutral spine) throughout the movement. | 1
- Explain target range-of-motion (i.e. knees form a 90˚angle at the bottom of the movement.) | 1
- Cue client to push off through the heel of the lead leg | 1
- Complete 8-10 reps per leg | 1
- Screen pain/discomfort during split squat | 1
- Offer client the option to use a mat | 1
- Have client assume a prone position (lying face down) on the floor with the legs fully extended and the toes pointed down to the floor. | 1
- Cue your client to keep the core engaged (torso should remain in a straight line; neutral spine) | 1
- Have client place their hands on the floor, palms down, ~ 1 to 3 inches wider than shoulder-width apart with the elbows pointed outward. | 1
- Explain the impact of moving hands closer in/further away from shoulder-width | 1
- Have client push (i.e. fully extend the elbows), then lower the body by allowing the elbows to flex to a 90° angle (or a position where the chest is hovering 1-2″ above the ground) | 1
- Complete at least 10 reps | 1
- Screen pain/discomfort during push-up | 1
- Explain a stretch appropriate for a novice client that targets the muscles trained in the split squat. | 1
|
| Hip Bridging + Plank |
- Offer client option to use a mat | 1
- Have client lie on their back, feet planted on the floor. Arms at sides for balance | 1
- Explain that movement involves client thrusting hips forward to full extension by pushing off heels and contracting glutes | 1
- Watch client demonstrate movement, helping client achieve full extension, if necessary | 1
- Complete at least 10 reps | 1
- Screen pain/discomfort during bridge | 1
- Demonstrate/teach progression to 1-leg bridge | 1
- Again, offer client the option to use a mat | 1
- Mention the importance of maintaining as erect a torso as possible (neutral spine) throughout the movement | 1
- In a prone position, have client brace against forearms, with elbows positioned under the shoulders, legs fully extended and the toes pointed down to the floor | 1
- Explain and cue engaging the core | 1
- Instruct the client to raise body upward until body is help in a straight line | 1
- Have client attempt to hold position for at least 30 seconds | 1
- Screening of pain/discomfort during plank | 1
- Explain a stretch appropriate for a novice client that targets the muscles used in the hip bridge | 1
|
| Inverted Row + McGill Crunch |
- Position a bar in a rack to a height that will allow client to extend arms without lying on the floor | 1
- Using a slightly wider than shoulder width grip (hands pronated), have client hang underneath the bar | 1
- Client’s body should be straight (neutral spine) with heels on the ground with their arms fully extended | 1
- Instruct the client to initiate movement by flexing the elbow, pulling their chest towards the bar. Pause then return to starting position | 1
- Complete at least 10 reps | 1
- Screening pain/discomfort during row | 1
- Offer your client a mat | 1
- Have client lie on their back on the floor with one leg extended straight and flat on the floor, the knee of the opposite leg should be bent and the foot flat | 1
- Explain to client the desired range-of-motion and target muscle activation | 1
- Have client place their hands hands palms down on the floor underneath the natural arch in their lower back | 1
- Have client slowly raise their head and shoulders off the floor without bending the lower back or spine | 1
- Hold this position for 7 to 10 seconds, then lower torso back to mat | 1
- Complete 3-5 repetitions | 1
- Screening pain/discomfort during crunch | 1
- Explain a stretch appropriate for a novice client that targets the muscles used in the row | 1
|
| Walking Lunge |
- Screen unloaded split squat mechanics on flat surface | 1
- Review stance and establish comfortable width | 1
- Discuss knee tracking and optimal range-of-motion | 1
- Discuss neutral spine and need for core stability | 1
- Establish non-dominant leg, cue client to start with that side | 1
- Stay in client line-of-sight while they move | 1
- Have client demonstrate unloaded walking lunge at least 8 reps (both legs) | 1
- Screen pain/discomfort | 1
- Establish effective working load, have client pick up the weight, get into position | 1
- Have client complete additional 8 reps (both legs) | 2
- Re-screen pain/discomfort | 1
- Include teaching point | 1
- Include teaching point | 1
- Include teaching point | 1
|
| Seated Dumbbell Shoulder Press |
- Set bench to proper position | 1
- Discuss neutral spine and proper posture | 1
- Explain how to get weights into start position | 1
- Discuss impact of grip (pronated vs. neutral) | 1
- Discuss optimal range-of-motion/not banging weights | 1
- Review safe spotting | 1
- Establish a warm-up load, have client complete at least 8 reps | 1
- Screen pain/discomfort | 1
- Establish effective working load, assist client getting weights into position | 1
- Have client complete additional 8-12 reps | 1
- Demonstrate proper spotting technique | 1
- Re-screen pain/discomfort | 1
- Include teaching point | 1
- Include teaching point | 1
- Include teaching point | 1
|
| Seated Row |
- Discuss neutral spine/proper posture | 1
- Review various grips (pronated vs. neutral vs. supinated) | 1
- Discuss impact of legs in retrieving/returning the handle | 1
- Discuss optimal range-of-motion | 1
- Discuss limiting momentum | 1
- Choose appropriate handle/grip | 1
- Establish a warm-up load, have client complete at least 8 reps | 1
- Ensure client is activating rhomboids/posterior deltoids and not just using biceps | 1
- Screen pain/discomfort | 1
- Establish effective working load, ensure client safely gets handle into position | 1
- Have client complete additional 8-12 reps | 1
- Re-screen pain/discomfort | 1
- Include teaching point | 1
- Include teaching point | 1
- Include teaching point | 1
|
| Lat Pulldown |
- Install bar safely | 1
- Ensure knee pad installed at correct height | 1
- Review proper posture/torso alignment | 1
- Discuss various grips (pronated vs. neutral vs. supinated) | 1
- Discuss limiting momentum | 1
- Review optimal range-of-motion | 1
- Establish a warm-up load, have client complete at least 8 reps | 1
- Ensure client is activating lats and not just using biceps | 1
- Screen pain/discomfort | 1
- Establish effective working load, have client complete additional 8-12 reps | 1
- Re-screen pain/discomfort | 1
- Remove bar safely | 1
- Include teaching point | 1
- Include teaching point | 1
- Include teaching point | 1
|
| Lab 7 Practice Video |
- Check this box | 5
- Do not check this box | 5
- Also check this box | 5
|
[/su_table]
View Lab Exam Feedback
No completed lab exam rubrics currently available
| Course: PHRE 5003 - High Performance Training | Movement Pattern: | Target: Quadriceps | Synergist(s): Gastrocnemius, Hamstrings |
| Exercise | 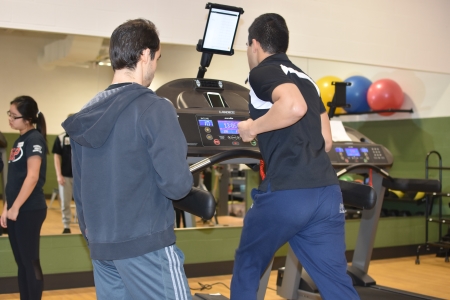 |
| Regressions: | | Progressions: | |
| Key Teaching Points | Expectation: [if 456 equals="Supervised Practice"]Supervised Practice [/if 456][if 456 not_equal="Supervised Practice"]Independent Learning[/if 456] | [579] |
|
| Description: | ASSESSMENT
The purpose of the Wellness Fitness Initiative (WFI) assessment is to estimate the VO2 max of each participant, using commercially available equipment (treadmill, heart rate monitor, stopwatch, height/weight scales).
Max HR (max heart rate) = (208 - 0.7 x age)
THR (target heart rate) = 85% of max HR; (208 - 0.7 x age) * 0.85
- The participant straddles the treadmill belt until it begins to move. When the treadmill reaches approximately 1 mph, instruct the participant to step on to the belt. Then increase the speed to 3 mph at 0% grade. Monitor the participant's heart rate continuously throughout the assessment.
- Start the stopwatch when the treadmill reaches 3 mph at 0% grade. Continue with this speed and grade for 3 minutes (steady state).
- After completing the 3-minute steady state interval, inform the participant that the speed will increase to 4.5 mph.
- Advise the participant that the assessment is a series of 1-minute intervals, alternating between speed and percent grade. All subsequent speed increases occur at 0.5 mph.
- At 4:01 minutes, increase the grade from 0% to 2%. At this time, inform the participant that all subsequent grade increases occur at 2% intervals.
- The assessment will continue until the participant’s heart rate exceeds the THR rate for 15 seconds, or the subject exhibits the medical criteria for early
termination.
- Once the heart rate exceeds the Target Heart Rate (THR), note the time and continue the assessment for an additional 15 seconds. Do not make any changes to the assessment speed or grade during this time. If the participant’s heart rate remains above the THR for the full 15 seconds,then stop the assessment and proceed to the cool-down phase. Record the total time, including the 3-minute warm-up, at which point the participant exceeds the THR. If the participant’s heart rate exceeds the target, but then drops back to the THR or below within 15 seconds,then the assessment should continue. The assessment is not complete until the participant’s heart rate exceeds the THR for 15 seconds. If this does not occur within 18 minutes, then terminate the assessment and record the time.
- Once the assessment is completed, the time is recorded. The participant should perform a cool-down for a minimum of 3 minutes at 3 mph, 0% grade. Continue to monitor the heart rate during the cool-down. Record the recovery heart rate at 1 minute of cool-down.
|
Time |
Speed (mph) |
% Grade |
| Trial |
0:00 - 1:00 |
3.0 |
0 |
| 1:01 - 2:00 |
3.0 |
0 |
| 2:01 - 3:00 |
3.0 |
0 |
| 3:01 - 4:00 |
4.5 |
0 |
| 4:01 - 5:00 |
4.5 |
2 |
| 5:01 - 6:00 |
5.0 |
2 |
| 6:01 - 7:00 |
5.0 |
4 |
| 7:01 - 8:00 |
5.5 |
4 |
| 8:01 - 9:00 |
5.5 |
6 |
| 9:01 - 10:00 |
6.0 |
6 |
| 10:01 - 11:00 |
6.0 |
8 |
| 11:01 - 12:00 |
6.5 |
8 |
| 12:01 - 13:00 |
6.5 |
10 |
| 13:01 - 14:00 |
7.0 |
10 |
| 14:01 - 15:00 |
7.0 |
12 |
| 15:01 - 16:00 |
7.5 |
12 |
| 16:01 - 17:00 |
7.5 |
14 |
| 17:01 - 18:00 |
8 |
14 |
| Recovery |
0:00 - 1:00 |
3.0 |
0 |
| 1:01 - 2:00 |
3.0 |
0 |
| 2:01 - 3:00 |
3.0 |
0 |
TERMINATE THE ASSESSMENT IF ANY OF THE FOLLOWING OCCURS:
- The THR is exceeded for 15 seconds.
- The THR has not been met after 18 minutes.
- The participant asks to terminate the exercise.
- The equipment malfunctions.
- Medical conditions arise that prohibit completing the
assessment.
Record the reason for terminating the assessment and the initial time the THR was exceeded (if applicable). Record time in minutes and convert second(s)into decimal. Use the test time (TT) the participant completed the assessment (i.e. exceeded the THR) along with the treadmill conversion formula to estimate VO2 max.
VO2 Max Calculation
VO2 max formula = 56.981 + (1.242 × TT) – (0.805 × BMI)
TT = time in minutes that THR was exceeded and test terminated
BMI = body mass index [body weight (kg)/height (m)^2]
|
| Common Error(s): | |
| Spotting: | |
>>
Return to My Course Home |