FMS Scoring reminders: 0 – pain (referral), 1 – can’t complete either movement pattern correctly, 2- completed a less demanding variation or part of the movement pattern, 3 – perfect completion of movement pattern.
Note: The seven FMS movement patterns require familiarity with the following bony structures or superficial landmarks: Tibial tuberosity, ASIS, Lateral and Medial Malleoli, Distal wrist crease, Joint line of knee.
Deep Squat
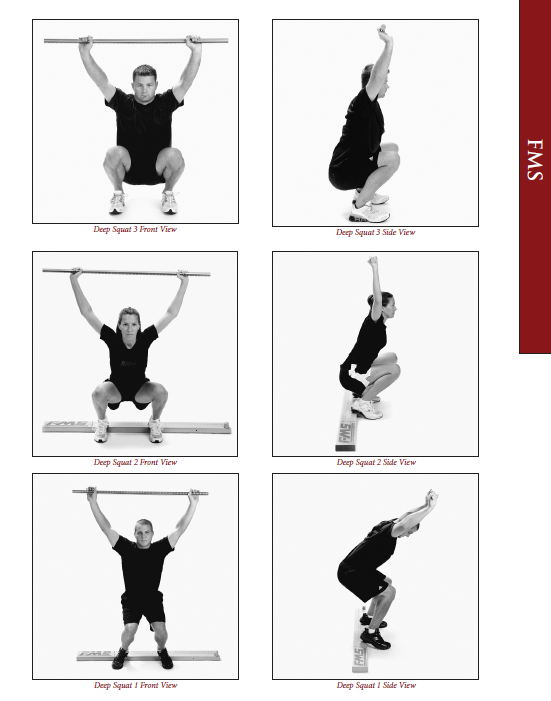
Set-up Verbal Instructions:
- Stand tall with your feet shoulder-width apart and toes pointed forward.
- Grasp the dowel in both hands and place it on top of your head so your shoulders and elbows are at 90 degrees.
- Press the dowel so that it is directly above your head.
- While maintaining an upright torso and keeping your heels and the dowel in position, descend into a squat as deeply as possible.
- Hold the bottom position for a count of one, and then return to the starting position.
Tips for testing:
- The client can perform the movement up to three times if necessary.
- If a score of three is not achieved, repeat above instructions using the board under the client’s heels.
- Observe the client from the front and side.
- All positions, including the foot position, should remain unchanged when the heels are elevated with either the FMS kit or a similar size board.
Scoring:
3:
- Torso is parallel with tibia or toward vertical
- Femur is below horizontal
- Knees do not track inside of feet
- Dowel aligned over feet
2:
- Same as above but the heels are elevated
1:
- Tibia and torso are not parallel
- Femur is not below horizontal
- Knees track inside of feet
- Dowel is not aligned over feet
0:
|
Hurdle Step
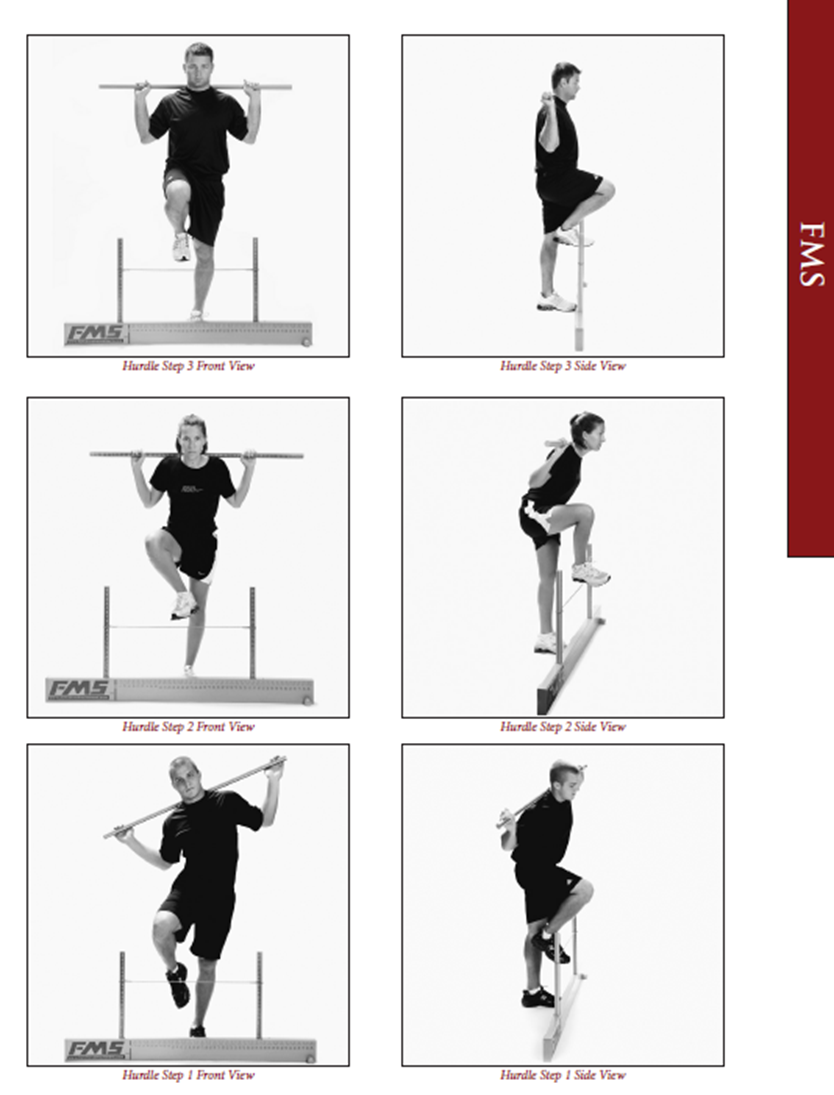
Set-up Verbal Instructions:
- Stand tall with your feet together and toes touching the test kit.
- Grasp the dowel in both hands and place it on top of your head so your shoulders and elbows are at 90 degrees. Then while maintaining hand position, lower dowel to the base of the neck and across the shoulders.
- While keeping an upright torso, raise the right leg and step over the hurdle, making sure to raise the foot towards the shin and maintain foot alignment vertically with the ankle, knee and hip.
- Touch the floor with your heel and return to the starting position while maintaining the same alignment.
Tips for testing:
- Ensure the cord is aligned properly.
- Tell the client to stand as tall as possible at the beginning of the test.
- Score the moving leg.
- Repeat the test on both sides.
- The client can perform the movement up to three times on each side if necessary.
- Watch for a stable torso.
- Observe from the front and side.
- Make sure the toes of the stance leg stay in contact with the hurdle during and after each repetition.
- If the client physically cannot bring the feet together to touch, ask them to bring their feet together as close as possible with toes touching the test kit, then allow them to perform test from that position.
Scoring:
3:
- Hips, knees and ankles remain aligned in the sagittal plane
- Minimal to no movement in lumbar spine
- Dowel and hurdle remain parallel
2:
- Alignment is lost between hips, knees and ankles
- Movement in Lumbar Spine
- Dowel and hurdle do not remain parallel
1:
- Inability to clear the cord during the hurdle step
- Loss of Balance
0:
|
Inline Lunge
Set-up Verbal Instructions:
- Step onto the center of the board with the right foot and your toe on the zero mark.
- The left heel should be placed according to your tibial measurement at “__”.
- Both toes must be pointing forward with the entire foot in contact with the board.
- Place the dowel along the spine so it touches the back of your head, your upper back and your tailbone.
- While grasping the dowel, your right hand should be in the curve of your neck, and the left hand should be in the curve of your lower back.
- Maintaining an upright posture so the dowel stays vertical and you maintain the three points of contact, descend into a lunge position so your right knee touches the center of the board.
- Then, return to the starting position.
Tips for testing:
- The front leg identifies the side you are scoring.
- The dowel remains vertical and in contact with the head, upper back and tail bone during movement.
- The front heel remains in contact with the board, and the back heel touches the board when returning to the starting position. Watch for loss of balance. For inline lunge, a loss of balance is stepping off the board.
- Remain close to the client to prevent a complete loss of balance.
- It’s important to remember that if the person does not at least make contact with the board or ground with the knee somewhere, it is the inability to complete the movement pattern, this is a score of one.
- Repeat the test on both sides.
- The client can perform the movement up to three times on each side if necessary.
Scoring:
3:
- Dowel contact maintained
- Dowel remains vertical
- Minimal to no torso movement
- Dowel and feet remain in sagittal plane
- Knee touches the center of the board
- Front foot remains in start position
2:
- Dowel contact not maintained
- Dowel does not remain vertical
- Movement in torso
- Dowel and feet do not remain in sagittal plane
- Knee does not touch center of the board
- Flat front foot does not remain in start position
1:
- Loss of balance by stepping off the board
- Inability to complete movement pattern
- Inability to get into set up position
0:
|
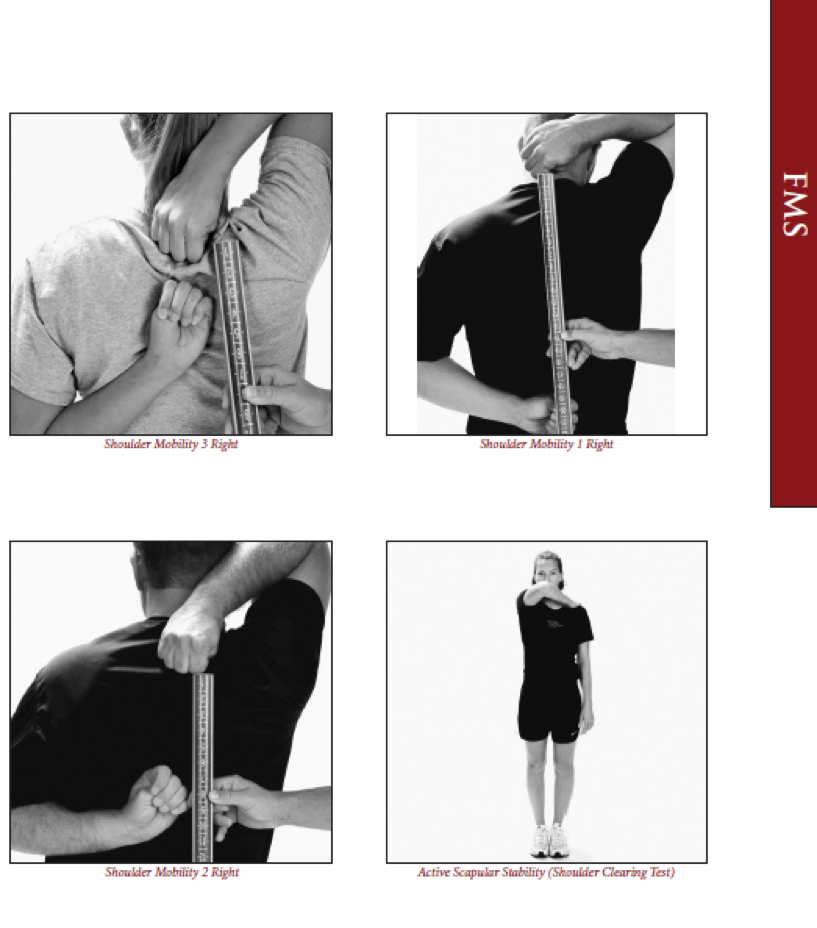
Shoulder Mobility
| Movement Pattern: Upper Body |
Target: |
Synergist(s): |
| Exercise |
 |
| Regressions: |
|
Progressions: |
|
| Key Teaching Points |
|
Set up verbal instructions:
- Stand tall with your feet together and arms hanging comfortably
- Make a fist so your fingers are around your thumbs
- In one motion, reach the right fist over the head and down your back as far as possible while simultaneously reaching your left fist up your back as far as possible
- Do not “creep” your hands closer after the initial placement
Tips for teaching
- The top shoulder identifies the side being scored
- Repeat the verbal instruction to “Stand tall…”. If by the 3rd attempt they still lose the setup position with cervical flexion or rounding of the back, stop the movement at the point they begin to lose position. Then take the measurement
- If the hand measurement is the same as the distance between two points, score low
- Make sure the client does not try to walk the hands toward each other following the initial placement
- Repeat the test and clearing exam on both sides
- The client can perform the movement up to three times on each side if necessary
Scoring:
3:
- Fists are within one hand length
2:
- Fists are within one and a half hand lengths
1:
- Fists are not within one and a half hand lengths
0:
Clearing test:
- Stand tall with your feet together and arms hanging comfortably
- Place your right palm on the front of your left shoulder
- While maintaining palm placement, raise your right elbow as high as possible.
- Ask client, do you feel any pain?
|
| Common Error(s): |
|
| Spotting: |
|
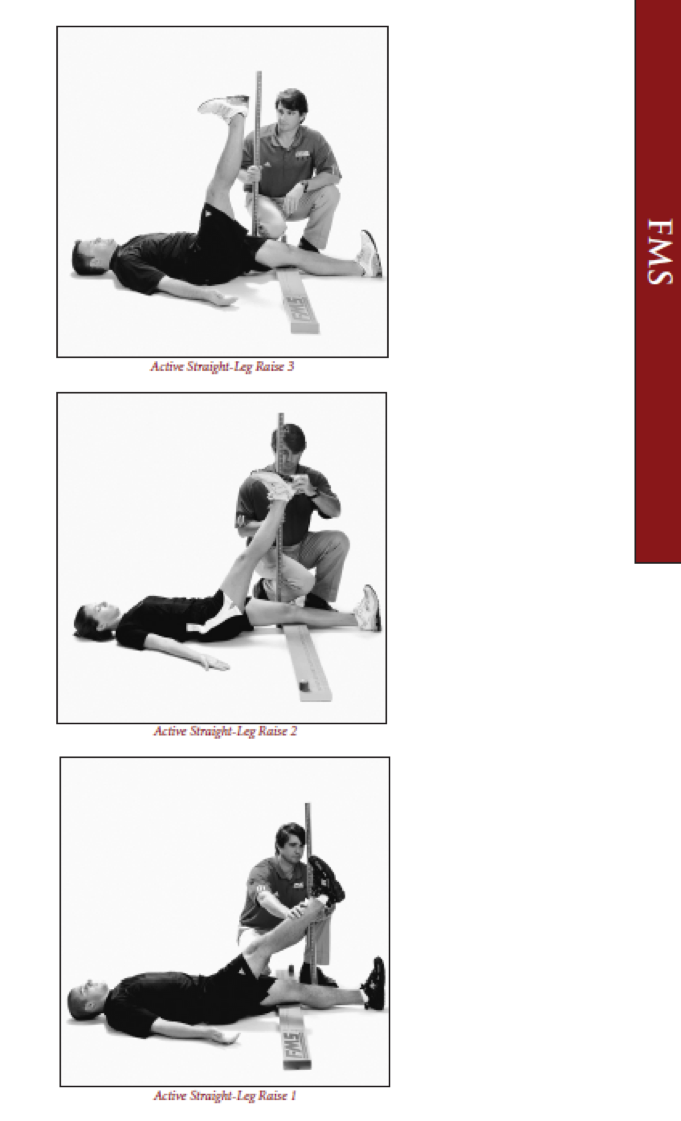
Active Straight Leg Lift
| Movement Pattern: Lower Body |
Target: |
Synergist(s): |
| Exercise |
 |
| Regressions: |
|
Progressions: |
|
| Key Teaching Points |
|
Set up verbal instructions:
- Lie flat with the back of your knees against the board, feet together with toes pointing up
- Place both arms next to your body with the palms facing up
- With the scoring leg remaining straight and the back of the opposite knee maintaining contact with the board, raise your scoring leg as high as possible
Tips for teaching:
- The moving limb identifies the side being scored
- Make sure the non-moving limb maintains a neutral position
- Repeat the test on both sides
- The client can perform the movement up to three times on each side if necessary
- Only move stick if a definitive vertical reference is needed at the border of 1 or 2 at mid-joint line
- Ask them to bring their feet together as close as Then perform the test from that position. Soles of feet still need to be perpendicular to the ground
Scoring:
3:
- Vertical line of the malleolus resides between mid-thigh and ASIS
- The non-moving limb remains in neutral position
2:
- Vertical line of the malleolus resides between mid-thigh and mid-patella
- The non-moving limb remains in neutral position
1:
- Vertical line of the malleolus resides below the mid-patella
- The non-moving limb remains in neutral position
0:
|
| Common Error(s): |
|
| Spotting: |
|
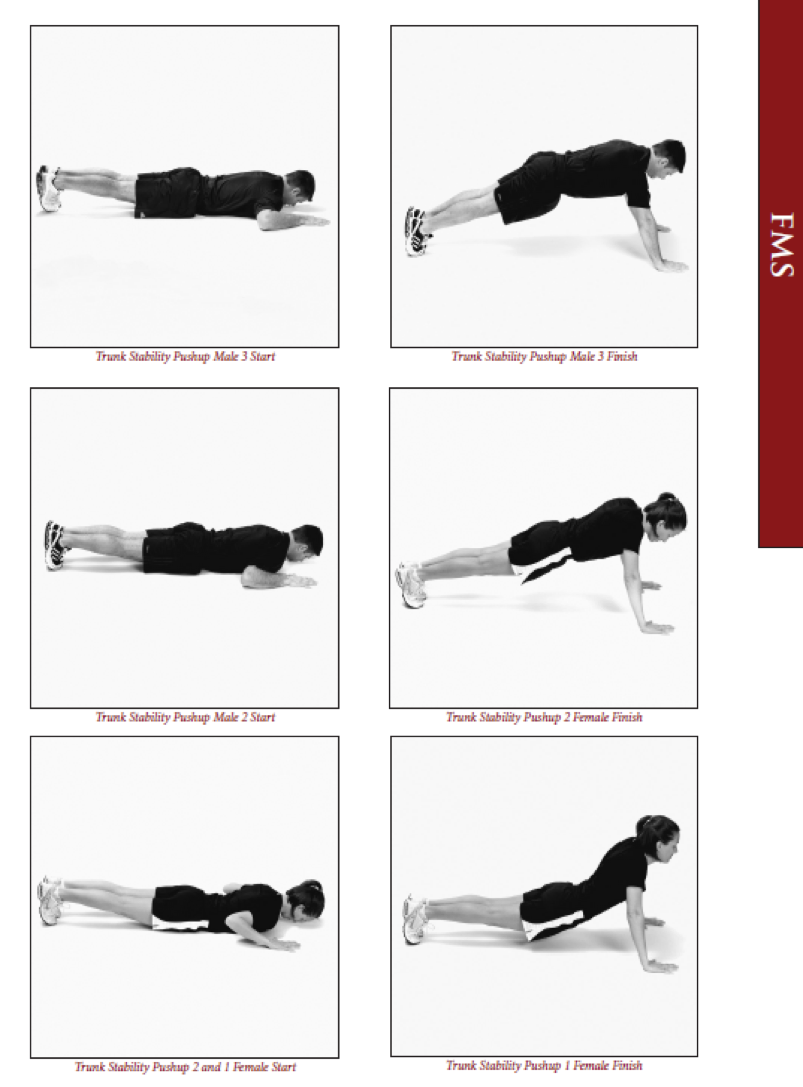
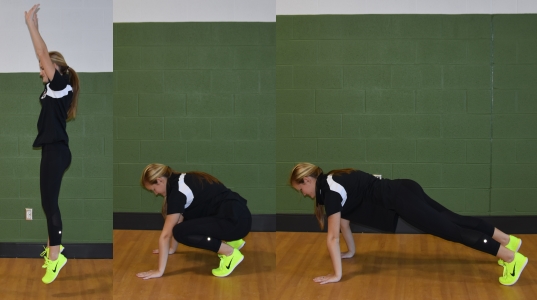
Trunk Stability Pushup
| Movement Pattern: Press | horizontal, Whole Body |
Target: |
Synergist(s): |
| Exercise |
 |
| Regressions: |
|
Progressions: |
|
| Key Teaching Points |
|
Set up verbal instructions:
- Lie face down with arms extended overhead at shoulder-width apart.
- Pull your thumbs down in line with your (forehead for men, chin for women).
- With your legs together, pull your toes toward the shins.
- Extend your knees and then lift your elbows slightly off the ground.
- While maintaining a rigid torso, push your body as one unit into a push-up position.
Tips for teaching:
- The client should lift the body as a unit
- To identify “shoulder-width apart” for hand position, align the web of the thumb with the crease of the armpit. This will place the hands at the individuals “should-width” position
- Be sure that the client starts with arms overhead and then drags the hands down at shoulder-width apart to the start It may be necessary to give them a tactile cue to adjust their hand to the correct position.
- On each attempt, make sure the client maintains the hand position and the hands do not slide down as the client prepares to push
- Make sure the chest and stomach come off the floor simultaneously
- The client can perform the movement up to three times if necessary
- Repeat the instruction with appropriate hand placement if necessary
Scoring:
3:
- Men perform a repetition with thumbs aligned with the top of the forehead
- Women perform a repetition with thumbs aligned with the chin
- The body lifts as a unit with no lag in the spine
2:
- Men perform a repetition with thumbs aligned with the chin
- Women perform a repetition with thumbs aligned with the clavicle
- The body lifts as a unit with no lag in the spine
1:
- Men are unable to perform a repetition with thumbs aligned with the chin
- Women are unable to perform a repetition with thumbs aligned with the clavicle
0:
Clearing Test:
- While lying on your stomach, place your hands, palms down, under your shoulders
- With no lower body movement, press your upper body off the ground until your elbows are straight
- Ask client, do you feel pain?
|
| Common Error(s): |
|
| Spotting: |
|
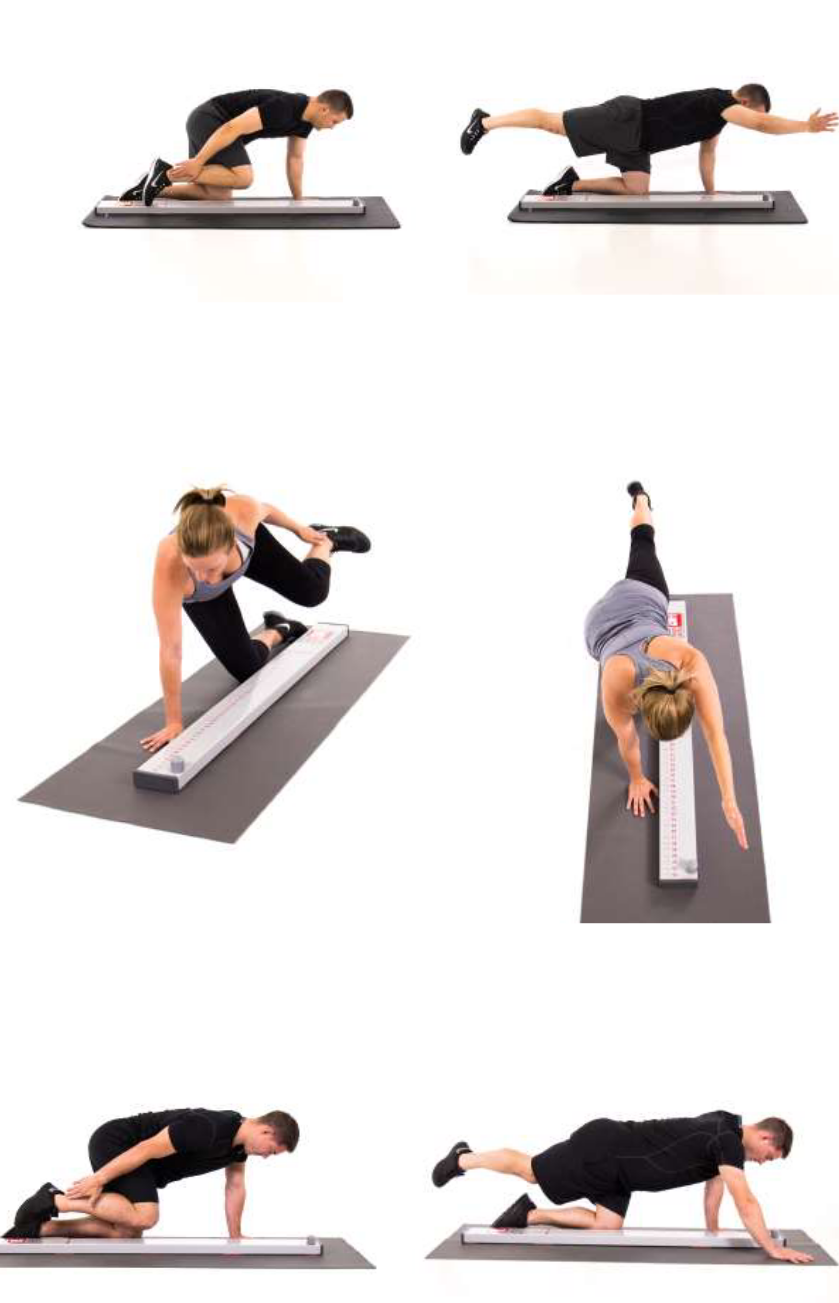
Rotary Stability
| Movement Pattern: Core | stabilization, Whole Body |
Target: |
Synergist(s): |
| Exercise |
 |
| Regressions: |
|
Progressions: |
|
| Key Teaching Points |
|
Set up verbal instructions:
- Get down on your hands and knees straddling the board with your thumbs, knees and toes touching the
- Your hands are under your shoulders and your knees are under your hips with your toes pointing
- At the same time, in one smooth and controlled motion, shift and lift the same side arm and leg.
- Without touching down, reach back with your hand and touch the outside of the ankle.
- Then extend that same side leg backward and arm forward, fully extending knee and elbow.
- Finally reach back to touch the ankle with the hand again, and then return to the starting position.
- Perform this pattern while keeping the arm and leg moving in-line with board.
Tips for teaching:
- Inability to complete the pattern would indicate that they lost balance, could not perform without making contact with the test kit, or could not get into setup position. This results in Score of 1.
- The foot, knee and thumbs should be in contact with the board to establish the start position. While shifting to complete the movement pattern, the foot and knee may slightly lose contact with board, but foot and knee start position on the ground should not change. Although they may lose contact, they should not roll away from board to the point that the placement of their hand, knee or foot changes on the ground.
- Loss of balance: Touching hand or foot down after the initial lift from the ground at any point before completing the pattern.
Scoring:
3:
- Hand and knee leave ground at the same time. Ability to perform this patter while keeping the arm and leg moving in-line and parallel with the board. Fingers touch the lateral malleolus. Knee and elbow achieve full extension.
2:
- Hand and knee did not leave the ground at the same time. Inability to keep the arm and leg moving in-line. Fingers touch the lateral malleolus. Knee and elbow achieve full extension.
1:
- Loss of balance. Hand does not touch the lateral malleolus. Knee and elbow do not fully extend. Inability to get into set-up position.
0:
Clearing Test:
- Get into the same start position with feet pointed backwards, and rock your hips toward your heels
- Lower your chest to your knees, and reach your hands in front of your body as far as possible
- Ask client, do you feel any pain?
|
| Common Error(s): |
|
| Spotting: |
|
Remember to save, then mark this task complete and move onto the next task.


 Have client practice 1 or 2 times
 Have client remove his/her shoes
 Have client complete pre-screening exercise; Client prone: single straight-leg extension with each leg, followed by straight-leg extensions with extension of opposite arm.